How does Accounting Software get data from Online Marketplaces like Amazon, eBay and Walmart?

This article will explain how accounting software providers receive eCommerce data, how safe it is for sellers to use, and how to think about choosing which provider to go with if you want to automate your eCommerce accounting.

Accounting Software providers such as QuickBooks, Xero and Seller Ledger use something called an API to import eCommerce sales data from online marketplaces such as Amazon, eBay, Walmart and Etsy. API stands for “Application Programming Interface.” They have been in existence for decades, and they are safely used all over the internet.

How Do API’s work?

Think of an API as a private way for software programs to talk directly to each other and exchange information. In addition to providing a standardized way to exchange data, most uses of APIs also include permissions to manage customer data privacy and security.

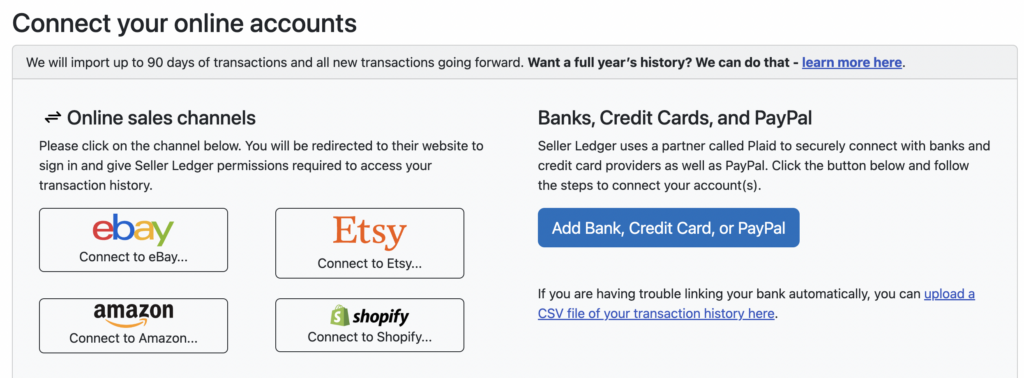
In the case of accounting software getting information from online marketplaces, the first step is for the accounting software to get approved as a reliable partner. The large marketplaces, with tons of customer data, don’t want just any software accessing their data. Once approved, each accounting software is issued what’s effectively a digital ID, which they can use to identify themselves each time they request information.

The next major step is making sure that the accounting software actually has permission to get data on behalf of an actual customer. In order to get this permission, the accounting software sends the customer to a special page to let the marketplace know what data they are permitted to share. This happens on the marketplace’s website, so no passwords are exchanged. Once the user gives permission, the marketplace sends the accounting software a token that can be used in future requests for data. Think of that token as a permission slip that the accounting software presents each time it asks for data.

Do all software providers connect with marketplace API’s in the same way?

We’re glad you asked!  No, they do not.  This is one of the big differences in the various accounting software solutions for eCommerce sellers.  Some accounting software companies connect directly to the marketplaces, others require the use of 3rd party eCommerce connectors like A2X Accounting, Link My Books and Synder. And some choose to offer both.

Below is a diagram showing the various options used by leading eCommerce accounting platforms.

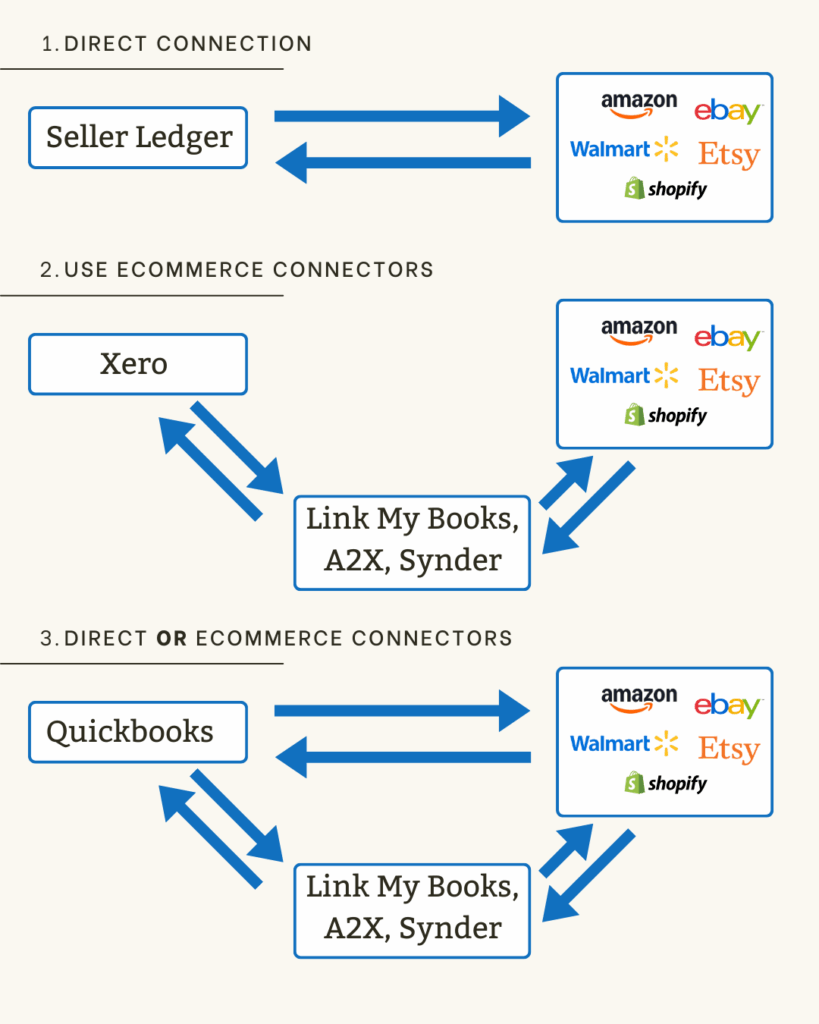
Let’s talk about some of the advantages and disadvantages of each option:

Direct connection

A direct connection means that not only has an accounting platform built their own access to marketplace data, but they have also taken the time to classify that information into the proper accounts, categories and tax lines that a business needs. Seller Ledger uses this approach.

Pros

Simplicity: Fewer moving parts means less work getting set up. And the connections and data are built into the core parts of the accounting software.

Lower costs: You don’t have to pay for extra software subscriptions.

Accountability: When marketplaces change their data, or introduce new fees, there’s only one party responsible for updating the software.

Cons

Less flexible: If your accounting needs are more unique, having the ability to choose between different methods of data connection (e.g. detailed vs summary) could be valuable.

3rd Party eCommerce connectors

Using 3rd party eCommerce connectors basically means an accounting platform is outsourcing the eCommerce data collection and classification to someone else. These 3rd parties specialize in eCommerce connectivity, so it’s a legitimate way to delegate responsibility. Xero has taken this approach.

Pros

Expertise of 3rd party connectors: The leading providers have been working with eCommerce Marketplaces for year, and are very familiar with the data.

Keeps books “clean and lean”: By delegating the task of collecting and summarizing eCommerce data, you can reduce the likelihood that your traditional accounting software gets bogged down by data it was never designed to handle.

Cons

Complexity: By using what some call “middleware”, you will have more setup to get things working as desired. And because the eCommerce connections are not baked into the core product, the user experience may feel disjointed.

Cost: Needing to use a separate software system will invariably cost more.

Choice of Direct OR 3rd part connectors

Then there’s the option for maximum flexibility. Some accounting platforms build their own direct connections to leading eCommerce marketplaces, but also allow you to choose a 3rd party connection instead. Quickbooks offers this choice.

Pros

Flexibility: You can choose which option works best for your business, even doing it on a marketplace by marketplace basis if so desired.

Experience: In the case of using 3rd party connectors, these tools have been used together for many years by many sellers.

Cons

Quality and coverage: Based on online commentary, there may be issues with how well the direct connection tools are managed. And Quickbooks, as of the time of this post, only provides a limited set of direct integrations (e.g. they don’t connect directly to Walmart.) As such, you could end up with a “kitchen sink” approach.

Complexity: Again, because the eCommerce connections are not a core part of the accounting software.

Cost: If you use a 3rd party connector in addition to a multi-channel tier of Quickbooks, prices could get up there.

Conclusion

As with any decision, your choice of accounting software to use for your eCommerce business comes down to the needs of your business and your personal preference. But, regardless of which option you choose, feel confident that there lots of ways to automate your eCommerce accounting using accounting software.

Balance sheet and journal entries

While it is important for Seller Ledger to remain simple to use, we have just rolled out some more powerful accounting features that were previously under the hood. Please note, they are all in open Beta, so please send us any feedback you have at [email protected].

Balance sheet accounts

From the beginning, Seller Ledger let you categorize your income and expenses, including the ability to add sub-categories. Now, we have provided the same functionality for balance sheet account, which you can find under Settings, in the new “Accounts” Tab,

Balance sheet accounts

As you will see, any connected accounts that you have will already show up there, as well as internal accounts we created behind the scenes, like Sales Tax Due and Owners Equity.

There are a number of possible accounts you might want to add, but here are some of the more common ones we have heard:

  1. Cash accounts for tracking cash you withdraw and spend
  2. Sales channel accounts that we do not yet support directly
  3. Equipment tracking accounts, for depreciable assets like computers
  4. Liability accounts for tracking outstanding loans

Balance sheet report

In addition to exposing and letting you customize your balance sheet, we’ve also just rolled out a new Balance Sheet report, which you can find in a new sub-tab under the Reports tab.

Journal entries

And finally, the ultimate accounting utility, the journal entry, has been introduced. This feature lets you create any accounting transaction across multiple accounts/categories.

It is also the first place you will see the use of the dreaded accounting terms “debit” and “credit.” But, we assume those who intend to use this feature are familiar enough with accounting to understand these terms.

Now, remember, with great power comes great responsibility. Journal entries allow you to change your account balances in many different ways. But it is also easy to mess up your books. If you are not familiar with the use of journal entries, we recommend learning more before using this feature too much.

One caveat: we do not yet let you make journal entries that affect directly connected sales channels, as we try to keep the raw data from those channels as accurate as possible.

6 Tips to simplify Shopify taxes

Tax time is here (in the United States, anyway) and for Shopify businesses in particular, that means a lot of potential complexity. And now that the 1099-K threshold is being lowered to $5,000 per platform, now is a great time to consider ways to simplify Shopify taxes

You can avoid a lot of hassle by investing some time in planning how to manage your business finances. And while tax preparation is one of the last things Shopify store owners tend to focus on (or enjoy,) each filing season can be a painful reminder of the choices we previously made.

6 tips to simplify Shopify tax organization and filing.

1. Use separate bank and credit card accounts

It sounds obvious, but newer and smaller sellers often think they can put this off for the future. But spending the time (and money) to separate commingled personal and business finances is just not worth it. Make sure you have a dedicated business banking account, where all of your eCommerce payouts get deposited. Take out a dedicated business credit card (or use a debit card) and make sure all of your business expenses are paid through it. Doing so makes it a relative breeze to get your transaction history for tax time. You’ll have fewer places to look, fewer statements to track down, and most importantly, get to completely skip “removing” personal transactions.

2. Choose banks and credit cards that have “good” online banking capabilities

When choosing a bank or credit card, do a little research into their online banking capabilities. While most banks have some level of online banking, some banks do a much better job making transaction history available electronically. In particular, small, regional banks and credit unions tend to invest less in their online banking capabilities. This can lead lead to less data being made available, and sometimes at lower quality.

Another way to evaluate online banking capabilities is by looking at how banks handle sign-in and authorization. The best banks now support OAuth, which permits 3rd party application developers to get customer “permission” to access specific data from their bank using special tokens, which avoid the need to request usernames and passwords. In addition, customers can choose to manage and “revoke” permission of these external programs from the bank’s website.

3. Use accounting/bookkeeping software that’s great at accessing electronic data

I mentioned in the prior tip the importance of online banking and access to electronic financial records. The same goes for eCommerce channels. Most large, established channels make their data available through APIs (application programming interfaces,) which allow other software companies to access that data. But not all access is the same.

Some accounting solutions take shortcuts, like only pulling payout information, which is pretty much what you get from banks anyway. But those payouts are missing key details, like item prices, shipping collected, sales tax collected and possibly remitted, and fees paid. Given that different platforms report different totals on 1099-Ks, you’ll want to make sure you have proper transaction details to give you an accurate financial picture.

Others completely ignore things like the actual products sold and that sale’s effect on inventory and cost of goods sold. For example, you may not want to choose a product whose Shopify review reads like this:

Actual accounting software review from a Shopify customer

“This does not pull in sales receipts with product info. So if you track inventory in [name removed to avoid embarrassment], it will not reduce your inventory when you sell an item”

Spend a little time up front, do your homework, read reviews and discussions in different online communities, and make sure your accounting software gets you the eCommerce details you need.

4. Watch out for channel duplication

These days, most successful eCommerce merchants sell across multiple channels. And some platforms, like Shopify, allow you to connect other marketplaces to get a more complete view of your sales. For example, the Shopify Marketplace Connect app allows you to bring in data from Amazon, eBay, Etsy, Walmart and more. But this can lead to challenges in reporting, as the same data gets replicated across different platforms. You’ll want to ensure that you’re never double counting sales or expenses.

Unfortunately, this may lead you to think you can simply connect all of your other marketplaces to Shopify, then pull all of that information from a single source. While this may sound in theory, having worked directly with Shopify’s API, we know that the level of detail you get from the kind of direct integrations outlined in Tip #3 is lost when the data gets to Shopify.

Hopefully, accounting/bookkeeping software knows how to handle this, but you will want to keep an eye on the data.

5. Create (and list) unique SKUs for your inventory

This might be the single biggest thing you can do to avoid headaches at the end of the year (and for many years to come.) Investing the time to create a system of assigning unique SKUs (stock keeping units) for each item you sell will pay off immeasurably down the road. A lot of retailers and eCommerce sellers use a “smart code” approach, similar to what Shopify outlines in this handy tutorial. But whichever method you use, the most important thing is to choose something that is unique to each product/item.

You’ll also want to make sure to use these same SKUs across channels when listing items for sale. Doing so can enable the following (assuming your accounting/bookkeeping system is set up well):

  • When an item sells, that sales record will reduce your inventory account, helping make sure you avoid stock-outs and accidentally selling product you no longer have.
  • Having your inventory counts get updated automatically also helps for end of year inventory counts and valuation.
  • Also, when that item sells, if you have recorded the cost of that information in your accounting/bookkeeping software, it can calculate the cost of goods sold automatically for you, both on that item, and over the course of the year.

In addition to simplifying end-of-year calculations of inventory value and cost of goods sold, this approach can also calculate the gross profit/margin on each sale, giving you better insight into what products drive the most profit for you.

6. If you still need help with sales tax, just pay for a service

While most online marketplaces (eBay, Amazon, Etsy, etc.) must now collect and remit sales tax on behalf of sellers, many online store platforms like Shopify, Woo Commerce and such still leave it up to the merchant to collect sales tax from the buyer and remit (a.k.a. “file”) to the individual states. For sellers in that category, I strongly recommend outsourcing to a paid service like Shopify Tax, TaxJar or another similar service.

Want to try it yourself? You can learn more in this article, but here’s a partial list of what that entails:

  • Determine in which states you have nexus (physical or economic) so that you know where to collect and file
  • Register your business in each state where you have nexus
  • Determine the correct rate to charge based on the item being sold (including any product taxability exemptions, whether shipping is taxable, etc) and the jurisdictions that apply (which can be state, county, city and even special taxing districts.)
  • Total up all of the sales by each reporting jurisdiction
  • File accurately in each state, some of whom share similar interfaces, many of whom are specific to just that state. Oh yeah, and the filing frequency differs by state.

As the original head of product for TaxJar (though I left long ago,) I can assure you that trying to manually determine all of the above and comply properly, is incredibly complex and can become a monster drain on your productivity as a business owner. Of all the places to try to save money, this one might be the worst idea to do so:)

In summary

As you can tell from this article, there is a strong bias in favor of thinking through and structuring your approach to business finances up-front, in the hopes of automatic future workflows. For any business owner, it’s better to spend the bulk of your time where you add the most value, and minimize time spent on drudgery. For Shopify and other eCommerce merchants, that means getting back to sourcing, listing and fulfilling. Hopefully, some of these tips can help simplify Shopify taxes going forward, with the added bonus of informing you how to run your business more profitably.

If you are a US-based eCommerce merchant who files a Schedule-C with your tax return, you may wish to consider Seller Ledger, an accounting/bookkeeping platforms that does a lot of what’s described above (particularly tips 3 & 4.) We offer a 30-day free trial, no credit card required. We can even help pull in all of your 2024 transaction data. And we have plans to expand to other business types as well as internationally.

Oh, and all of our customer support is handled via email by the actual product team.

Try us today: https://sellerledger.com/shopify-accounting-software/

Automate your Shopify accounting with Seller Ledger

The Seller Ledger team is pleased to announce that we now connect directly with your Shopify Store to help automate much of your eCommerce business accounting. As with eBay, Amazon and Etsy, you can link your Shopify store(s) to Seller Ledger and we’ll regularly import your sales and expenses and automatically categorize them for you. Just log into your dashboard and click the “Add Account” button to link your Shopify store.

The flow is a bit different for Shopify than it is for connected marketplaces. After clicking on the button to “Connect to Shopify”, you will be taken to Seller Ledger’s listing on the Shopify App Store. Click the button to “Install” our app, and you will redirected back to Seller Ledger once the connection and proper permissions have been established.

Also, like with eBay, Amazon and Etsy, you can always change how you’d like to see your Shopify information categorized by customizing your settings.

What if I already sync eBay and Amazon with Shopify?

We do know that some users have chosen to sync their eBay and Amazon sales and product information with their Shopify store. But fear not, we only import Shopify store-specific sales from Shopify and ignore any other information from other platforms. To get data from multiple channels, you will need to connect to each channel directly. We do this to maximize the granularity and accuracy of the underlying data, as well as to avoid duplicate entries.

Thanks go out to the current Seller Ledger customers who helped us beta-test the integration with Shopify. If you are a Shopify customer and like the continued automation we’re providing, please consider helping us out with a review on the listing page. It’s a terrific way to help get the word out.