API Tutorial: Build a simple web app to load mileage trips into Seller Ledger
To prove how easy it is to use Seller Ledger’s (brand) new API, we’ve thrown together a super lightweight web application that even a novice programmer could replicate.
Goal: create a way to load mileage data into a Seller Ledger account
As a simple use case, let’s take a request we’ve heard from a number of customers – how can I import mileage transactions that I have tracked elsewhere? Given that a number of mobile mileage trackers provide trip data in CSV format, we decided to create the simplest tool we could think of: a single web form where you can copy and paste some mileage data in CSV format and send it to your Seller Ledger account.
We’ll be doing this using Ruby on Rails as the framework for this tutorial.
Step 1: Learn how to access a Seller Ledger account
Looking at the documentation for Seller Ledger’s API, you can see that all you need to get started is an api token…

which can be found under the new Settings -> API sub-tab (that the docs link to.)

IMPORTANT
Please be aware – the API token in the above screen shot is fake – it is not tied to a real account. Throughout this tutorial, you will need to use an actual Seller Ledger API token for this example to work.
Step 2: Learn what information Seller Ledger expects in order to load mileage transactions
Looking again at the API documentation, creating a mileage transaction requires only 3 pieces of information and describes the format required:
- Date of the trip
- A description of the trip
- Distance traveled
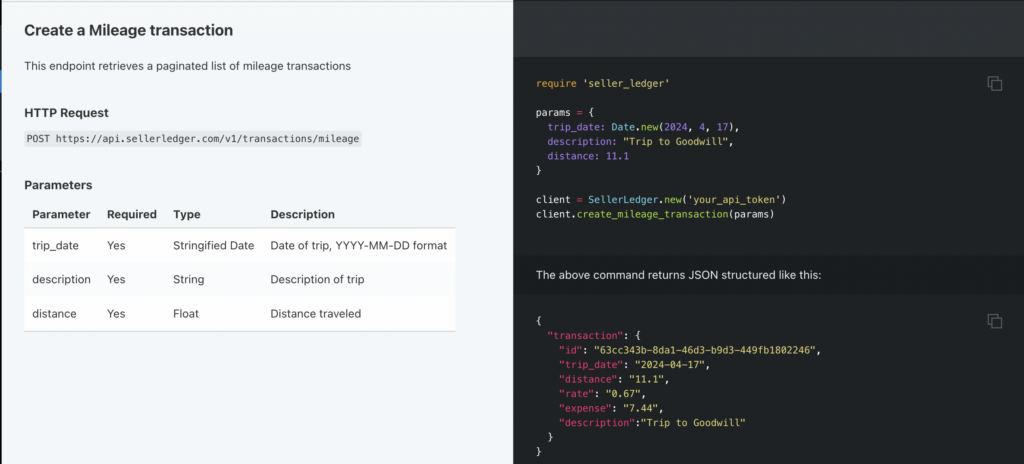
You don’t need to know the current IRS mileage rate . Seller Ledger has that information and does the calculation based on the date of the trip.
Step 3: build the simplest way to capture the information needed to load mileage data into Seller Ledger
So, it appears that we only need two type of information to update Seller Ledger with mileage data – an authentication token and the raw trip data itself. Let’s put that to the test. Time to start a new rails application:
rails new test-sl-mileage-appFortunately, Seller Ledger has published a Ruby gem to help develop against its API. The source code for that gem, and it’s readme is published on GitHub. Looking at the readme instructions, I can install that gem. Let’s go into the directory of our new rails app
cd test-sl-mileage-app/and add the gem to our project
bundle add seller_ledger-rubyNow, let’s do some blocking and tackling to get a page where you can enter the info. These are steps specific to building a lightweight rails app, so feel free to skip ahead if you’re already familiar. Let’s create a new “home” controller – which will be the only one we’ll need (and apologies in advance for not using proper design patterns:)
rails g controller homeNow, go update your routes file and edit the default root_url route:
change #root "articles#index" to root "home#index"Make sure to add the index method to home_controller.rb
def index
end
Now it’s time to build the actual HTML page at home#index to capture the important information. To keep things simple, include a single text box to request the API token, and a text field box where a user could paste in (or type, if s/he so desires) a bunch of csv data. Create a new view file under the home folder, called index.html.erb. And add the following basic HTML:
<h1>A Simple Mileage Loading app for Seller Ledger</h1>

<%= form_with url: "/load", method: :post, data: {turbo: false} do |form| %>
    <p><%= form.label "Seller Ledger API Token:" %><p>
    <p><%= form.text_field :token %></p>

    <p><%= form.label :data, "Enter mileage data:" %></p>
    <p><%= form.text_area :data, size: "70x5" %></p>
    <p><%= form.submit "Submit" %></p>
<% end %>
Voila – we see the following completely un-styled, yet potentially functional web page. This should allow us to capture the information needed to load multiple mileage trips into Seller Ledger
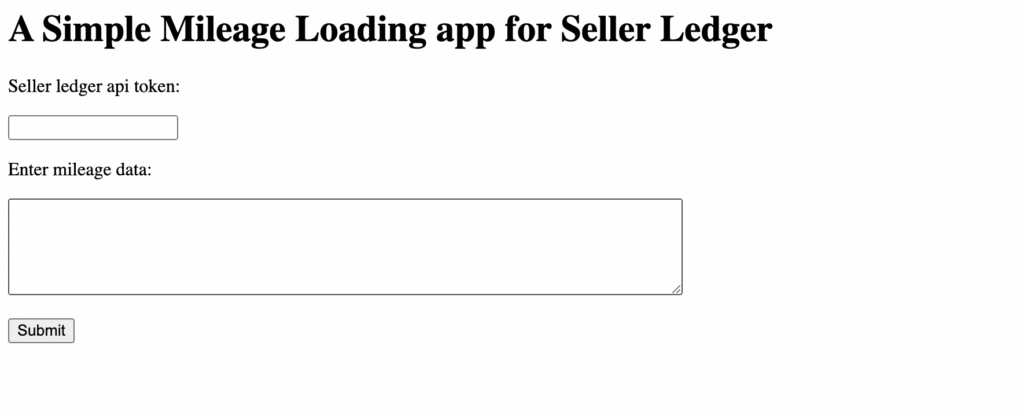
Before moving on to the next phase, add a route for that form’s post action in our routes.rb file. To keep things simple, we will put everything in the “home” controller.
post "load" => "home#load", :as => "load"Step 4: Take the information from the web form, and push it into Seller Ledger
An easy first step here is to create a single Ruby service object (a PORO – or “plain old ruby object”) that takes an API token, initializes itself with it. The service object can then have a method that takes the raw csv data passed to it, parses it, and sends it to Seller Ledger. Create a “services” directory under the “app” folder and, inside that new folder, and create a new file. In this tutorial, we’re calling our object “Parser” and naming the file parser.rb.
class Parser

end
Now it’s time to create mileage transactions within Seller Ledger, so let’s take a look at that API documentation again.

Add the ‘require’ statement at the beginning of the object file. Also, create an initialize method that takes an API token as it’s parameter and creates a new Seller Ledger api client that can be used by the rest of our Parser object:
def initialize(token)
    @client = SellerLedger.new(token)
end
To see if this is working, let’s open ‘rails c’, create a token variable and see if we can initialize our new Parser object with it:
irb(main):001> token = 'SL_PRD_acbdef12acbdef12acbdef12acbdef12'
=> "SL_PRD_acbdef12acbdef12acbdef12acbdef12"
irb(main):002> p = Parser.new(token)
=>
#<Parser:0x00000001080178f0
Bingo! Now, what’s the simplest thing we can test to see if our code is actually talking to Seller Ledger? Well, “Get all Mileage transactions” looks pretty straightforward:
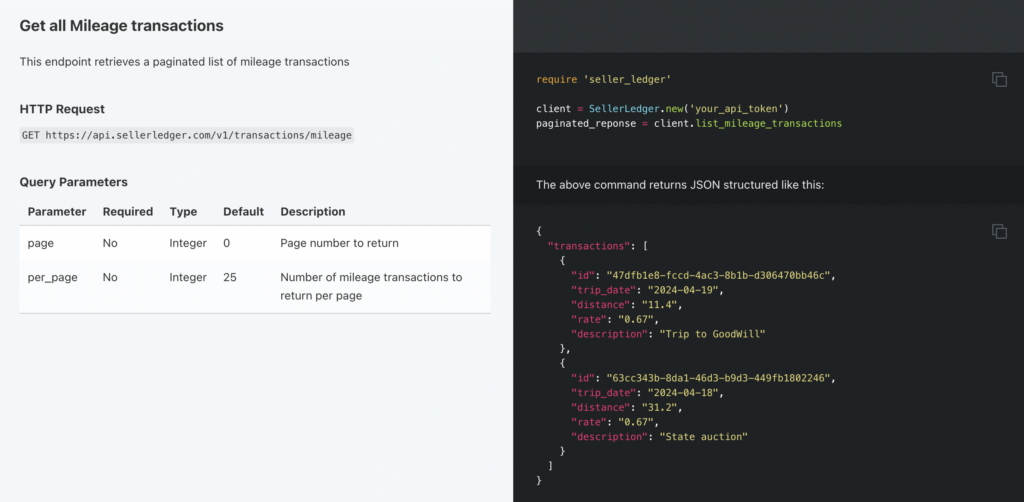
Now let’s add a quick method to our Parser.rb file.
def list_mileage
    @client.list_mileage_transactions
end
And we’ll try this again.
irb(main):001> token = 'SL_PRD_acbdef12acbdef12acbdef12acbdef12'
=> "SL_PRD_acbdef12acbdef12acbdef12acbdef12"
irb(main):002> p = Parser.new(token)
=>
#<Parser:0x000000010962e0f8
...
irb(main):003> p.list_mileage
=>
{"total"=>0,
 "total_pages"=>0,
 "per_page"=>25,
 "page_number"=>1,
 "next_page_number"=>0,
 "prev_page_number"=>0,
 "transactions"=>[]}
Alrighty! Our lightweight web app is talking directly to Seller Ledger. Now, let’s add a “load” method in the “home” controller with some logic to grab the form data and get it ready to send to our Parser object:
def load
    token = params[:token]
    data = params[:data]
    p = Parser.new(token)
    @result = p.load(data)
end
We’re grabbing the token value from the form field and passing it in when we initialize the Parser object. We then grab the actual csv data from that form field and pass it to a new method that we’ll call “load”. And we’ll store the response from that method in an instance variable that we can show in the view.
Now, we just need to create that new “load” method in Parser.rb to grab the csv data, actually parse it, iterate over it, and pass the values into Seller Ledger:
def load(data)

    keys = ["trip_date", "description", "distance"]
    results = []
    data.each_line do |line|
        results << @client.create_mileage_transaction(Hash[keys.zip(line.chomp.split(","))])
    end
    return results
end
The approach used here was to create keys and build a hash using them for each line of input. We further assume no header information is provided in the CSV data, just the raw trip information. However, while iterating over the raw csv data, you could just as easily assign the parameters to pass into Seller Ledger individually like in the documentation.
Finally, let’s create a load.html.erb view file to show the returned results:
<h1>Results</h1>

<%= @result %>
Step 5: try it out
Go ahead and enter some simple csv formatted data into that web form, along with your API token (remember to use your actual token, not this fake one:)
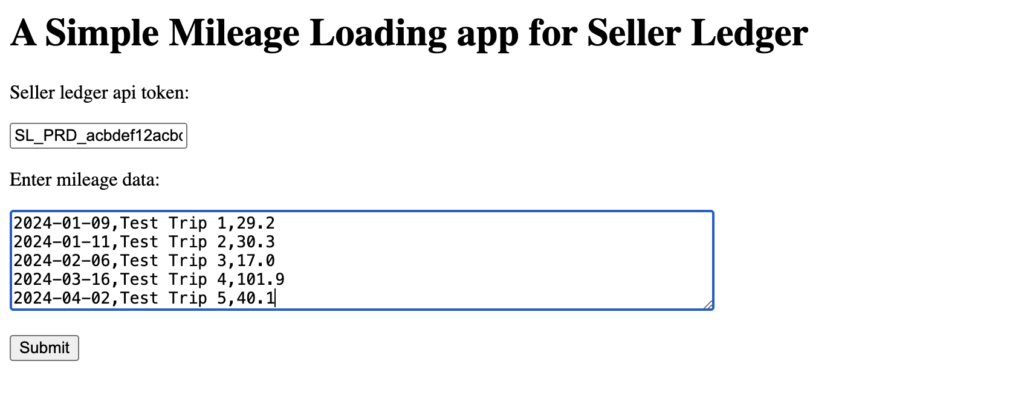
Hit “Submit” and….

Looks like we got a result with rates and calculated deduction amounts. Let’s check our Seller Ledger account’s Mileage transaction view:
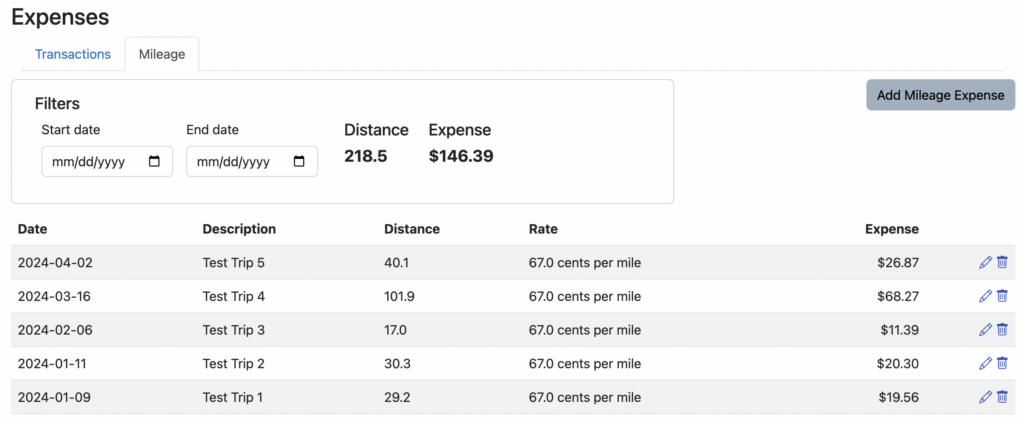
There you have it. A super simple web app to load multiple mileage trips into Seller Ledger. It actually took far less time to create the app than it did to write this tutorial.
Help us expand the API
We’re very eager to hear from other developers what we can do to make our API better and more valuable. Email us your ideas at [email protected] or fill out the brief form on our API page.
