Seller Ledger recently announced the ability to help eCommerce sellers track and report on their sales tax obligations. To make that possible, we built out a full sales tax engine, complete with state and local jurisdiction-level breakdowns. Now we are making that functionality available to developers and potential partners through the release of a sales tax calculations endpoint in our API.
How to calculate sales tax
To accurately calculate the sales tax on an eCommerce order, you need to know a number of things:
The amount of each item within an order
Whether shipping was collected from the customer and whether it is taxable
The shipping address of the purchasing customer
The states where you have nexus (physical or economic)
The sourcing rules for a given order
Whether the specific item is subject to any special tax rules or exemptions
Fortunately, Seller Ledger makes all of that simple. We automatically track nexus for you based on your account. And we make it very easy to submit the necessary information to our API to get the right amount to collect. If you collect enough information to properly fulfill an order, you will have enough information to tell Seller Ledger what it needs to know.
Coming soon: Product taxability
As of the date of this post, we are still working on a comprehensive set of product taxability rules. Stay tuned for that release.
Get the full breakdown
Because we have a pretty extensive history in sales tax (our founders ran product and engineering for TaxJar,) we know that a single tax amount isn’t sufficient for all clients. So, our API returns not only the total amount of sales tax due on an order, but we also break it down by how much is owed to each jurisdiction, including:
State amount collected
County amount collected
City amount collected
Special district amount collected
To learn more about our new sales tax calculations endpoint, visit our API documentation.
Pricing for sales tax calculations is the exact same as it is for Seller Ledger. We simply charge you based on the number of monthly transactions you have flow through our system. Plans start at $10 per month with a 30-day free trial.
Ready to automate your eCommerce bookkeeping?
Join thousands of sellers who save hours every month with Seller Ledger.
This article will explain how accounting software providers receive eCommerce data, how safe it is for sellers to use, and how to think about choosing which provider to go with if you want to automate your eCommerce accounting.
Accounting Software providers such as QuickBooks, Xero and Seller Ledger use something called an API to import eCommerce sales data from online marketplaces such as Amazon, eBay, Walmart and Etsy. API stands for “Application Programming Interface.” They have been in existence for decades, and they are safely used all over the internet.
How Do APIs work?
Think of an API as a private way for software programs to talk directly to each other and exchange information. In addition to providing a standardized way to exchange data, most uses of APIs also include permissions to manage customer data privacy and security.
In the case of accounting software getting information from online marketplaces, the first step is for the accounting software to get approved as a reliable partner. The large marketplaces, with tons of customer data, don’t want just any software accessing their data. Once approved, each accounting software is issued what’s effectively a digital ID, which they can use to identify themselves each time they request information.
The next major step is making sure that the accounting software actually has permission to get data on behalf of an actual customer. In order to get this permission, the accounting software sends the customer to a special page to let the marketplace know what data they are permitted to share. This happens on the marketplace’s website, so no passwords are exchanged. Once the user gives permission, the marketplace sends the accounting software a token that can be used in future requests for data. Think of that token as a permission slip that the accounting software presents each time it asks for data.
Do all software providers connect with marketplace APIs in the same way?
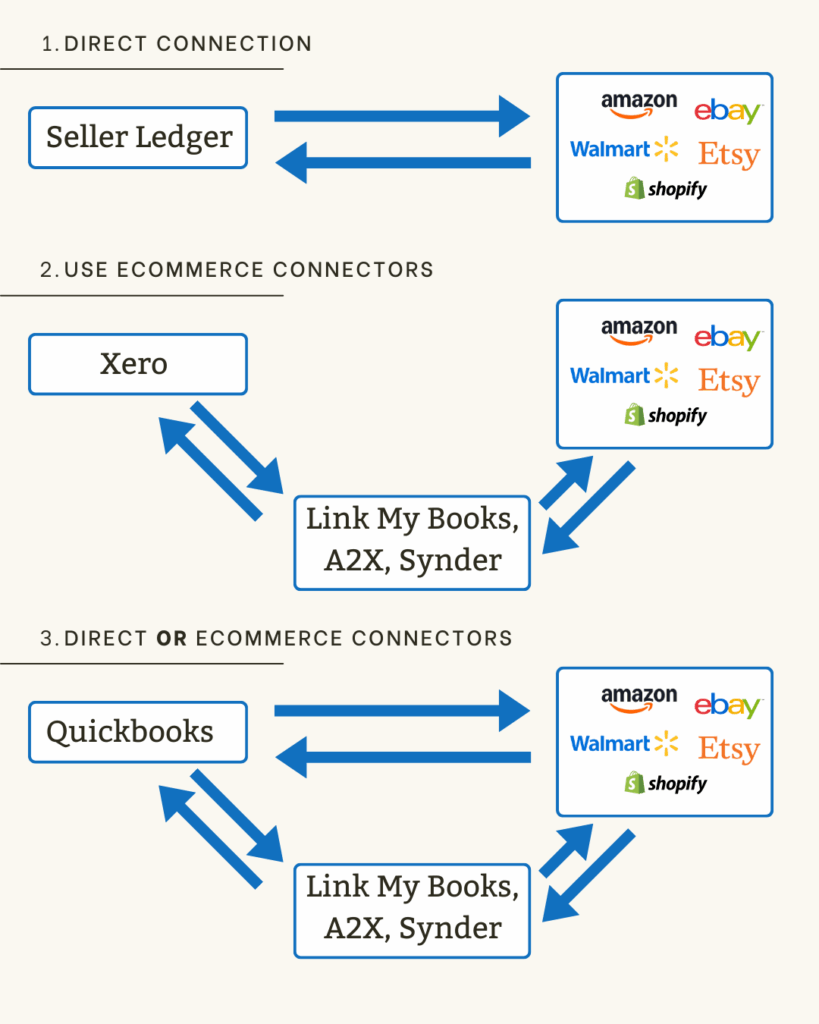
We’re glad you asked! No, they do not. This is one of the big differences in the various accounting software solutions for eCommerce sellers. Some accounting software companies connect directly to the marketplaces, others require the use of 3rd party eCommerce connectors like A2X Accounting, Link My Books and Synder. And some choose to offer both.
Below is a diagram showing the various options used by leading eCommerce accounting platforms.
Let’s talk about some of the advantages and disadvantages of each option:
Simplicity: Fewer moving parts means less work getting set up. And the connections and data are built into the core parts of the accounting software.
Lower costs: You don’t have to pay for extra software subscriptions.
Accountability: When marketplaces change their data, or introduce new fees, there’s only one party responsible for updating the software.
Cons
Less flexible: If your accounting needs are more unique, having the ability to choose between different methods of data connection (e.g. detailed vs summary) could be valuable.
3rd Party eCommerce connectors
Using 3rd party eCommerce connectors basically means an accounting platform is outsourcing the eCommerce data collection and classification to someone else. These 3rd parties specialize in eCommerce connectivity, so it’s a legitimate way to delegate responsibility. Xero has taken this approach.
Pros
Expertise of 3rd party connectors: The leading providers have been working with eCommerce Marketplaces for years, and are very familiar with the data.
Keeps books “clean and lean”: By delegating the task of collecting and summarizing eCommerce data, you can reduce the likelihood that your traditional accounting software gets bogged down by data it was never designed to handle.
Cons
Complexity: By using what some call “middleware”, you will have more setup to get things working as desired. And because the eCommerce connections are not baked into the core product, the user experience may feel disjointed.
Cost: Needing to use a separate software system will invariably cost more.
Choice of direct OR 3rd party connectors
Then there’s the option for maximum flexibility. Some accounting platforms build their own direct connections to leading eCommerce marketplaces, but also allow you to choose a 3rd party connection instead. QuickBooks offers this choice.
Pros
Flexibility: You can choose which option works best for your business, even doing it on a marketplace by marketplace basis if so desired.
Experience: In the case of using 3rd party connectors, these tools have been used together for many years by many sellers.
Cons
Quality and coverage: Based on online commentary, there may be issues with how well the direct connection tools are managed. And Quickbooks, as of the time of this post, only provides a limited set of direct integrations (e.g. they don’t connect directly to Walmart.) As such, you could end up with a “kitchen sink” approach.
Cost: If you use a 3rd party connector in addition to a multi-channel tier of Quickbooks, prices could get up there.
Conclusion
As with any decision, your choice of accounting software to use for your eCommerce business comes down to the needs of your business and your personal preference. But, regardless of which option you choose, feel confident that there are lots of ways to automate your eCommerce accounting using accounting software.
Ready to automate your eCommerce bookkeeping?
Join thousands of sellers who save hours every month with Seller Ledger.
While most of the major eCommerce marketplaces, like Amazon, eBay, Walmart, and Etsy have robust APIs that make it possible for us to automatically import and categorize their transactions, a lot of newer and smaller marketplaces haven’t made that investment.
For some of the more popular ones, like Whatnot, Poshmark, Mercari and Depop, we’ve built a custom import tool for the transactions that they allow you to export. And we continue to evaluate other marketplaces.
But, in the meantime, we’ve recently rolled out the ability to track sales from any marketplace. You can now import order history from any online platform, so long as you can modify their transaction files to match our format. Here’s how it works:
Step 1: Download your transaction history in CSV format
Log into your marketplace and find the place to access your order/transaction history. The more detailed the report, the better. Then, download it in a CSV (comma-separated) format – a very common format for exporting data.
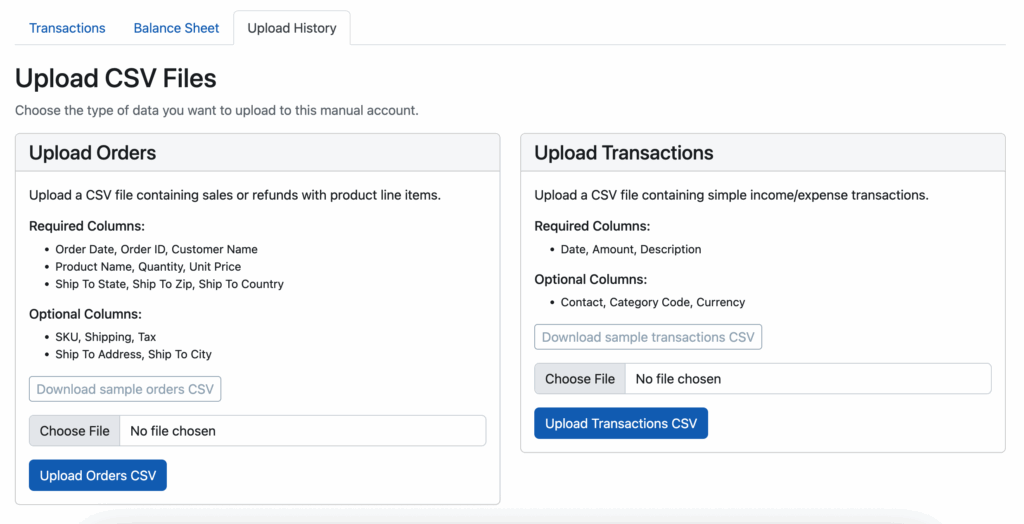
To upload a file with order and refund details, Seller Ledger expects the following fields:
Required:
Order Date
Order ID
Customer Name
Product Name
Quantity
Unit Price
Ship To State
Ship To Zip
Ship To Country
Optional:
SKU
Shipping
Tax
Ship To Address
Ship To City
In fact, it may be easier to simply use our sample format file, which we provide here.
Step 4: Upload the new file to Seller Ledger
Click into your newly created marketplace account from the dashboard and click the “Upload history” tab.
You’ll want to choose the “Upload orders” option on the left. Click the “Choose File” button, select the reformatted file you just created, and click Save. Seller Ledger will begin importing your order history, complete with any product, fee and refund details that are provided.
Ready to automate your eCommerce bookkeeping?
Join thousands of sellers who save hours every month with Seller Ledger.
To prove how easy it is to use Seller Ledger’s (brand) new API, we’ve thrown together a super lightweight web application that even a novice programmer could replicate.
Goal: create a way to load mileage data into a Seller Ledger account
As a simple use case, let’s take a request we’ve heard from a number of customers – how can I import mileage transactions that I have tracked elsewhere? Given that a number of mobile mileage trackers provide trip data in CSV format, we decided to create the simplest tool we could think of: a single web form where you can copy and paste some mileage data in CSV format and send it to your Seller Ledger account.
We’ll be doing this using Ruby on Rails as the framework for this tutorial.
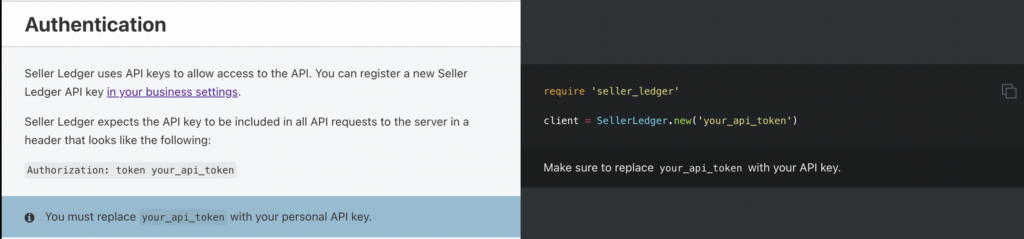
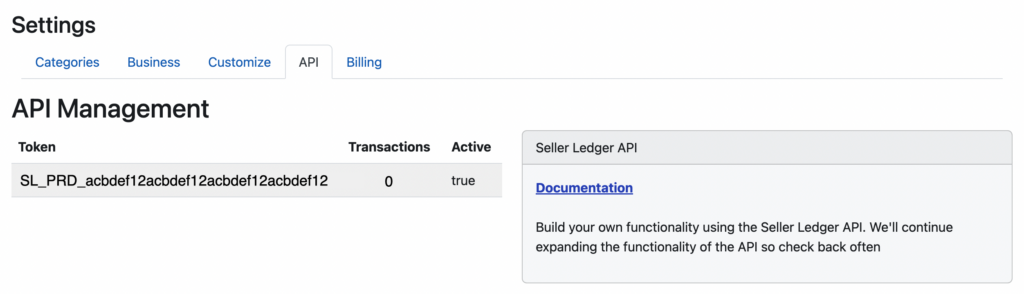
Step 1: Learn how to access a Seller Ledger account
Please be aware – the API token in the above screenshot is fake – it is not tied to a real account. Throughout this tutorial, you will need to use an actual Seller Ledger API token for this example to work.
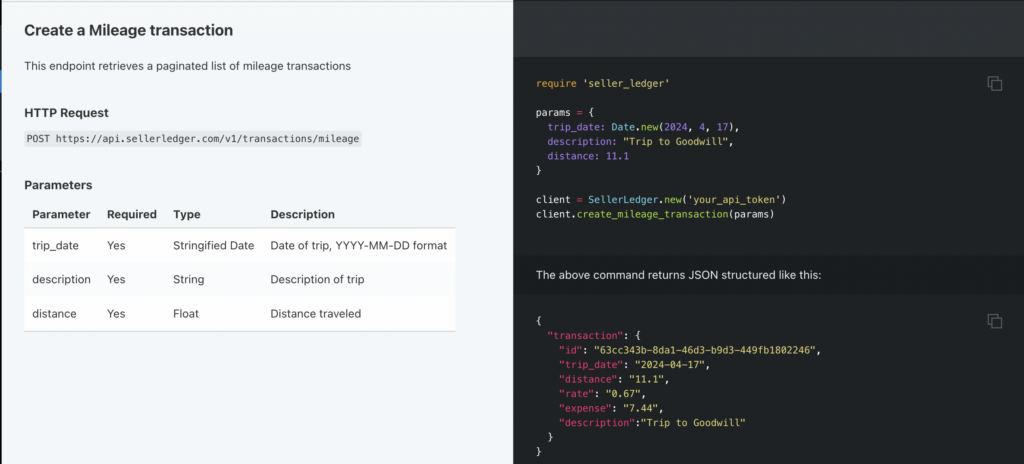
Step 2: Learn what information Seller Ledger expects in order to load mileage transactions
Looking again at the API documentation, creating a mileage transaction requires only 3 pieces of information and describes the format required:
Date of the trip
A description of the trip
Distance traveled
You don’t need to know the current IRS mileage rate. Seller Ledger has that information and does the calculation based on the date of the trip.
Step 3: build the simplest way to capture the information needed to load mileage data into Seller Ledger
So, it appears that we only need two types of information to update Seller Ledger with mileage data – an authentication token and the raw trip data itself. Let’s put that to the test. Time to start a new Rails application:
rails new test-sl-mileage-app
Fortunately, Seller Ledger has published a Ruby gem to help develop against its API. The source code for that gem, and its readme is published on GitHub. Looking at the readme instructions, I can install that gem. Let’s go into the directory of our new rails app
cd test-sl-mileage-app/
and add the gem to our project
bundle add seller_ledger-ruby
Now, let’s do some blocking and tackling to get a page where you can enter the info. These are steps specific to building a lightweight rails app, so feel free to skip ahead if you’re already familiar. Let’s create a new “home” controller – which will be the only one we’ll need (and apologies in advance for not using proper design patterns).
rails g controller home
Now, go update your routes file and edit the default root_url route:
change #root "articles#index" to root "home#index"
Make sure to add the index method to home_controller.rb
def index
end
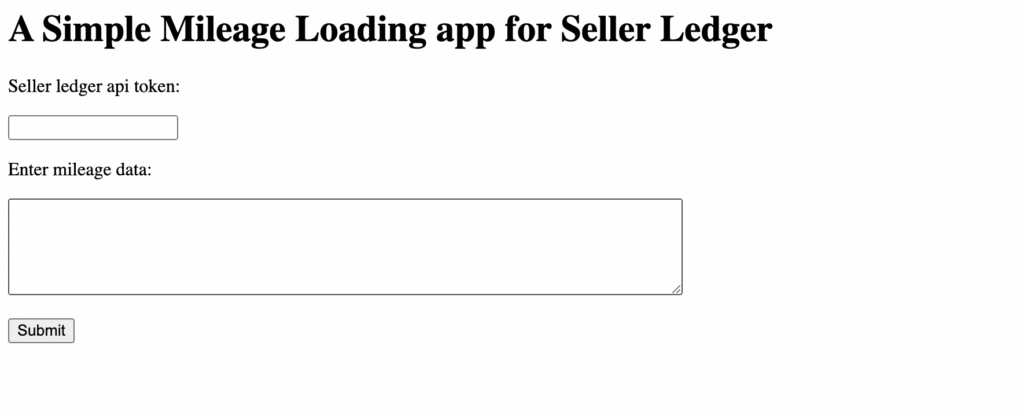
Now it’s time to build the actual HTML page at home#index to capture the important information. To keep things simple, include a single text box to request the API token, and a text field box where a user could paste in (or type, if s/he so desires) a bunch of csv data. Create a new view file under the home folder, called index.html.erb. And add the following basic HTML:
Voila – we see the following completely un-styled, yet potentially functional web page. This should allow us to capture the information needed to load multiple mileage trips into Seller Ledger
Before moving on to the next phase, add a route for that form’s post action in our routes.rb file. To keep things simple, we will put everything in the “home” controller.
post "load" => "home#load", :as => "load"
Step 4: Take the information from the web form, and push it into Seller Ledger
An easy first step here is to create a single Ruby service object (a PORO – or “plain old ruby object”) that takes an API token, initializes itself with it. The service object can then have a method that takes the raw csv data passed to it, parses it, and sends it to Seller Ledger. Create a “services” directory under the “app” folder and, inside that new folder, and create a new file. In this tutorial, we’re calling our object “Parser” and naming the file parser.rb.
class Parser

end
Now it’s time to create mileage transactions within Seller Ledger, so let’s take a look at that API documentation again.
Add the ‘require’ statement at the beginning of the object file. Also, create an initialize method that takes an API token as its parameter and creates a new Seller Ledger api client that can be used by the rest of our Parser object:
def initialize(token)
    @client = SellerLedger.new(token)
end
To see if this is working, let’s open ‘rails c’, create a token variable and see if we can initialize our new Parser object with it:
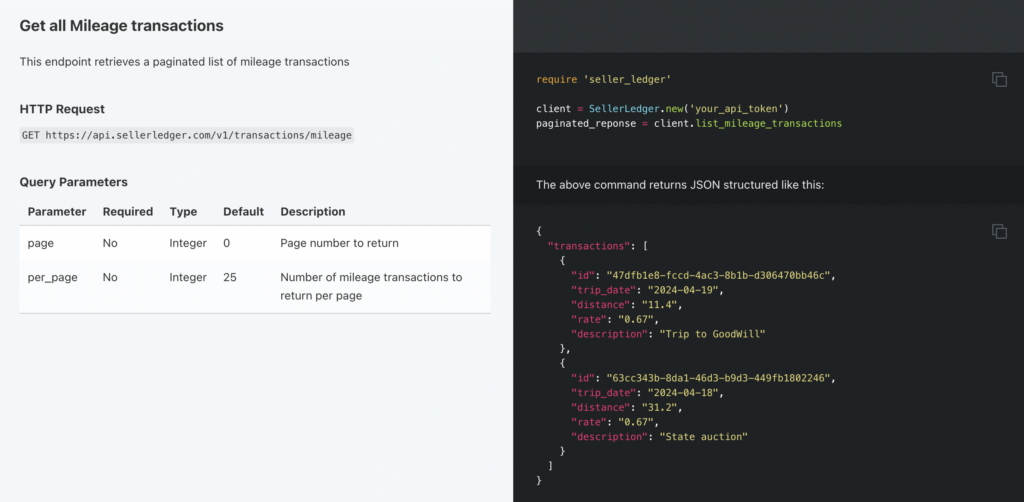
Bingo! Now, what’s the simplest thing we can test to see if our code is actually talking to Seller Ledger? Well, “Get all Mileage transactions” looks pretty straightforward:
Now let’s add a quick method to our Parser.rb file.
def list_mileage
    @client.list_mileage_transactions
end
Alrighty! Our lightweight web app is talking directly to Seller Ledger. Now, let’s add a “load” method in the “home” controller with some logic to grab the form data and get it ready to send to our Parser object:
def load
    token = params[:token]
    data = params[:data]
    p = Parser.new(token)
    @result = p.load(data)
end
We’re grabbing the token value from the form field and passing it in when we initialize the Parser object. We then grab the actual csv data from that form field and pass it to a new method that we’ll call “load”. And we’ll store the response from that method in an instance variable that we can show in the view.
Now, we just need to create that new “load” method in Parser.rb to grab the csv data, actually parse it, iterate over it, and pass the values into Seller Ledger:
def load(data)

    keys = ["trip_date", "description", "distance"]
    results = []
    data.each_line do |line|
        results << @client.create_mileage_transaction(Hash[keys.zip(line.chomp.split(","))])
    end
    return results
end
The approach used here was to create keys and build a hash using them for each line of input. We further assume no header information is provided in the CSV data, just the raw trip information. However, while iterating over the raw csv data, you could just as easily assign the parameters to pass into Seller Ledger individually like in the documentation.
Finally, let’s create a load.html.erb view file to show the returned results:
<h1>Results</h1>

<%= @result %>
Step 5: try it out
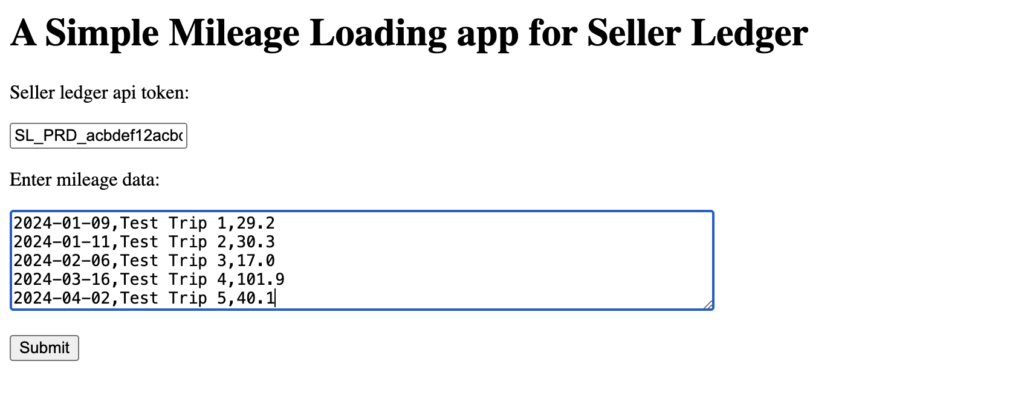
Go ahead and enter some simple csv formatted data into that web form, along with your API token (remember to use your actual token, not this fake one).
Hit “Submit” and….
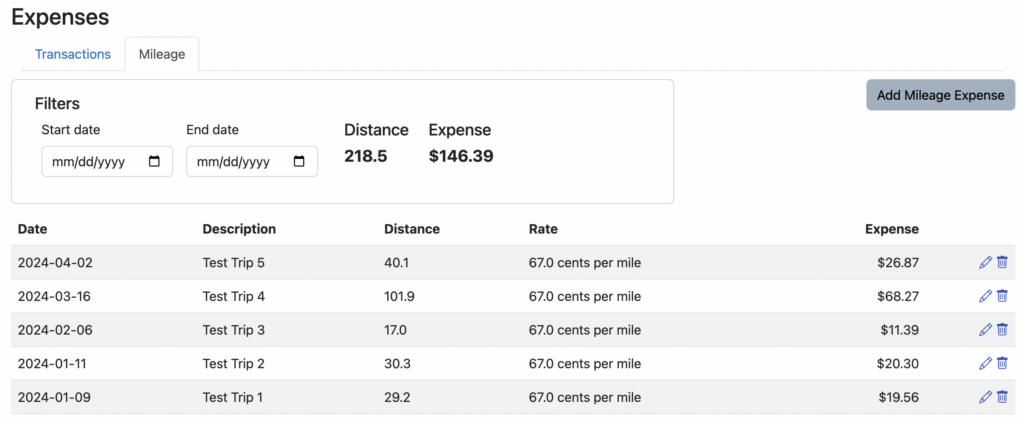
Looks like we got a result with rates and calculated deduction amounts. Let’s check our Seller Ledger account’s Mileage transaction view:
There you have it. A super simple web app to load multiple mileage trips into Seller Ledger. It actually took far less time to create the app than it did to write this tutorial.
In the spirit of encouraging more automation in the world of eCommerce accounting, Seller Ledger is announcing the launch of a new API (application programming interface). This will allow third-party developers to further extend their product functionality by making it easy to interact with Seller Ledger.
What can I do with an API?
To provide one illustration, let’s take a look at the mileage deduction. There are many third party apps (a lot of them mobile) that do a good job of tracking the miles you drive for your business, but getting that information into your accounting platform can be challenging. Seller Ledger’s first API endpoint allows anyone to upload and access their mileage trips.
We will be expanding support for more areas of eCommerce accounting and welcome suggestions from developers near and far. Please let us know what else you’d like to see.