Recently, we wrote about how folks who source on eBay can track their purchases in Seller Ledger. Well, we’ve also heard that more and more resellers are sourcing from Whatnot, a fast-growing live-streaming sales platform. We already make it possible to import your Whatnot sales into Seller Ledger, but today, we’ll show you how to create inventory from your purchase history.
Step 1: Get your Whatnot purchase history in the right format
First, you’re going to want to download your Whatnot orders report for a given period of time. It will come in a CSV file format that, when you open it in a spreadsheet, will look something like this:
The good news, because it’s already in a CSV file format, you only need to make a few changes and it will upload to Seller Ledger just fine.
Step 2: Remove and rename columns
The vast majority of the columns in this file won’t be needed for uploading inventory. You can simply delete the following columns, which are not supported by our inventory upload feature
order id
order numeric id
buyer
seller
product description
product category
processed date
order status
order style
order currency
sold price
subtotal
shipping price
taxes
taxes currency
credits applied
Inbound cost of goods sold
Note: because the “total amount” column amount includes the inbound “shipping price” and “taxes” amounts, that “total amount” will be properly divided among the quantity of the items and be included in the item costs.
Keep the “product name” column header as is, as well as the header for “quantity.” But rename “total amount” column header to “total cost” to match the column headers we require.
Step 3: Create unique SKUs for each product
The most important step now is to add a new column, titled “sku” and to create unique SKUs for each item in this file. Then, when you list them on various platforms to sell (and include the corresponding SKU value,) Seller Ledger can tie the sale back to the original cost, reduce your inventory and properly calculate cost of goods sold.
Step 4: Upload your inventory to Seller Ledger
Lastly, to load this cost information into Seller Ledger, just go to the Inventory tab and click the “Add Inventory” button. Record the date that you are uploading this information, “Whatnot” as “Purchased from” and enter the total amount of all of the items (which you can add up in the spreadsheet). Then click the button near the bottom of the screen that says “Upload inventory”, choose the file, and click save. Within a few minutes, it should show as a single large purchase of items with all of the cost details broken down.
Don’t track inventory in Seller Ledger? That’s ok too
We recently rolled out the ability to upload generic expenses in a CSV file format, which can include COGS purchases from other platforms. Learn more about how to do that here.
That’s it. Happy sourcing on Whatnot. May your profit be ever increasing.
Ready to automate your eCommerce bookkeeping?
Join thousands of sellers who save hours every month with Seller Ledger.
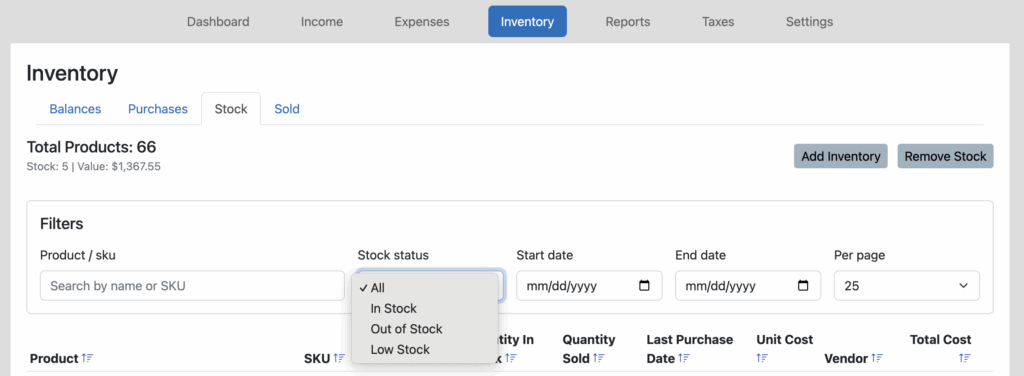
In an effort to help sellers avoid stock outs, we just released a new version of the Inventory -> Stock page.
We’ve added a couple of new features to help avoid stock outs by making it easier to track out-of-stock inventory. They will also help with re-ordering and inventory analysis.
For one, you can now filter by stock levels, including items that are out of stock, and those that are at a low stock level (below 10 units).
Plus, you can now sort your inventory by any of the columns.
We’ve been getting more and more requests from our resellers asking for ways to better automate inventory management, in this case when they source from eBay. It is possible to track eBay inventory purchases as Inventory, but it takes a little bit of adjusting. Here are the key steps:
Step 1: Get your eBay purchase history in the right format
First of all, you’ll need to request your purchase history from eBay, which should get you a list that looks like this:
Next, you will need to copy and paste the table information from this page into a spreadsheet and save it as a CSV formatted file. Fortunately, because the data is laid out in a table format, copying and pasting should work quite well. Having your data in this format will allow you to easily upload the details to Seller Ledger.
Also, make sure to delete any items that were purchased for personal use.
Note: because the total cost column amount includes the Transaction Shipping Fee amount, that amount will be properly divided among the quantity of the items and be included in the item costs.
Rename the Listing Title column to “product name” and the Total Price column to “total cost” to match the column headers we require.
Step 3: Create unique SKUs for each product
The most important step now is to add a new column, titled “sku” and to create unique SKUs for each item in this file. Then, when you list them on eBay, record them in the Custom label (SKU) field. That will ensure that we can tie the sale back to the item cost.
Step 4: Upload your inventory to Seller Ledger
Lastly, to load this cost information into Seller Ledger, just go to the Inventory tab and click the “Add Inventory” button. Record the date that you are uploading this information, “eBay” as “Purchased from” and enter the total amount of all of the items (which you can add up in the spreadsheet). Then click the button near the bottom of the screen that says “Upload inventory”, choose the file, and click save. Within a few minutes, it should show as a single large purchase of items with all of the cost details broken down.
Don’t track inventory in Seller Ledger? That’s ok too
We recently rolled out the ability to upload generic expenses in a CSV file format, which can include COGS purchases from other platforms. Learn more about how to do that here.
That’s it! Hopefully that saves a bunch of time for those of you sourcing inventory from eBay.
Ready to automate your eCommerce bookkeeping?
Join thousands of sellers who save hours every month with Seller Ledger.
Do you sometimes give away some of your inventory for promotional purposes? Or do you sometimes have to return inventory to a vendor? If so, how do you handle the accounting for that?
To date, Seller Ledger has treated manually removed inventory as shrinkage. But no longer. Today, we add support for additional reasons.
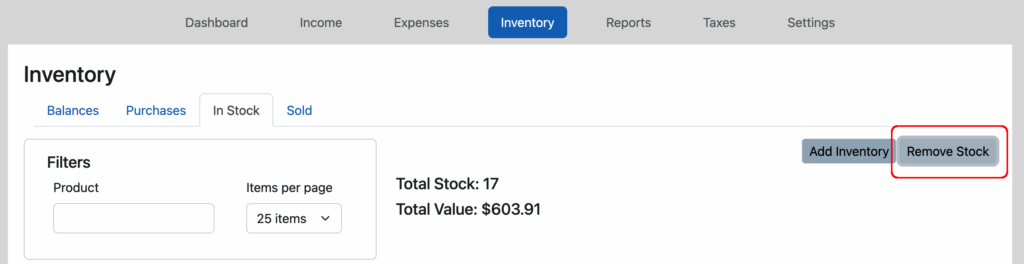
Let’s take the example of giving away inventory items for promotional purposes. When you go into your Inventory ->In Stock view, click the “Remove stock” button:
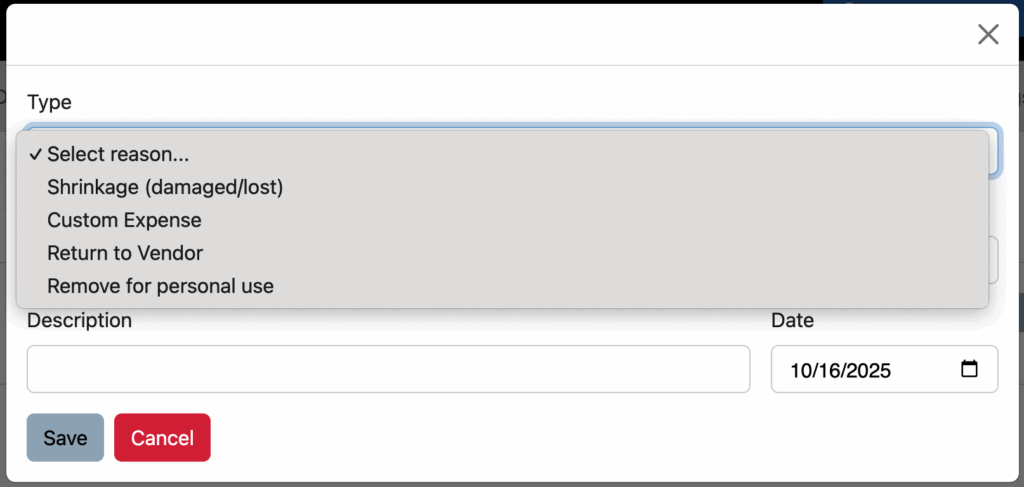
You will then be presented with an updated form. Click on the new “Type” field to choose a reason for this inventory removal. Notice that “Shrinkage” is still an option, but you also now have the flexibility to choose a different expense option.
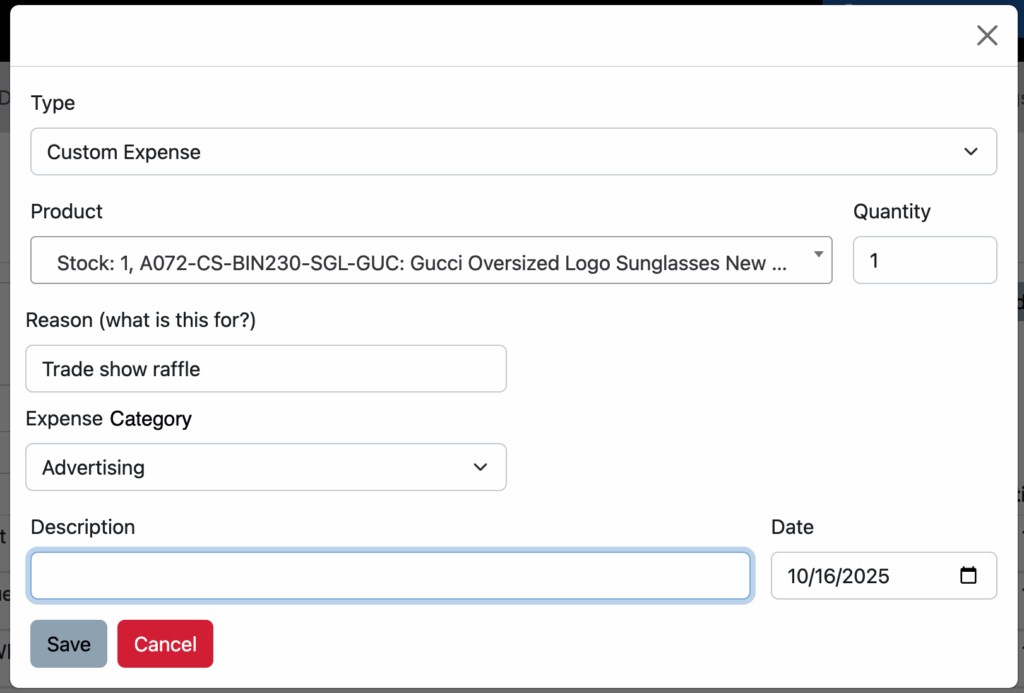
When you choose “Custom Expense”, in addition to asking for the specific product that you are removing from inventory, we also ask for an expense category. In this case, because we’re using the inventory item as a promotional giveaway, we’ve chosen “Advertising” as the category.
The reason this might matter to you is the impact it has on gross profit and gross margin calculations. If you were to include giveaway items in your gross profit calculations, you might draw the conclusion that you are earning less on each individual sale than you actually are.
Ready to automate your eCommerce bookkeeping?
Join thousands of sellers who save hours every month with Seller Ledger.
Based on a recent question from a customer, we decided to outline the steps to make sure you automate the ability to track cost of goods sold with Poshmark.
The first step is to create a unique SKU (short for “stock keeping unit”) for each item you list. Next, record the SKU and purchase price (and any other inbound costs) of that item in Seller Ledger. Finally, when listing your item for sale on Poshmark, make sure to include the unique SKU value in the listing. Doing this is not obvious, as the field is considered “optional” and not exposed by default.
Adding SKU value to your Poshmark listing
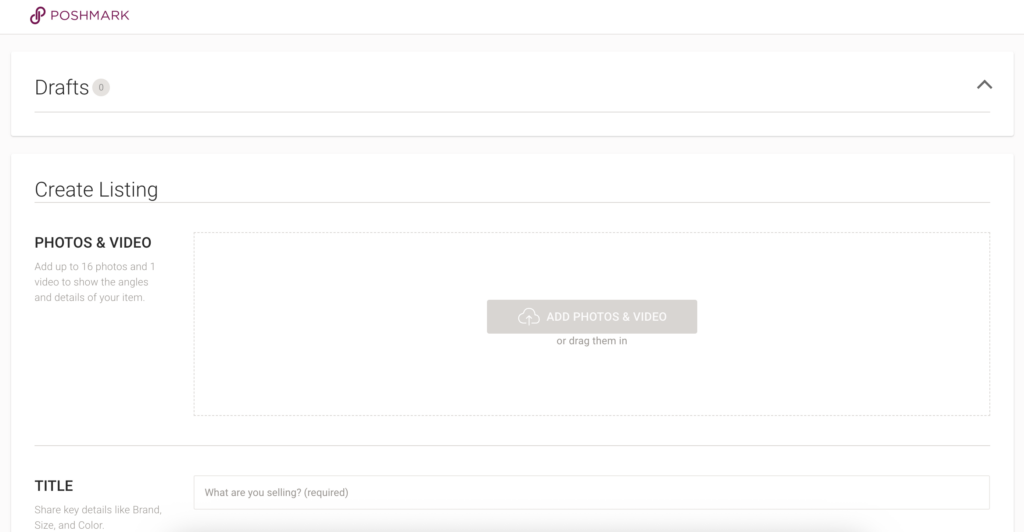
When you go to create a new listing at Poshmark, you will see a screen that begins like the following:
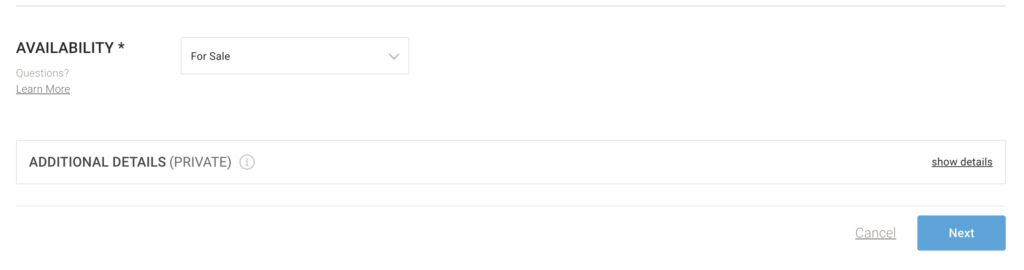
Scroll down to the bottom and you’ll see a private section called “Additional Details.”
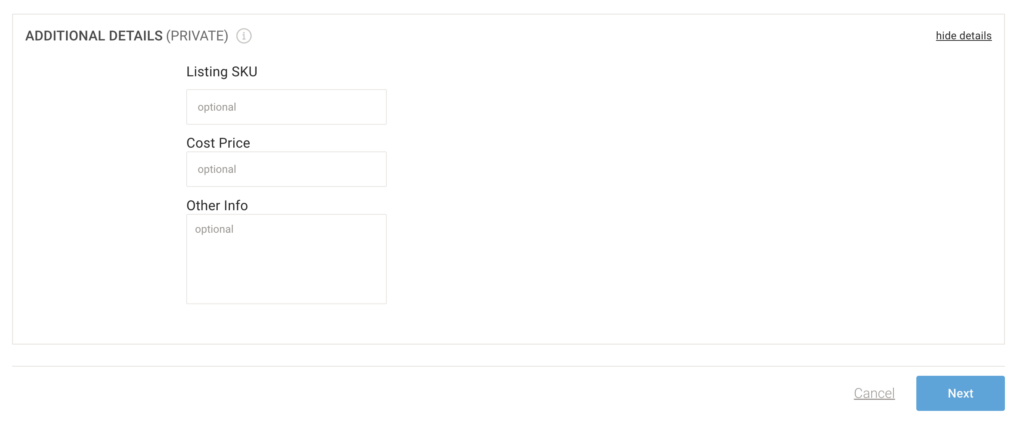
In order to add a SKU to your listing, you’ll need to open the “Additional Details” section by clicking “show details” on the far right. That expands the section to reveal a field for SKU:
Note – there is also a “Cost Price” field in there, but it’s not necessary (nor recommended) to record your costs there, as Seller Ledger should already have the cost information for that item in its records.
That’s it?
Yes, that’s it. What happens from here is that, when your item sells on Poshmark and Seller Ledger imports that sales information into our software, we look for the SKU value and automatically match it to what we show in your Seller Ledger inventory. Once we do that, we reduce the amount of your inventoryand automatically update your cost of goods sold expense amount. There is no additional record keeping or analysis that you need to do.
Ready to automate your eCommerce bookkeeping?
Join thousands of sellers who save hours every month with Seller Ledger.
A.k.a “The simplest way to calculate cost of goods sold”
There’s a lot of content out there on the internet around inventory, accounting, cost of goods sold and taxes. While it has the potential to be very confusing, we’re going to try to simplify things a bit, especially for small online sellers.
Definitions
The most basic definition of cash-based inventory tracking (versus accrual accounting for inventory) is as follows.
Cash-based
Expense the cost of your inventory when you buy it, regardless of when it sells
Accrual
Expense the cost of your inventory when it sells, regardless of when you bought it
Historically, the IRS pushed most people to use the accrual approach, even if using cash-based accounting for the rest of the business. But we have seen a TON of sellers file this way, and know that some tax pros have dug into this as a legitimate approach. I don’t want to get into any tax advice here, but I will show you how, practically, each approach works, and how they can actually be very, very similar to each other.
Let’s take a look at how you can use cash-based inventory tracking using Seller Ledger. This is actually the default setting when you first start using Seller Ledger. It works by giving you the option to categorize expenses as “cost of goods sold” when you purchase them and deduct the total amount on your tax return. Check out this video tutorial on expensing cost of goods sold to see exactly how that works.
This is the simplest approach you can take. But I want to explain what you’re effectively doing if you file this way.
Understanding the math
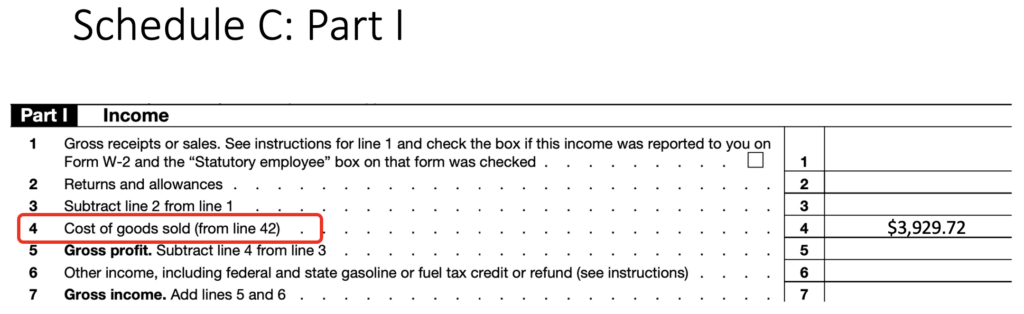
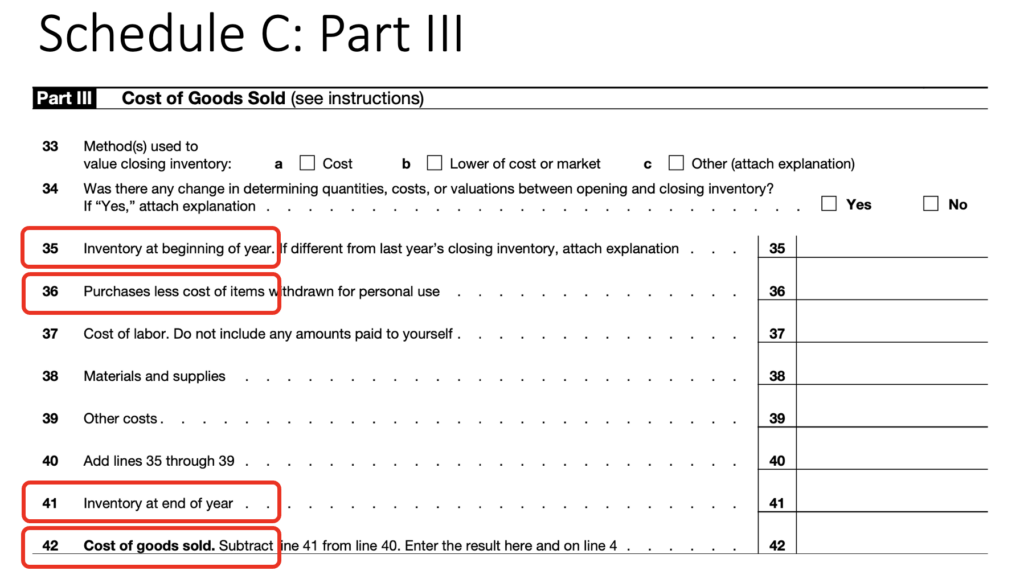
If you look at the actual Schedule C form provided by the IRS, yes, line 4 (highlighted in red) does ask for Cost of Goods Sold. But in parentheses, it says “from line 42”. Line 42 comes from Section III.
Here is what Section III of the Schedule C looks like:
The key lines in Section 3 (again, highlighted in red) are Lines 35 (your beginning of year inventory), 36 (the cost of items you purchased throughout the year) and 41 (your end of year inventory).
As you can see, Cost of Goods is calculated using this basic formula, which we can lay out in a slightly different way:
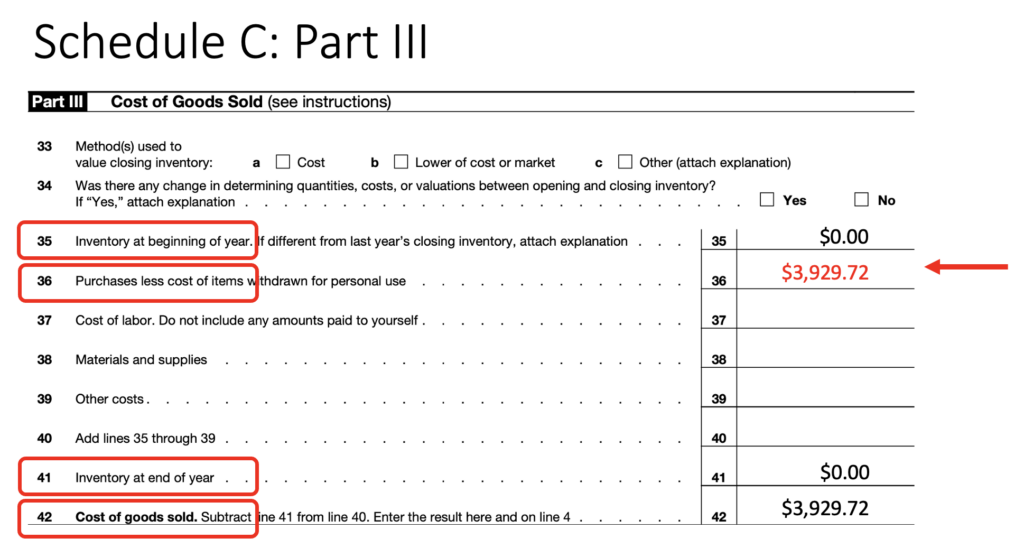
By simply categorizing all of your purchases as cost of goods sold, you’re basically saying to the IRS, everything I bought, I sold within the same year. As in, if this is my first year selling, my beginning inventory was zero (because I didn’t buy anything the prior year) and my ending inventory is zero, because I’ve sold everything I bought this year. Now, using that same formula above, you would get:
In our example, you’d be declaring a starting inventory balance of $0 and an ending inventory balance of $0. In order for your costs of goods sold to end up at $3,929.72, you would enter that same amount under items purchased for the year.
The only thing that is changing is that, instead of calculating Cost of Goods Sold based on the other 3 values, you are backing into the Purchases value by assuming that opening and ending inventory is zero. That’s all the Cash-method for inventory and cost of goods sold tracking is. In fact, we’ve seen cases where tax professionals are filing returns using a pretty significant, non-zero opening and matching closing inventory balance, and still just declaring that purchases and cost of goods sold are the same.
In fact, the funny secret here is that, for all intents and purposes, cash-based inventory (a.k.a. just writing off your purchases as you make them,) is no different than periodic inventory tracking. The only difference? Whether you actually count up the cost of your unsold inventory at least once a year.
A big limitation
All of the above is meant to outline the easiest way to track inventory for tax purposes. But, the cash-based method for inventory tracking (as well as the periodic method of accrual accounting) do have a pretty big limitation – they won’t help you figure out how much money you make on each sale or type of product. For that, you are going to want to look into tracking at the item level (a.k.a. continuous inventory management).
Ready to automate your eCommerce bookkeeping?
Join thousands of sellers who save hours every month with Seller Ledger.
Now that we’re through another tax season (for those that didn’t file extensions), we’ve released a few minor enhancements around sorting. Specifically, around sorting columns in the Income and Expense views, as well as Inventory.
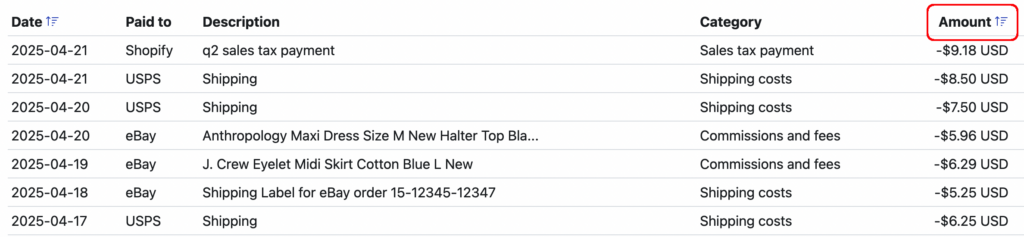
Under both the Income and Expense tabs, you can now sort values based on the Amount column. Just click on the icon to the right of the column header.
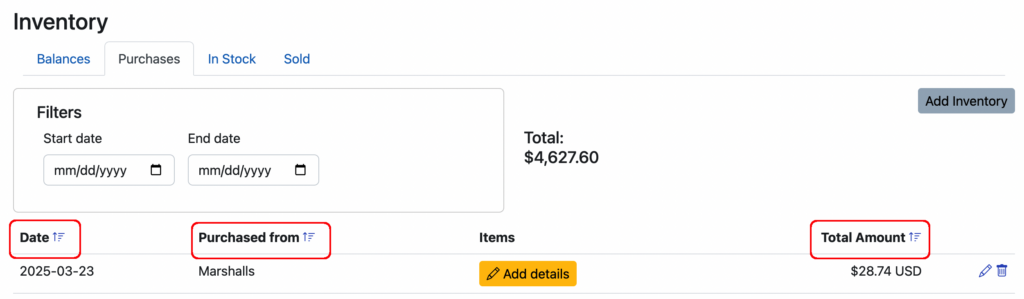
Under the Inventory tab, we have also added the ability to sort results by a number of different columns. In the Purchases sub-tab, you can now sort by Date, Purchased from and Total Amount columns:
In addition, you can also now sort by every column in the “In Stock” sub-tab and the Date and Total Amount columns under the Sold sub-tab.
Keep those customer suggestions coming and we’ll keep cranking out the improvements. Just email us at [email protected]
Ready to automate your eCommerce bookkeeping?
Join thousands of sellers who save hours every month with Seller Ledger.
Are you are an eCommerce seller who stores inventory in a closet, basement, garage or other location in your home? You may be able to use the Home Office deduction for those spaces to reduce your tax burden. This article explains how to qualify for the Home Office Deduction and how it can be used for inventory storage in your home.
Disclaimer
Before proceeding, it’s important to mention that we at Seller Ledger are not tax experts. We are not trying to provide tax advice. It is critical that you as a reader make your own decisions on how to handle your specific tax situation. This may include hiring a professional.
Qualifying for the Home Office Deduction
Generally, qualifying for the home office deduction requires that you meet two criteria:
Your home must be the Principal Place of Business for your business AND
the spaces you are claiming must meet the criteria of Exclusive and Regular Use.
If you run your eCommerce business from home and have no other place of business, you may qualify for that first criterion. In addition, you may ONLY use the space you are claiming for your home office deduction for business, not for any other purposes. Here is a link to the IRS page describing the Home Office Deduction in more detail. We recommend you consult with a tax professional to see if you qualify.
Let’s talk about a couple of inventory storage examples with the home office deduction to clarify.
Do you use a spare room in your home for mixed purposes, such as storing your own out-of-season clothing or other personal items mixed in with the inventory for your business? If so, you will likely forfeit your ability to claim the home office deduction for that space. If, however, there’s a portion of the room that is dedicated exclusively to inventory and that section is separate from the space used for personal items, the portion dedicated to inventory storage would be acceptable to claim.
The same is true of spaces for packing and shipping. If you use your dining room table for these purposes, and that is where you also eat all your meals, it would not qualify as a business-use-only space. However, if you pack and ship in a corner of an office that is never used for personal purposes, that space would qualify.
How to Calculate Your Home Office Deduction
If you qualify for the home office deduction, there are two methods for calculating the amount to deduct. There is both a simplified method to calculate your deduction, which many people find to be easier to use, and a regular method.
Simplified Method
The simplified method is quite simple. It allows you to measure the square footage dedicated to your business and then calculate $5 per square foot. But there is a limit of up to 300 square feet. This method applies to both a traditional home office space where you work for your business and spaces in your home you use for dedicated inventory storage for your business.
Let’s say you store inventory in one dedicated closet of the home as well as a portion of your basement. If the closet measures 30 square feet and the portion of the basement dedicated to inventory measures 120 square feet, that would be a total of 150 square feet. Let’s say you also have a 10×12 office that you use exclusively for your business to list items for sale, manage customer support, purchase inventory and package items for your business, so that would be another 120 square feet. (Remember, this office must be a dedicated space for your business, not a mixed-use space!). The closet, plus the portion of the basement, plus the office is 30 sf + 120 sf + 120 sf = 270 sf. This meets the test that it is not above the maximum allowed of 300 square feet. The total of 270 square feet is multiplied by $5 to be $1,350. That would be the amount of your Home Office deduction on your taxes.
Now, some of our larger sellers may look at that 300 square foot maximum and say, aw, isn’t that cute. But I have way more inventory than that. For folks in that situation, you might want to consider the “regular method.”
Regular Method
To use the Regular Method, you would divide your expenses of operating the home into those that are business-related and those that are personal. You may deduct any purely business expenses in full. For shared expenses, you may allocate the portion that is business-related as a percentage of the total, using the percentage of square footage in the home that is dedicated to the business.
For example, let’s say your home is 2000 square feet. If 350 square feet are dedicated to your business, you would use 17.5% as the percentage that is business-related. Deductible expenses for business use of home include the business portion of real estate taxes, mortgage interest, rent, casualty losses, utilities, insurance, depreciation, maintenance and repairs, etc. In this example, you could deduct 17.5% of each of these costs. Again, you should consult the IRS details and seek advice from a tax professional to get this exactly right. And you may use either the Regular method or the Simplified method, but not both.
Edge Cases
Now let’s clarify some edge cases that might apply to you:
What if your inventory is stored in a separate detached structure on your property such as a garage, barn, shed or other out-building? So long as you meet both the Principal Place ofBusiness and Exclusive and Regular Use criteria, all of these would qualify.
What if you live in an apartment or condo instead of a home? Or you rent your home instead of owning it? Or you live in a mobile home or on a boat? Again, if you meet both the Principal Place of Business and Exclusive and Regular Use criteria, these would all qualify as well.
Let’s say you’ve outgrown your home as a place to store inventory. You store the bulk of your inventory in a rented warehouse, but some inventory gets stored at home too. In this case, you may NOT meet the criteria necessary to use the home office deduction. Your home may no longer be the principal place for your business. According to the IRS, inventory storage is deductible “so long as your home is the SOLE fixed location of such trade or business”. Consult a tax professional for further advice on this situation.
How do I enter a Home Office Deduction in Seller Ledger?
If you’re already using Seller Ledger, entering a Home Office Deduction is very easy. Simply go to the Expenses tab and click the “Add Expense” button in the upper right. When prompted, enter a description like “Home Office Deduction” and the amount you’ve calculated. Seller Ledger will automatically know to categorize that expense and it will roll up on your real-time Schedule C form. You can always reach out to us at [email protected] with any questions.
If you’re not yet using Seller Ledger, feel free to give it a try. We offer a 30-day free trial to all customers, no credit card required. You can learn more at www.sellerledger.com. For tips on additional deductions that may apply to you, you can also see our blog post on 3 Hacks to Maximize Mileage Deductions.
Ready to automate your eCommerce bookkeeping?
Join thousands of sellers who save hours every month with Seller Ledger.
In our continuing efforts to make eCommerce accounting easier, today we announce a big step forward for inventory tracking.
In short, you can now take a picture of your receipt and upload it to Seller Ledger. We use the latest “artificial intelligence” technology to extract item cost information from the image and pre-populate the inventory purchase form.
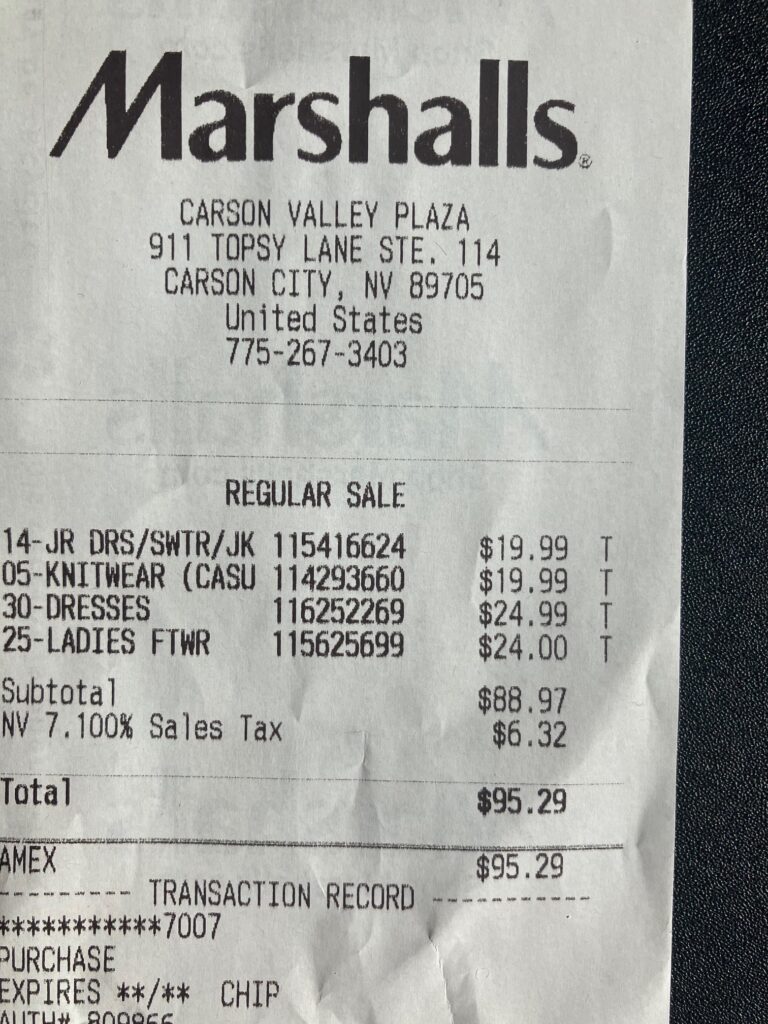
To show you exactly what’s possible, here is a picture, taken from an iPhone, of a receipt from a trip to our local Marshalls store:
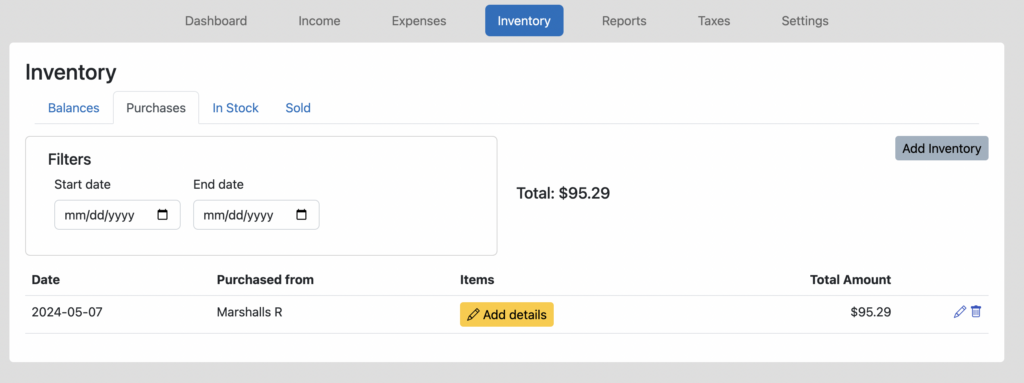
Within Seller Ledger, if this purchase came in from a linked bank or credit card, make sure to categorize it as “inventory” and then go to Inventory -> Purchases and click “Add details.” If this was a cash purchase, or from a source not connected to Seller Ledger, just go to this same screen and click the “Add Inventory” button.
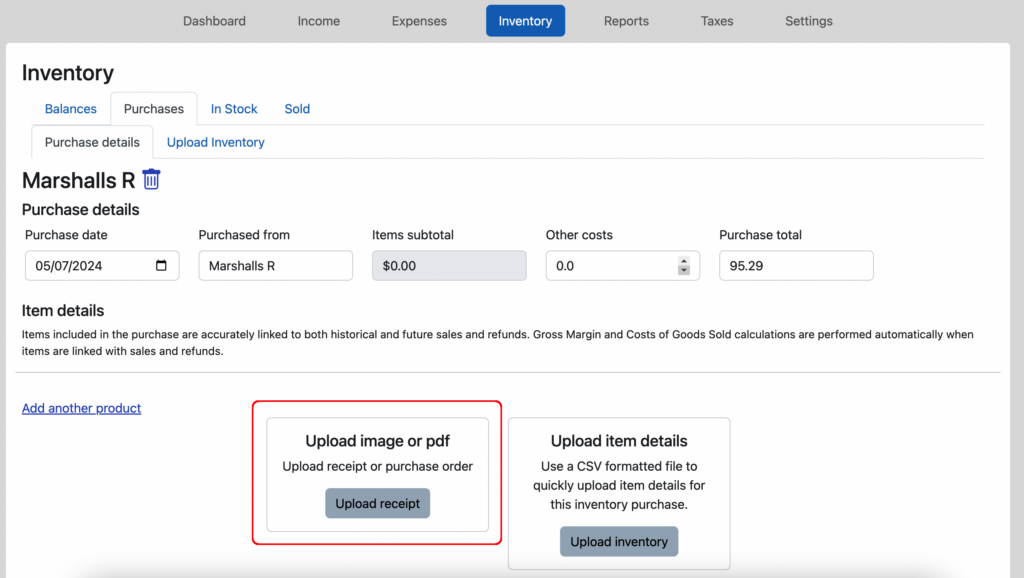
You will see a new option at the bottom of the screen to “Upload image or pdf”:
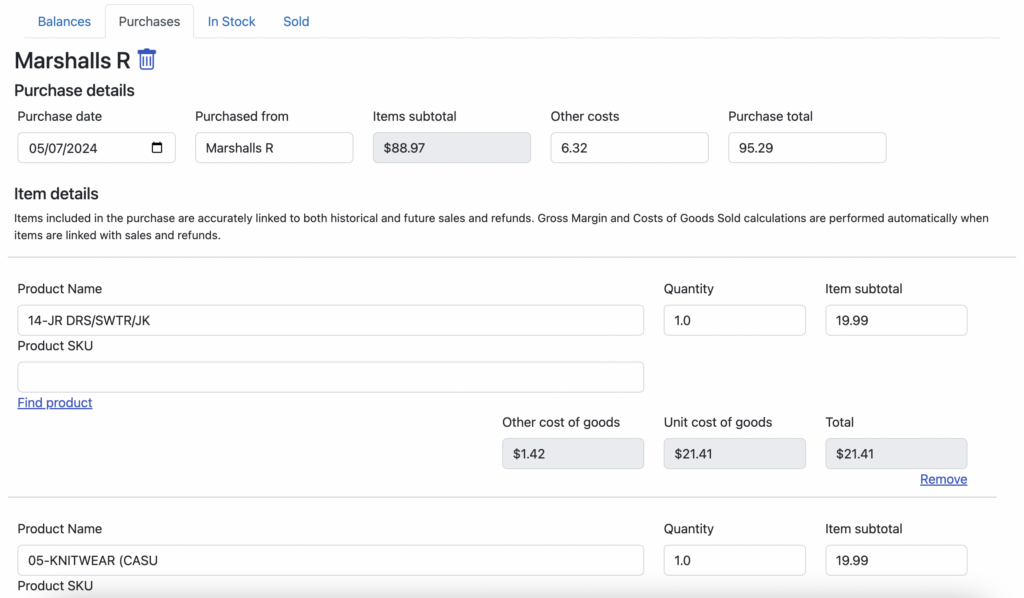
Click the “Upload receipt” button and choose the picture that you took of your receipt (or try the example we’ve posted above.) Seller Ledger will then process the image and extract as much information as possible. In the above example, you will end up with the following:
And scroll down to see the remaining information that we were able to extract from the image…
Notice that we found 4 unique items with descriptions and the correct per-item costs. Not only that, but we were able to recognize the $6.32 in sales tax. And given our recent feature that allocates extra cost of goods amounts, we automatically allocated that $6.32 across the 4 items.
The one piece of work left for you to complete is to either identify or create the unique SKU for each item, which will then allow Seller Ledger to match to sold items, thereby updating inventory and cost of goods amounts automatically when it sells.
To help us improve this feature over time, it helps to get as many customers trying it as possible. Please give it a try and let us know how we can make it better.
Ready to automate your eCommerce bookkeeping?
Join thousands of sellers who save hours every month with Seller Ledger.
When you purchase inventory, there are often other costs besides the cost of the individual items that must be accounted for as part of “cost of goods.” In fact, we wrote a blog post about it a while back.
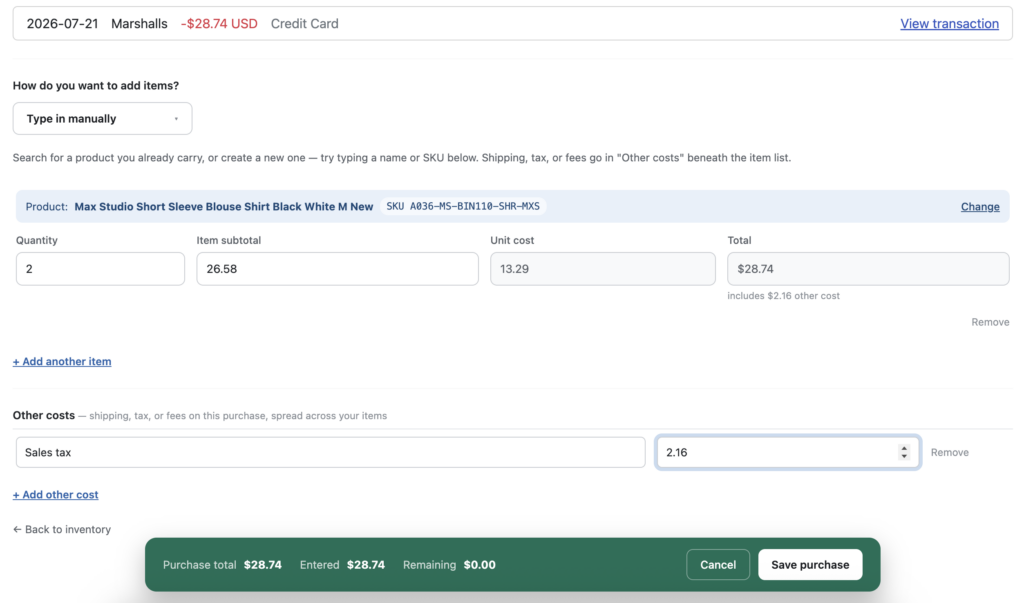
Until now, deciding how to handle those extra costs was something that customers had to figure out on their own. Well, no more. Now, Seller Ledger allows you to enter those additional costs and we automatically adjust the per-item cost of goods for your inventory.
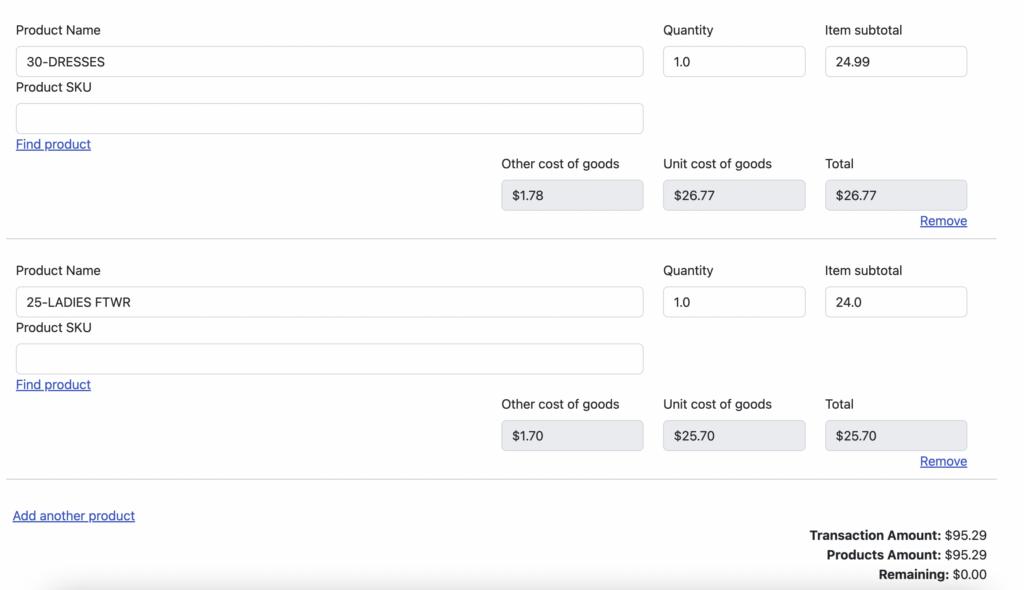
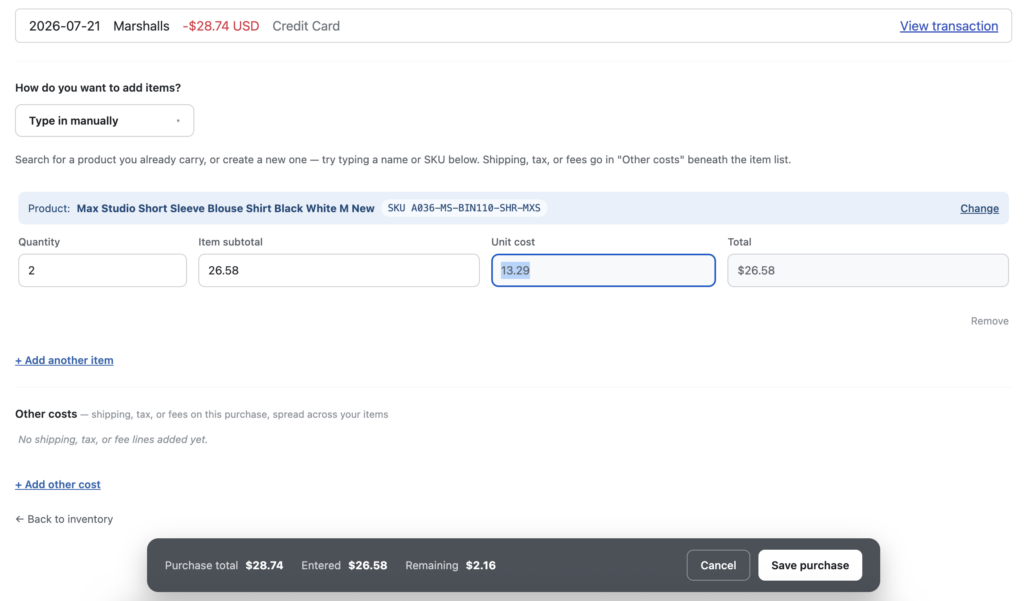
After you record the cost of your individual items, you will now see a new “Other costs” area for adding landed inventory costs. Click the “Add other cost” link and enter the cost of any extra costs paid – be it sales tax, inbound shipping, processing fees, whatever. You will then see the “other costs” amount divvied up among the items, based on the weighted average cost of those items within the overall purchase.