Don’t miss out on your deductions. Just tell Seller Ledger the date of the trip, a description of its purpose, and the distance traveled – we’ll calculate the rest. And remember, not only can you track your trips one at a time, but you can now also upload a CSV file of all of your trips – a pretty good option if you’re making lots of trips to the post office:)
Do you make a lot of the same business-related trips in your vehicle throughout the course of the year? Like going to the post office to ship packages? Do you go to the same venues to source on a regular basis? If so, manually recording each trip can become a bit burdensome when it comes to writing off your mileage. Well, no more. Seller Ledger now makes it simple to record many mileage trips at once.
If you use a spreadsheet to track your mileage trips so that you can copy and paste the same trip over an over, you can now upload a version of that to Seller Ledger and let us calculate the deductions for you.
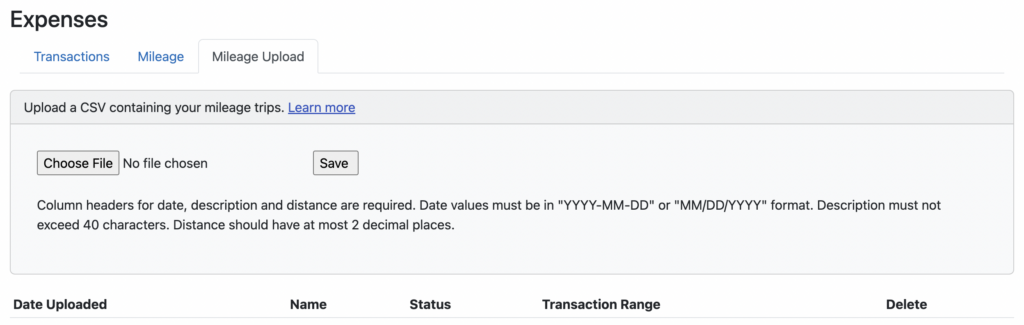
Click the “Choose File” button to find the CSV file on your computer and then click “Save”. Seller Ledger will import the file and create mileage trips for each row in your file, as well as calculating the deduction based on the date and the IRS standard rate for that date.
In an effort to make sure you write off all legitimate business deductions for your eCommerce business, we though it would be helpful to go a bit deeper on the IRS rules around “Business use of your car” so that you cab maximize mileage deductions.
Mileage deductions are a simple way to reduce your tax burden, and many driving trips for resellers and online store owners qualify, but it’s so hard to remember to enter them all!
The IRS recommends tracking mileage driven for your business by recording every trip at the time that you take it. You can include your trips to all of these types of destinations that might be relevant for you:
Inventory sourcing trips
Office supply runs
Trips to the Post Office, FedEx or UPS to ship your packages
Trips to reseller meet ups or conferences
Driving to any in-person training sessions or educational opportunities related to your business
There are two different methods to calculate your mileage deduction, which we explain in more detail below, but either method requires you to track how many miles you drove for business purposes, so you’ll want to be as accurate as possible in capturing these.
But what if you’re already three quarters of the way through the year and you haven’t been tracking all of your miles? Read on for how we’ve seen some sellers capture legitimate business trips they took, even if they might not have been recorded in the moment.
Here are 3 ways we’ve seen sellers maximize their mileage deductions.
Disclaimer
Before proceeding it’s important to mention that we at Seller Ledger are not tax experts and are not trying to provide tax advice. It is critical that you as a reader make your own decisions on how to handle your specific tax situation, which may include hiring a professional.
1. Use a mileage tracking app
Some sellers use mileage tracking apps, such as MileIQ or Everlance, that can help you to keep track of how many miles you’re driving for business purposes versus personal. On the plus side, these apps can save you a lot of time versus manually entering each expense. On the minus side, they can be an additional cost and they don’t help for the time period you weren’t tracking your miles.
2. Mine your other financial records
Wouldn’t it be great if someone could give you a record of each of your driving trips throughout the year even though you forgot to record them at the time?
If you’re using Seller Ledger’s automated bookkeeping software to import your business bank and credit card expenses and categorize those expenses, it can get you pretty close. Chances are, you’ve got a record in Seller Ledger of an expense for each of those inventory sourcing trips. Simply go to the Expenses tab, select the “Cost of Goods Sold” category and you’ll have a list of each vendor you bought from and the date of the transaction. We’ve seen sellers create a Mileage Deduction in Seller Ledger for each of those trips where they know they drove to the vendor.
We’ve seen sellers use the same tactic for trips to the Post Office, FedEx or UPS for shipping trips. In your Expense tab, select Category “Shipping Costs” and you’ll see a list of your transactions. Sellers obviously can’t deduct mileage for instances where they purchased a shipping label from eBay or Amazon online to ship a package, and they can’t deduct mileage if the shipper picked product up from their home or office, but each seller knows how their business operates and where legitimate driving trips are included, this is a tactic that has helped other sellers to identify them.
This method works for Office supply runs, Education sessions, or any other vendor/expense where it was needed to drive to for business purposes.
3. Use Google Maps
The Simple Part: We’ve talked with sellers who didn’t know the distance between two locations they traveled to earlier in the year. They simply entered their starting point and the destination in Google Maps, and there they had it – they knew the number of miles traveled.
The More Sophisticated Part: One seller even taught us about the timeline in Google Maps. It’s possible to see your timeline in Google Maps both in the mobile app and on the website. All the places you have searched for throughout your history will come up – you can click the “see more” button to see more locations, revealing the potential destinations from your past. The seller was using this tool to research past trips that might qualify as business trips they could deduct.
They shared another approach in Google Maps which is to click on your profile in the upper right of the mobile app and turn on your location history. With this feature enabled you can see the driving trips that you actually took whether they were today, a week ago, a month ago, etc. and it can include your location history that you actually travelled to. This was another gold mine for the seller in identifying trips they took for business purposes.
Standard Mileage Deduction Rate
In 2025, the current IRS mileage deduction rate is now $0.70 per mile. To use the standard mileage rate method, you can multiply this amount by the number of miles driven for each work trip to calculate your mileage deductions. At the end of the year, the sum of all those mileage deductions can be subtracted from your taxable income so that you pay taxes on a lower amount.
Actual Expense Method
Alternatively, there is another method to deduct driving costs by writing off a percentage of your vehicle costs, the actual expense method. This method takes into account spending on things like car insurance, and vehicle repairs among other vehicle-related costs. To use this method, calculate the number of total miles driven for work during the year. Then note the total miles driven by the vehicle during the year. The number of miles driven for work divided by the total miles is the deduction percentage.
For example, if you drove 2,000 miles for work out of a total of 10,000 miles in a year, then 2,000/10,000 = 20%. Once you know this percentage, you will apply it to the total money spent on the vehicle during the year. If you spent $5,000 on the vehicle that year, then 20% * $5,000 would be $1,000, so you could deduct $1,000 for the year.
Unfortunately, you cannot use both methods to deduct vehicle-related expenses, you must choose one or the other. Most folks choose the simple mileage deduction rate, logging their miles as they go and multiplying by the IRS rate to calculate their total deduction for the year.
Of course every seller’s situation will be unique and we cannot provide tax advice for your unique situation. An accountant can help you to identify and maximize mileage deductions. In addition, here are a couple links from the IRS that might be helpful to you on this topic:
Lastly, if you’re an online seller looking for an easy way to track your business expenses going forward, we recommend giving Seller Ledger a try. Seller Ledger offers a 30 day free trial, with no credit card required, and lots of smart features that learn and remember your vendors, so the more you use it, the faster and easier it gets over time. You can even upload a CSV file of all of your trips.
Seller Ledger was designed to provide the simplest, most automated bookkeeping solution for ecommerce sellers, at an affordable cost. If you sell on eBay, Etsy, Amazon, Walmart, Shopify, Poshmark, Mercari, Whatnot and more, Seller Ledger can automate your bookkeeping and make tax time easy.
Good news for small business owners. The IRS has increased the standard mileage rate for business use of your car from 67 cents per mile in 2024 to 70 cents per mile in 2025.
Don’t miss out on your deductions. Just tell Seller Ledger the date of the trip, a description of its purpose, and the distance traveled – we’ll calculate the rest.
The “At a glance” section of the Seller Ledger dashboard hasn’t received a lot attention since we first launched. Based on feedback from customers, we recently added the ability to choose from a few time periods that you can view.
Have you ever logged into Seller Ledger and seen your data at the top of the screen changed to all zeros? Well, that’s because the default view was “This month”, which, on the first of a month, often reverts to zero because we haven’t imported any new transactions yet. It’s even more alarming when you get to January first.
Well, we’ve made a couple of changes to help with that.
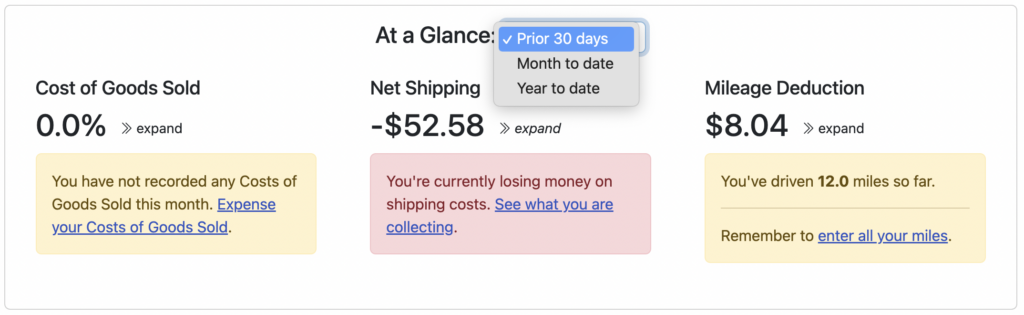
First, we now offer a few different time periods to choose from:
As you can see, instead of always being “Month to date”, you can now choose “Prior 30 days” and “Year to date”.
Second, we now default to “Prior 30 days” so that this section is likely to always have data displayed.
While a small change, we hope it helps avoid some confusion and adds value to the customer experience.
Are you thinking of switching from QuickBooks to Seller Ledger but are worried about losing historical data? Well, it turns out that we have started making it easy to take your QuickBooks transaction information and bring it over.
Mileage trips
We just built a simple tool to import all of your QuickBooks mileage history into Seller Ledger. All you need to do is export your trip history in a CSV format. Working with a customer recently, we found that the QuickBooks mileage file contains the following columns:
Date
Type
Trip Purpose
Vehicle
Start Address
End Address
Distance
Deduction
Logging Method
Now, because Seller Ledger is designed for small businesses who file a Schedule C, we don’t require as much information to be tracked. For example, we only care about “Business” trips, so don’t ask for a “Type” value (e.g. Business or Personal.) We also don’t ask you which vehicle you’re using. In fact, we only require the minimum information necessary to calculate your IRS standard mileage deduction:
Trip date
Description
Distance
Seller Ledger knows the right mileage rate based on your trip date, and we let you decide how you wish to calculate the distance drive.
In fact, if you send us a CSV file that includes value for just those 3 columns, we’ll be happy to help upload the data for you.
Is this a feature?
At the moment, we don’t have this functionality as a customer-facing feature within the application. In fact, our customer support team built a simple tool using our recently introduced API (which stands for “application programming interface.) For any technical users who might be interested, we published a step-by-step tutorial on exactly how to build such a tool.
So if your want to switch from QuickBooks to Seller Ledger, and could use help with your mileage information, shoot us an email at [email protected] and we’ll be happy to help.
And stay tuned for future updates on other ways to help you switch:)
To prove how easy it is to use Seller Ledger’s (brand) new API, we’ve thrown together a super lightweight web application that even a novice programmer could replicate.
Goal: create a way to load mileage data into a Seller Ledger account
As a simple use case, let’s take a request we’ve heard from a number of customers – how can I import mileage transactions that I have tracked elsewhere? Given that a number of mobile mileage trackers provide trip data in CSV format, we decided to create the simplest tool we could think of: a single web form where you can copy and paste some mileage data in CSV format and send it to your Seller Ledger account.
We’ll be doing this using Ruby on Rails as the framework for this tutorial.
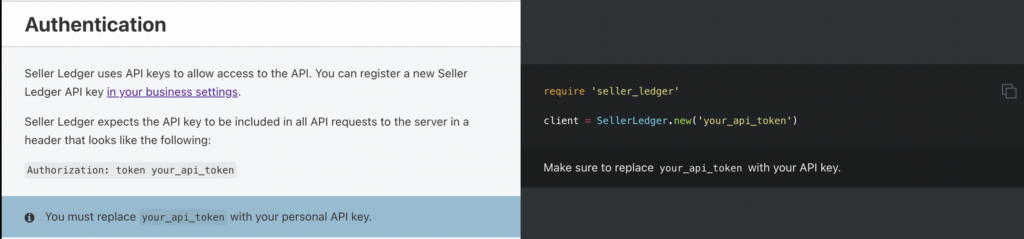
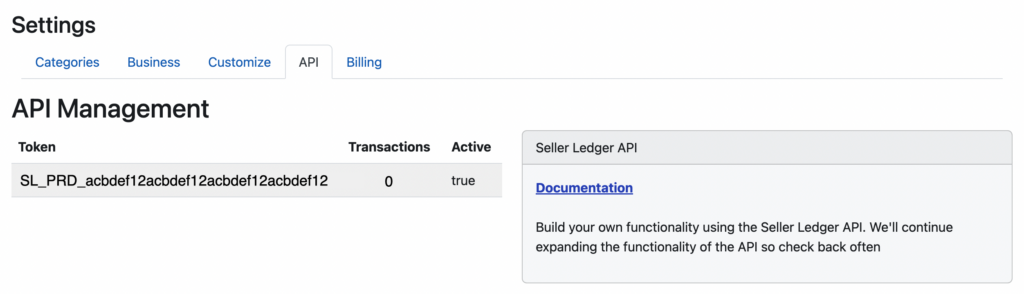
Step 1: Learn how to access a Seller Ledger account
Please be aware – the API token in the above screen shot is fake – it is not tied to a real account. Throughout this tutorial, you will need to use an actual Seller Ledger API token for this example to work.
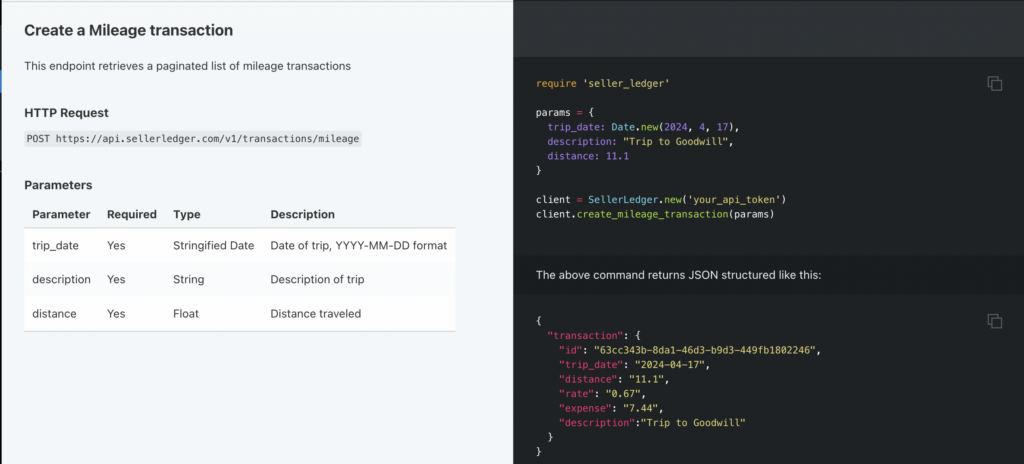
Step 2: Learn what information Seller Ledger expects in order to load mileage transactions
Looking again at the API documentation, creating a mileage transaction requires only 3 pieces of information and describes the format required:
Date of the trip
A description of the trip
Distance traveled
You don’t need to know the current IRS mileage rate . Seller Ledger has that information and does the calculation based on the date of the trip.
Step 3: build the simplest way to capture the information needed to load mileage data into Seller Ledger
So, it appears that we only need two type of information to update Seller Ledger with mileage data – an authentication token and the raw trip data itself. Let’s put that to the test. Time to start a new rails application:
rails new test-sl-mileage-app
Fortunately, Seller Ledger has published a Ruby gem to help develop against its API. The source code for that gem, and it’s readme is published on GitHub. Looking at the readme instructions, I can install that gem. Let’s go into the directory of our new rails app
cd test-sl-mileage-app/
and add the gem to our project
bundle add seller_ledger-ruby
Now, let’s do some blocking and tackling to get a page where you can enter the info. These are steps specific to building a lightweight rails app, so feel free to skip ahead if you’re already familiar. Let’s create a new “home” controller – which will be the only one we’ll need (and apologies in advance for not using proper design patterns:)
rails g controller home
Now, go update your routes file and edit the default root_url route:
change #root "articles#index" to root "home#index"
Make sure to add the index method to home_controller.rb
def index
end
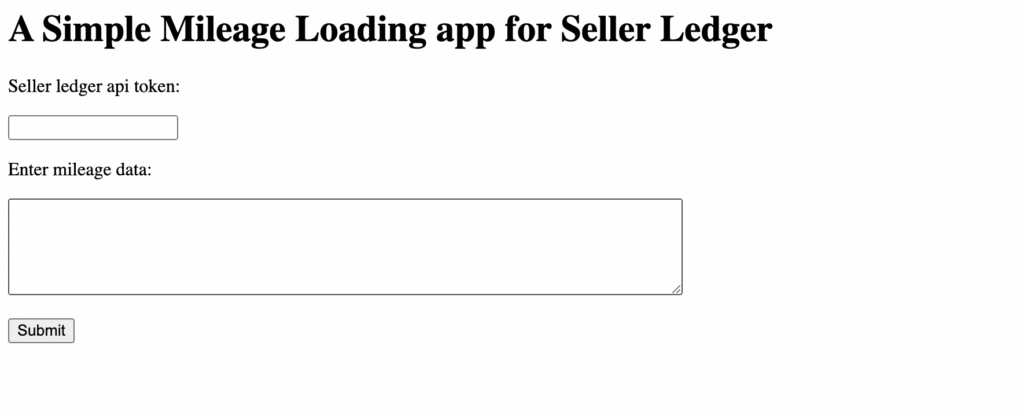
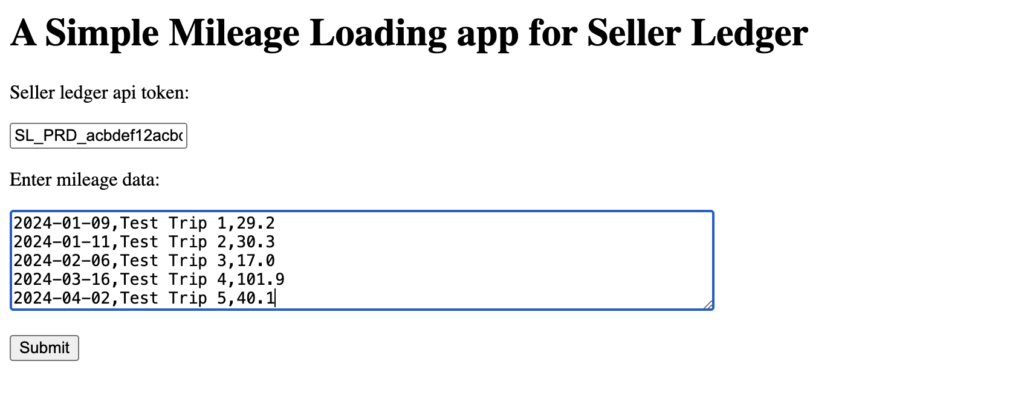
Now it’s time to build the actual HTML page at home#index to capture the important information. To keep things simple, include a single text box to request the API token, and a text field box where a user could paste in (or type, if s/he so desires) a bunch of csv data. Create a new view file under the home folder, called index.html.erb. And add the following basic HTML:
Voila – we see the following completely un-styled, yet potentially functional web page. This should allow us to capture the information needed to load multiple mileage trips into Seller Ledger
Before moving on to the next phase, add a route for that form’s post action in our routes.rb file. To keep things simple, we will put everything in the “home” controller.
post "load" => "home#load", :as => "load"
Step 4: Take the information from the web form, and push it into Seller Ledger
An easy first step here is to create a single Ruby service object (a PORO – or “plain old ruby object”) that takes an API token, initializes itself with it. The service object can then have a method that takes the raw csv data passed to it, parses it, and sends it to Seller Ledger. Create a “services” directory under the “app” folder and, inside that new folder, and create a new file. In this tutorial, we’re calling our object “Parser” and naming the file parser.rb.
class Parser

end
Now it’s time to create mileage transactions within Seller Ledger, so let’s take a look at that API documentation again.
Add the ‘require’ statement at the beginning of the object file. Also, create an initialize method that takes an API token as it’s parameter and creates a new Seller Ledger api client that can be used by the rest of our Parser object:
def initialize(token)
    @client = SellerLedger.new(token)
end
To see if this is working, let’s open ‘rails c’, create a token variable and see if we can initialize our new Parser object with it:
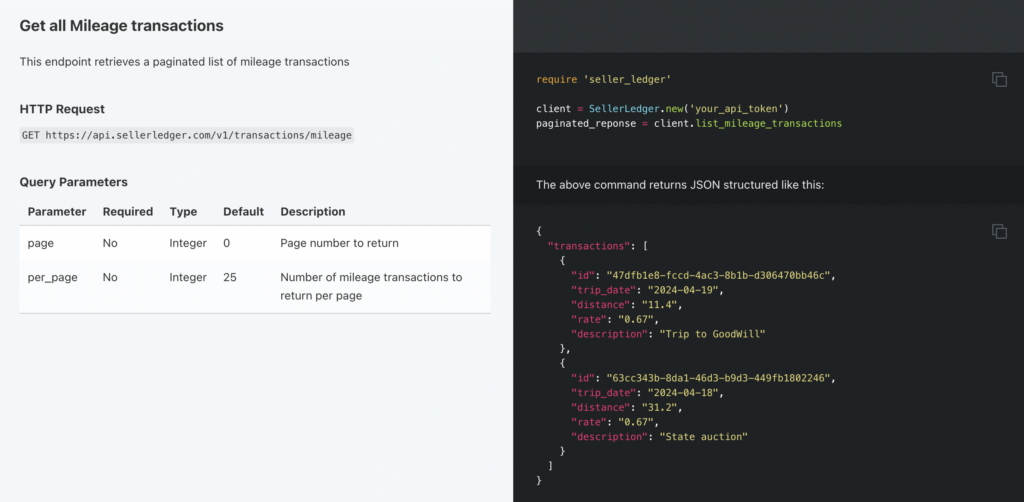
Bingo! Now, what’s the simplest thing we can test to see if our code is actually talking to Seller Ledger? Well, “Get all Mileage transactions” looks pretty straightforward:
Now let’s add a quick method to our Parser.rb file.
def list_mileage
    @client.list_mileage_transactions
end
Alrighty! Our lightweight web app is talking directly to Seller Ledger. Now, let’s add a “load” method in the “home” controller with some logic to grab the form data and get it ready to send to our Parser object:
def load
    token = params[:token]
    data = params[:data]
    p = Parser.new(token)
    @result = p.load(data)
end
We’re grabbing the token value from the form field and passing it in when we initialize the Parser object. We then grab the actual csv data from that form field and pass it to a new method that we’ll call “load”. And we’ll store the response from that method in an instance variable that we can show in the view.
Now, we just need to create that new “load” method in Parser.rb to grab the csv data, actually parse it, iterate over it, and pass the values into Seller Ledger:
def load(data)

    keys = ["trip_date", "description", "distance"]
    results = []
    data.each_line do |line|
        results << @client.create_mileage_transaction(Hash[keys.zip(line.chomp.split(","))])
    end
    return results
end
The approach used here was to create keys and build a hash using them for each line of input. We further assume no header information is provided in the CSV data, just the raw trip information. However, while iterating over the raw csv data, you could just as easily assign the parameters to pass into Seller Ledger individually like in the documentation.
Finally, let’s create a load.html.erb view file to show the returned results:
<h1>Results</h1>

<%= @result %>
Step 5: try it out
Go ahead and enter some simple csv formatted data into that web form, along with your API token (remember to use your actual token, not this fake one:)
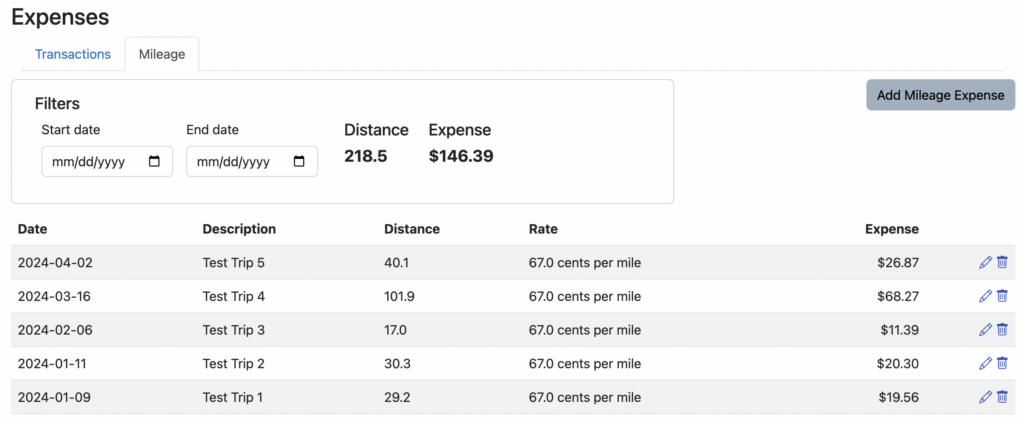
Hit “Submit” and….
Looks like we got a result with rates and calculated deduction amounts. Let’s check our Seller Ledger account’s Mileage transaction view:
There you have it. A super simple web app to load multiple mileage trips into Seller Ledger. It actually took far less time to create the app than it did to write this tutorial.