To better help you manage the products you sell, Seller Ledger has added a new view under the Inventory tab. In addition, for those of you who are not tracking inventory (i.e. using a “cash-based” approach) and writing off cost of goods sold directly, you’ll notice that the Inventory tab now has more useful features.
Finding your products
Clicking into the Inventory tab, you will see a new sub-tab called “Products”. For those of you already tracking inventory, it will show to the right of the other tabs.
For those of you writing off cost of goods directly, you’ll also have access to the new Products tab, just without the extra Inventory tabs:
Editing your products
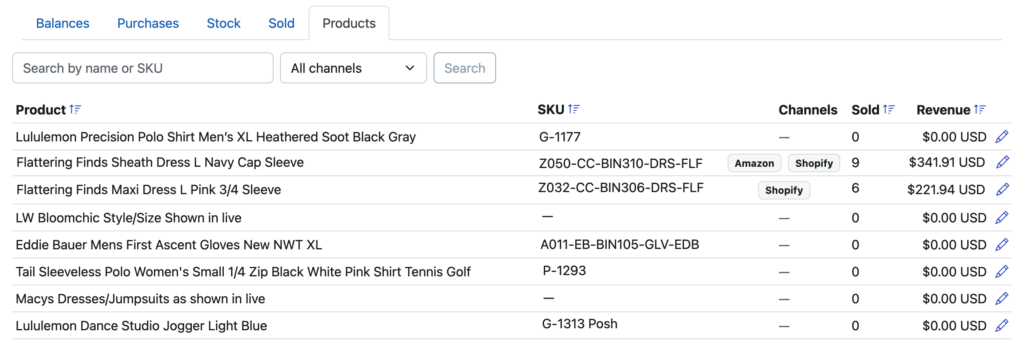
Click into your products tab to a see a list of every product that you have either sold or loaded purchase/cost information for. We show you each product’s name, SKU, how much has been sold and on what channels.
You can sort by product name, by SKU, number sold or revenue.
If you have multiple copies of the same product that use slightly different names, now you can correct that. The same holds for cases where you are missing SKUs or using the same SKU for different items. Correcting those makes it possible to fully automate your cost of goods sold and see your profit per order.
Ready to automate your eCommerce bookkeeping?
Join thousands of sellers who save hours every month with Seller Ledger.
Do you sell cards from top games like Magic: The Gathering, Pokémon, Yu-Gi-Oh!, One Piece and Disney Lorcana? Well, now there’s an easier way to track your sales and determine your profits. Using our updated Chrome browser extension, Seller Ledger will regularly import the key information you need to determine the profitability and taxes owed for your business, including:
Card and pack item prices
Shipping collected
Commissions
Transaction fees
Item fees
Payouts
Plus, if you track your inventory costs with unique SKUs, Seller Ledger will automatically tie those sales back to the item costs, reduce your inventory and update cost of goods sold.
Seller Ledger matches payouts to your bank deposits
Seller Ledger does something pretty powerful when we import your sales, fee and payout history from TCGplayer. We compare all imported transactions from TCGplayer to the payouts we receive and make sure the sum total of all of the transactions in the payout match the amount of each payout.
We even organize your transactions into two sections when you click into your TCGplayer account: “Not paid out” transactions and “Paid out” transactions. In fact, from the TCGplayer account summary view, you can click into any payout to see every single transaction that makes up that payout. This makes sure that your financial amounts from TCGplayer are accurate.
Lastly, if you choose to link your bank account to Seller Ledger, we will also automatically match the payouts that come from TCGplayer to the deposits when they show up in Seller Ledger. These are properly treated as transfers, so you avoid any risk of double counting.
How to automate your TCGplayer accounting
In order to link your TCGplayer account to Seller Ledger, you need only do the following:
1. You should use the Chrome browser when accessing Seller Ledger so that you can also make use of the second tool (below).
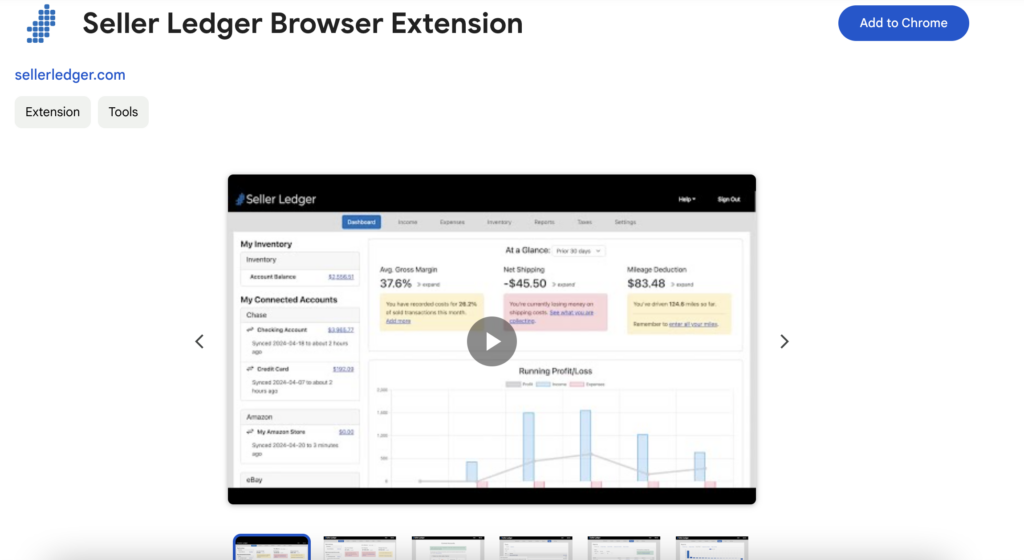
2. Once you are using Chrome, you will want to install Seller Ledger’s custom-built Browser Extension. This extension allows Seller Ledger to automatically pull down and import the proper transaction details.
Once you are properly set up, Seller Ledger will regularly access your TCGplayer account and retrieve the order, shipping, commission, fee, and payout information.
Ready to automate your eCommerce bookkeeping?
Join thousands of sellers who save hours every month with Seller Ledger.
For the first time since 2022, the IRS is upping the standard mileage rate mid-year. Self-employed individuals and businesses can now deduct $.76 per mile driven. This new rate is effective July 1, 2026 through the end of the year.
Don’t forget to track your miles and maximize your write-offs. And remember, Seller Ledger offers not only the ability to track mileage deductions, but we also let you upload them in bulk.
Ready to automate your eCommerce bookkeeping?
Join thousands of sellers who save hours every month with Seller Ledger.
In our continued efforts to simply eCommerce accounting, we’re pleased to announce the ability to sync your Square account with Seller Ledger. This provides the biggest step to better automate accounting for Square sellers.
As we did before with our Shopify integration, we allow Square sellers to bring in both online and point-of-sale transactions.
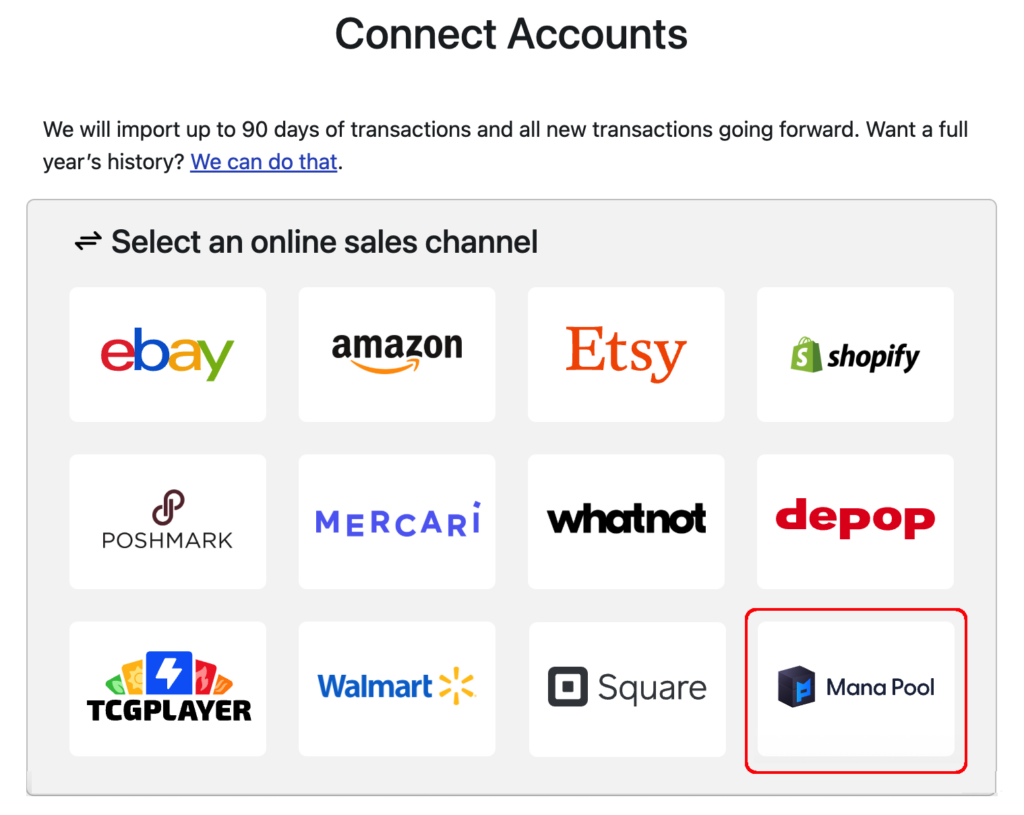
To link your Square account, simply click the “Add Channels, Banks and Accounts” button on your dashboard. Then, click the Square logo:
Log in to Square and, once you are returned to Seller Ledger, we will begin importing you transaction history. Doing so will allow us to bring in sales, returns, fees and even sales tax that you may have collected – all broken out in detail and summarized to help you with tax filing.
And as with any new functionality, we’d love to hear any constructive feedback you might have. Email us at [email protected].
Ready to automate your eCommerce bookkeeping?
Join thousands of sellers who save hours every month with Seller Ledger.
Have your own eCommerce store? Do you sell in person or at fairs? Do you have nexus in a state that still requires you to file sales tax returns? If so, we have some great news – Seller Ledger now helps you manage sales tax.
While large eCommerce marketplaces like Amazon, Walmart, eBay and Etsy started collecting and remitting sales tax for sellers a while back, there are still a number of cases where you may still need to collect, remit and file sales tax returns.
Top reasons to still deal with sales tax
Online store
If you have an online storefront or website where you sell products or services, you will likely have to collect and remit taxes in states where you have nexus (more on the notion of nexus in a bit)
In-person sales
As with an online storefront, if you sell in person and meet a state’s nexus requirement, you will have to collect, file and remit sales tax.
Zero Dollar returns
Even if 100% of your sales are through marketplaces that remit taxes for you, there are still a number of states that require you (subject to their nexus laws) to file a return stating your gross income, even if you owe $0.00 in sales tax due. Those states include: California, Florida, Illinois, Michigan, Minnesota, Ohio and Texas.
How Seller Ledger Helps
Economic nexus determination
In the old days, before the Supreme Court ruling in South Dakota v. Wayfair, the primary way to determine if you needed to collect and remit sales tax within a state was through “physical” nexus – either having a company facility (including Amazon FBA warehouse inventory) or employees located within that state.
However, since the ruling, states have rolled out a number of new ways to require collection and remittance of sales tax, the largest of which is the idea of “economic” nexus. This means, if you sell more than a certain amount to buyers in a state, you qualify as having nexus and need to collect and remit.
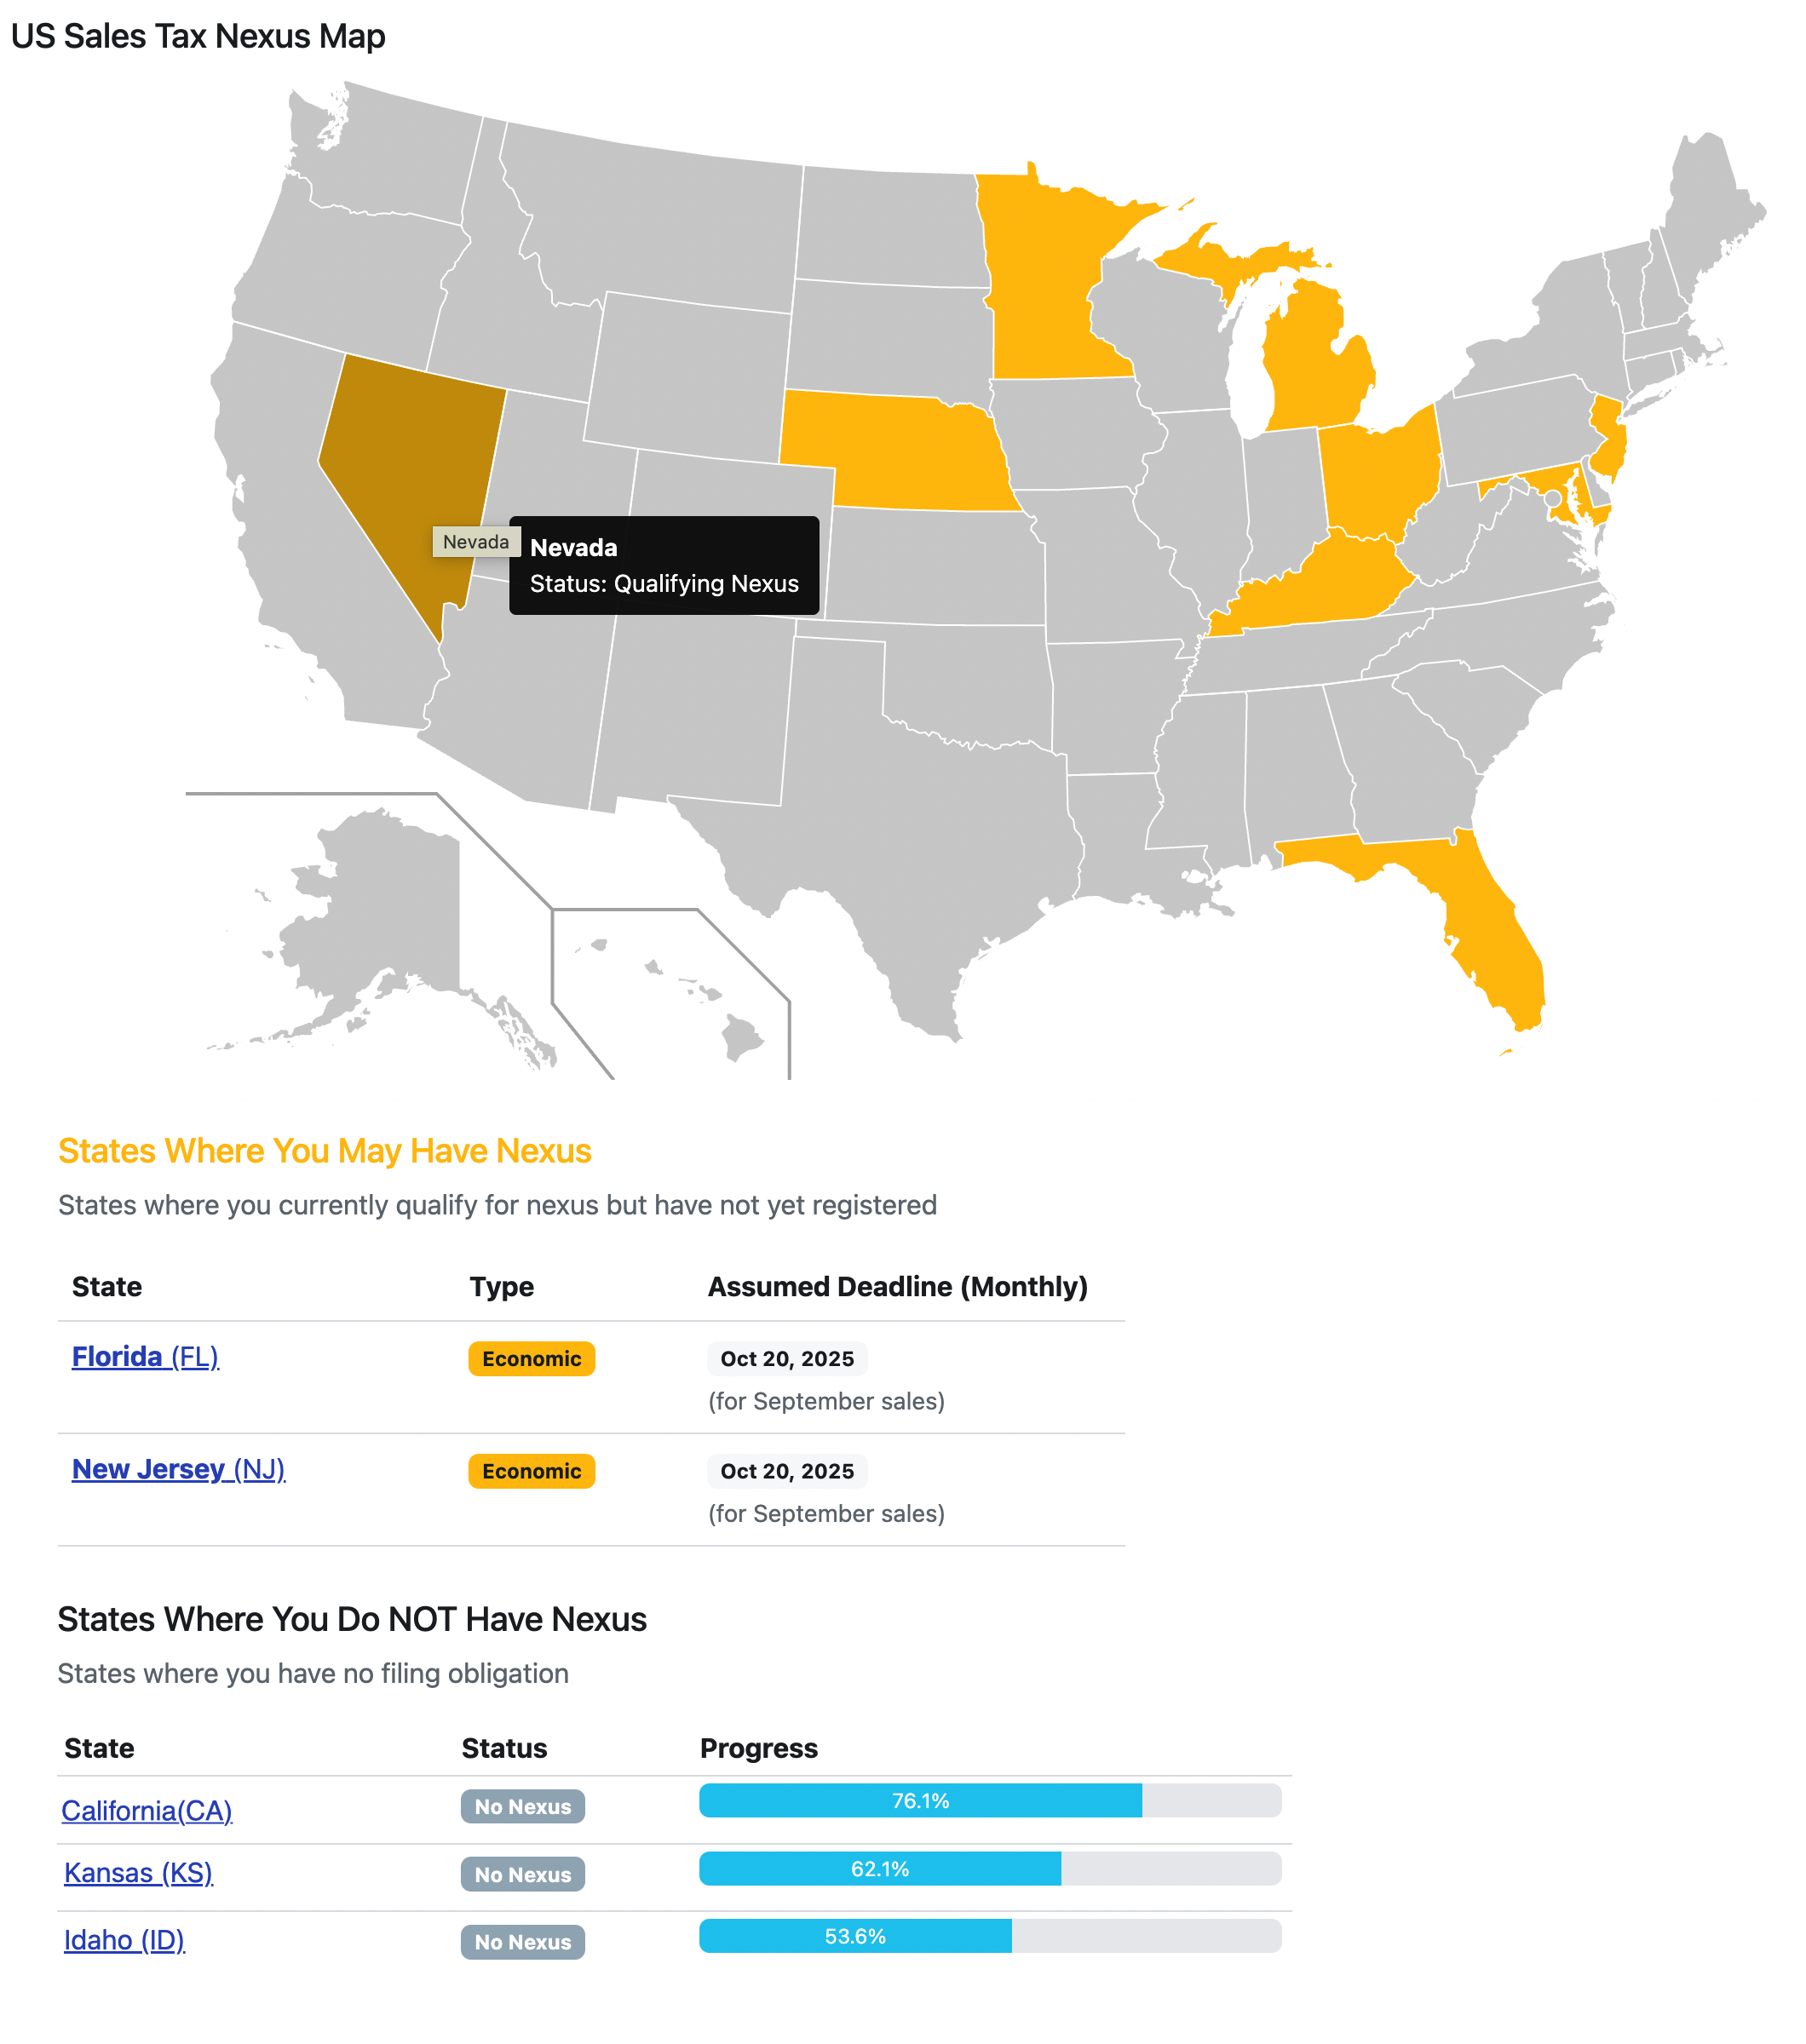
Fortunately, you don’t need to worry about those thresholds. Seller Ledger tracks all of those rules and will alert you if you have exceeded the threshold in any state, as well as if you are getting close. Just click on the new Taxes -> Sales Tax sub-tab and see a map of the US with any potential nexus states highlighted:
Jurisdiction-level reports
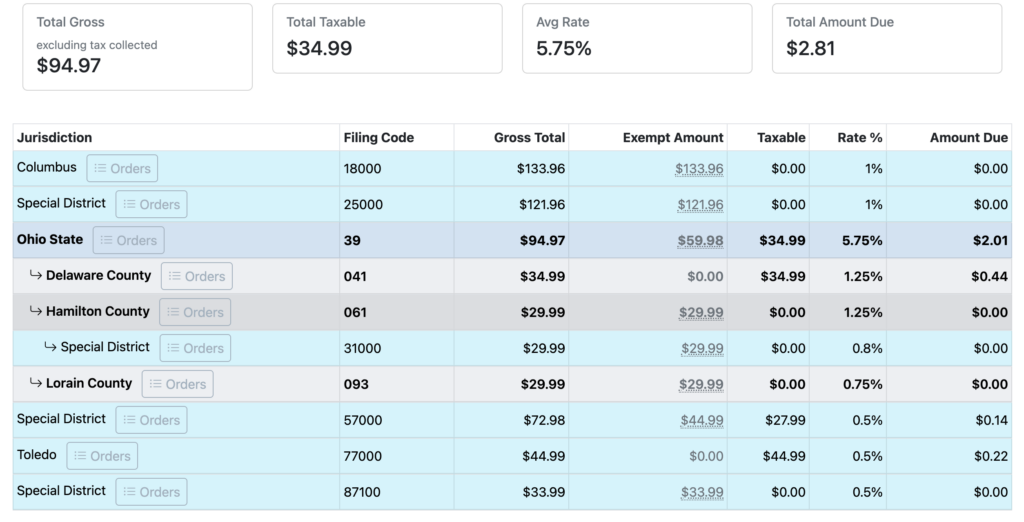
Once you’ve determined that you do need to collect and remit sales tax within a state, Seller Ledger will also provide you with the jurisdiction-level information necessary to file a sales tax return
What about filing?
At the moment, Seller Ledger does not yet provide electronic filing of sales tax returns. But we have plans to add filing and currently allow you to join a waitlist for each state.
Does Seller Ledger offer sales tax calculations?
That is an excellent question. The short answer is – soon. Stay tuned.
Ready to automate your eCommerce bookkeeping?
Join thousands of sellers who save hours every month with Seller Ledger.
One of the most powerful things about eCommerce is the ability to sell to customers all around the world. Yet one of the most challenging aspects of that is dealing with all the different currencies and the record keeping that comes with that.
Fortunately, Seller Ledger is excited to announce the availability of multi-currency support for eCommerce merchants.
The challenges
To help illustrate the financial complexity, let’s take the example of a North American Amazon seller. When you sell on Amazon to customers in Canada and Mexico, Amazon treats all of those transactions separately from your US-based sales. They issue payouts for those sales (minus expenses) in their native currencies. They also provide their “Activity reports” in those native currencies. This creates a couple of interesting challenges:
1. Reconciling payouts to bank deposits
Even though Amazon issues payouts in their native currencies, when they hit your bank account, you will see them show up in US dollars. But how do you know which deposit goes with the corresponding payout from Amazon? How do you reconcile a payout of $2,316.43 MXN to a deposit of $123.80 USD?
2. Reporting on your business in a single currency?
Even if you can figure out how to match foreign currency payouts to US dollar deposits, how do you look at a single profit and loss statement (or other financial report) that shows an apples-to-apples comparison of sales and expenses?
Automate your eCommerce bookkeeping with Seller Ledger.
How Seller Ledger handles foreign currency transactions
Seller Ledger now uses currency exchange rates to translate foreign currency amounts to US dollars. To see this in action, simply click into your account from the dashboard and scroll down to any non-US transactions, and you’ll see them in both USD and the original native currency underneath:
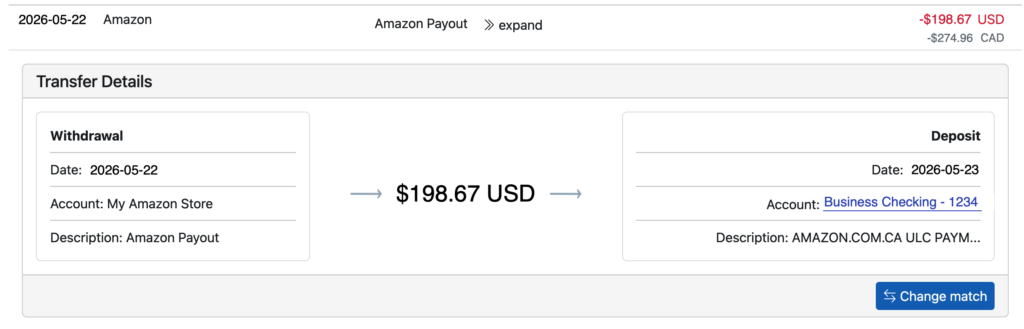
And when you find a payout, we provide you with even more details. Click “expand” next to a payout that you see in your marketplace account and you’ll see it matched to a deposit in your linked bank account:
What about differences from the exchange rate?
That’s an excellent question and we’re so glad we brought it up. Because exchange rates change all the time, and Amazon doesn’t provide the exact rate used at the time of each transaction, we use the daily “spot rate” to convert amounts from their native currencies to US dollars. And discrepancies end up going under a new category: Foreign Exchange Gain or Loss. This category rolls up to Line 27a: Other expenses on the Schedule C tax form. It will show as a negative number if you lost money overall on the conversion (and as a positive number if you were fortunate enough to benefit from the conversion).
As with many brand-new features, we have released this functionality in a “beta” status, meaning there may be bugs or edge cases that we don’t yet support well. But as with everything else we release, we make updates quickly based on customer feedback. So please let us know.
All included…at no additional cost
Unlike some other accounting platforms, who may require a higher tier to access multi-currency, raise prices frequently and STILL require you to use a third party connector like A2X in order to handle the reconciliation, Seller Ledger just handles it within the software, at the same price as your normal plan. No forced upgrades. No additional software subscriptions. Just a single, affordable solution. So decide for yourself which accounting software works best for Amazon sellers.
Ready to automate your eCommerce bookkeeping?
Join thousands of sellers who save hours every month with Seller Ledger.
A while back, we wrote a pretty in-depth blog post about consignment sales and 1099-Ks. Since then, we’ve had a number of questions from customers about how to properly track consignment sales in Seller Ledger. And we’ve added a LOT of functionality to make that easier, so let’s dive right in.
Consigned items are not technically your inventory…
The first thing to realize when dealing with consignment sales, is that, even if you are temporarily taking possession of the items to sell, they do not count as your inventory because they never belong to you. As such, they would not normally be part of your business’s inventory for accounting purposes.
However, online sellers often treat consigned items similar to their own inventory because they receive the items, list them for sale, accept the customer payments, and then try to figure out the profits to be shared. Marketplaces also include all of those sales in their 1099-K to sellers, as they can’t tell the difference between a seller’s own inventory item listed or sale and a consigned item.
Fortunately, Seller Ledger provides a way for consignment sellers to handle this case.
Treat your consigned item as inventory with $0.00 cost
So long as you are using either periodic or continuous inventory tracking, you can simply record your consigned items as inventory with a $0.00 cost. This ensures that the per-order profit reflects only those costs needed to sell the item, which can then be used to accurately calculate the commission owed to the consignor.
The trade-off
The one caveat with this technique is that it will skew the total gross profit numbers for your business. Consigned items will effectively look like they generate 100% gross margin, and when included with the rest of your personal sales, will make your overall numbers look better than they likely are.
How do I calculate the net profit of each sale?
Most consignees (the people doing the selling on behalf of someone else) negotiate payment terms based on the money earned AFTER subtracting costs like shipping and fees. Normally, this requires a lot of time spent in spreadsheets. But for many online sales channels, Seller Ledger does this for you automatically. We import the sale price, any shipping label costs, order-related fees – everything. See how we do it for eBay, Amazon, Walmart and other platforms.
In this case, let’s say you were doing a 50/50 split with the consignor. That would mean sending her/him $15.74.
In fact, we have a report that you can look at to see the net profit by product across all sales – the Gross and Net Profit report.
Pro tip
If you use unique SKUs but include a shared code in those SKUs for consigned items, you can search on that SKU in the gross and net profit report to see just your consigned items. For example, if every consigned item starts with “CONS-“, just search on those letters and the report will filter to just those sales. This is also a good work-around for letting you see business-wide gross profit for consigned vs non-consigned items.
Categorizing consignor payments
As mentioned earlier, the items you sell on behalf of your consignor do not count as inventory. Then the question becomes, how do you treat those payments? As mentioned in that prior blog post, the most common category we see used is “Commissions & fees.” By making sure each of those payments gets categorized that way, you have legitimate expenses to reduce your taxable income from consignment sales that may show up on your 1099k.
Frequency of payments
The odds are, you don’t want to have to be sending lots of small to midsize payments to a consignor, especially if you start scaling your consignment business. It would be better to keep track of what you owe each consignor and then send them payment on a regular basis when the amount owed hits a certain level. So how do you do that?
Well, it’s pretty easy. The phrase “how much you owe” should provide a clue. We just need to create a new “accounts payable” liability account that will keep track of how much you owe, and then when you pay it.
Automate your eCommerce bookkeeping with Seller Ledger.
To start, go to the Settings -> Accounts in your Seller Ledger account (or click “Manage accounts” on your Dashboard):
Scroll down the page a bit and click the button to “Add Liability Account.” Then, select “Accounts Payable” as the Account Type, pick a name and, optionally, a start date and opening balance.
If you sell items for more than one consignor, you might think about creating an account for each one of them. But as you’ll see, you can track all of your consignor payments in a single account too.
Now that you have created an account for tracking consignment amounts owed, click into it from your Seller Ledger dashboard to see options for recording bills and payments. Each time an item sells, and you calculate the commission based on the net profits we outlined earlier, simply click the button to “Record a bill” and enter the details for that commission amount. Don’t forget to categorize the amount owed as “Commission and fees.”
As you sell more items for this consignor, continue to record those commissions within this account. You will see your account balance grow over time:
Tracking commission payments
Now, when it comes time to send a payment to your consignor, you have a couple of choices on how to do it. If you have a linked bank account where your payment is imported, you can categorize the payment amount as “Transfer: Consignment: Joes Garage”. Or, if you don’t have a linked bank account, just click into this account, click the “Make a Payment” button, and record the payment details. Because we have multiple commissions to be paid out, we can click the “Apply to balance” option.
Click “Record Payment” and voila – you have paid all of the outstanding money owed to your consignor. And better yet, you get to determine how often you make those payments.
Ready to automate your eCommerce bookkeeping?
Join thousands of sellers who save hours every month with Seller Ledger.
As we recently announced with improved support for invoice tracking, we are also announcing similar improvements to tracking bills (a.k.a. money you owe to other people).
For those sellers that may pay vendors on Net 30 terms, or for consignment sellers, this new functionality should come in pretty handy.
Tracking bills
The first thing you need to do is to create a new account to track your bills. In accounting parlance, these are “accounts payable.” Again, go to Settings -> Accounts (or click on the “Manage accounts” link in the lower left part of your Seller Ledger dashboard). Scroll down the page to the Liabilities section and click the “Add Liability Account” button:
Next, choose the account type “Accounts Payable”, name your account, set an optional start date and opening balance, and you’re ready to start tracking bills.
Once you have created an account for tracking bills due, click into it from your Seller Ledger dashboard to see options for recording bills and payments.
Click the button to Record a Bill, fill out the details and click save.
Record payment of a bill
Very similar to how it works with Invoices, you have a couple of different ways to record payment of a bill. From within your linked bank account (or credit card,) you can categorize the payment amount as “Transfer: Bills Due”. When you do, you’ll see an extra button pop up to “Apply to Outstanding Bill”.
If you click that button, you’ll be shown any outstanding bills to which you can apply that payment.
If you don’t have your payment account linked to Seller Ledger, you can always click back into the Bills Due account, click the “Make a payment” button and record it that way.
Ready to automate your eCommerce bookkeeping?
Join thousands of sellers who save hours every month with Seller Ledger.
As we continue to improve the product based on customer feedback, today we’re announcing the release of improvements to tracking invoices. In accounting parlance, this involves accounts receivable (money owed to you) accounts.
Why would I need to track invoices?
For many small sellers, cash-based accounting works quite well. You simply recognize income and expenses when you receive or spend the money. But as your business grows, you may choose to use more of an accrual model, where you recognize income when you make the sale, since payment can come a bit later. For that, you’ll need some new accounts.
Tracking invoices
To track invoices in Seller Ledger, you’ll want to create a new account. Go to Settings -> Accounts, or just click “Manage accounts” at the bottom of the account list on your dashboard.
Click the “Add Asset Account” button to see the following:
Choose “Accounts Receivable” as the type, give the account a name and, optionally, a start date, and you’ve created an account that will let you keep track of the money people owe you.
Now, once you’ve created your invoice account just click into it to start recording invoice transactions.
At the top of the screen, you’ll see buttons to “Add an Invoice” or “Receive a Payment”
Click “Add an Invoice” and you’ll see a screen like the following:
You can even split the invoice amount into multiple categories if you would like.
Tracking invoice payments
When a customer pays an invoice, you can record that payment in a few different ways.
If you have connected the bank account where checks and payments get deposited, you should see the payment for an invoice show up there. Simply click to categorize that payment as a transfer to the new Invoices account.
Notice that, as soon as you choose the Transfer: Invoices option, a button appears to allow you to “Apply to Outstanding Invoice.” Click that and you can mark the specific invoice as having been paid.
And if you don’t have a connected bank account, just click into the Invoice account and choose the “Receive a payment” button.
Invoice amount tracking only
At the present time, Seller Ledger only allows you to track the amounts of your invoices. We do not provide electronic sending of invoices. Not do we yet support the ability for customers to pay your invoices electronically.
Ready to automate your eCommerce bookkeeping?
Join thousands of sellers who save hours every month with Seller Ledger.
Amazon’s announcement of a new 3.5% fuel surcharge is a whopper of a hit for Amazon sellers’ profits. It sounds expensive as a cost taken out of your top line, but it is even worse when considered in the context of a seller’s net profits.
Prior to the surcharge, there were already a number of different Amazon fee types that could be taken out of a seller’s revenue. Some of these fees are charged as standard monthly fees and others are charged on a per-item basis. That makes it hard to understand the costs associated with any given sale. Given the volumes and complexity, you may need an automated accounting software tool designed for eCommerce to get a true handle on what it’s really costing you to sell.
What does it cost to sell a $100 item on Amazon?
Here’s an illustrative example. Let’s take an Amazon seller with an item that sells for $100.
Inventory Cost
Often the largest cost of selling an item on Amazon is the inventory cost itself, what the seller had to pay in order to acquire the item. Let’s say they purchase it for $50 and are reselling it for $100 on Amazon. This $50 inventory cost is typically referred to as Cost of Goods Sold.
Monthly Amazon Fees
Sellers have to pay $39.99/month as a professional seller or $0.99 per item as an individual seller in order to sell on the platform. Let’s assume our seller is selling 100 items per month on the professional plan, so that monthly fee would work out to $0.39 per item sold.
If they are using Fulfillment by Amazon (FBA) they will also pay monthly storage fees for their inventory to be stored in Amazon’s warehouses. These fees go up if inventory has been stored too long, is oversized, or is dangerous. The fees also go up depending on the time of year when the inventory is being stored, with October-December more expensive to handle the peak holiday volumes. Storage in January-September for standard goods might cost $0.78 per cubic foot of inventory stored, plus an Aged Inventory Surcharge starting at $0.50 per cubic foot for items stored longer than 180 days. If our $100 item takes up one cubic foot and has not been stored longer than 180 days, it would cost $0.78 per month to store.
With these two monthly costs, we’re at a total of $0.39 + $0.78, or $1.17 in total monthly costs for our $100 item. For the sake of simplicity, let’s say the item was only stored for 1 month and this is our total FBA storage cost (though in many cases inventory must be stored longer than this.)
Per-Item Fees
Amazon charges a Referral Fee of anywhere from 8-17% depending on the category in which the item is sold, with a minimum $0.30 fee in most categories. Let’s assume our $100 item is something in the Toys & Games category, which is 15%. Our $100 item would cost $15 in Referral Fees.
FBA Fulfillment Fees are also charged on a per-item basis. These fees range significantly depending on the size and weight of the item as well as other factors. For the sake of simplicity, let’s say we have a “Large Standard” item and we’re paying approximately $5.50 to have Amazon fulfill this shipment for us.
FBA Fulfillment Fees are where the new 3.5% fuel surcharge fee has been added. We’ll hold that cost out for now and show how that impacts Net Profit at the end of this article.
Amazon Advertising Fees
It used to be enough to list your products on a well-established marketplace to drive sales, but in today’s world, it often requires paying advertising fees in order to generate visibility to those listings as well. Advertising on Amazon is sold on a Cost-Per-Click (CPC) basis and costs can range from $0.60 per click in a Low-Competition category to over $5.00 per click in a more competitive space. It’s not uncommon for a seller to pay an additional $15-$30 in Advertising to get a $100 item to sell, though they probably can’t be doing this across all their inventory and remain profitable.
In addition, there are overhead fees to advertising. Agencies to manage your advertising often charge 10-15% of advertising fees. For sponsored brands campaigns, things like high quality photography and ad creative development can be quite expensive.
For simplicity, let’s say advertising costs $5 all in for our $100 item.
Additional Amazon Fees
In addition to the standard fees listed above, there are many additional things Amazon charges for including Inbound Placement Fees, to move your inventory between Amazon Warehouses, Low Inventory Fees, when a high-velocity product becomes low in stock, Returns Processing Fees, Removal Order Fees, when you request your inventory is returned to you, Label Order Fees, when Amazon labels your products for you, and more. For today’s example, we won’t include any of these fees, but they are very real costs of doing business for an Amazon seller.
Net Profit, BEFORE the 3.5% Fuel Surcharge
What is net profit? It’s how much money you’ve made after all of your costs have been taken into account.
In our example of the $100 item sale, we’ve now accounted for the following fees:
$50.00 Inventory / Cost of Goods Sold $0.39 Amazon Professional Sellers Fee $0.78 monthly FBA Storage Fee $15.00 Amazon Referral Fee $5.50 FBA Fulfillment Fee $5.00 Advertising Fees
$76.67 Costs
On our $100 sale, this is a Net Profit of $23.33.
Net Profit, AFTER the 3.5% Fuel Surcharge
If our $100 item has an additional 3.5% Fuel Surcharge, which is calculated on the full cost of the $100 sale, that would be an additional $3.50 in cost.
After the Fuel Surcharge, Net Profit is $19.83. If our seller was making $23.33 before, and now they’re only making $19.83, that is a 15% reduction in Net Profit.
Outsized impact on Net Margin
Your NET PROFIT will drop by 15% in this case
With razor thin margins and massive competition on Amazon already, this is a huge change.
How Can Sellers Understand What this Fee Change Actually Means for their Profits
This was just an illustrative example, and fees on Amazon are very complex. Each seller needs to truly understand their own economics on Amazon in order to know how significant an impact this change will have for them.
The most effective way to truly understand your profits on Amazon is to use an automated accounting software, designed for eCommerce, that will capture the full details of your costs of selling and roll these up to enable you to accurately view your net profit.
Seller Ledger is an automated accounting platform that was designed from the ground up for eCommerce. Sellers can link their Amazon selling account for automated importing and categorization of all Amazon revenues and fees. They can also link their bank accounts and business credit cards to import other costs and sources of revenue. Seller Ledger’s net profit feature allows sellers to see these costs aggregated and understand their net profit. Pricing for Seller Ledger starts at $10/month and there is a 30 day Free trial, no credit card required.
What Can I Do About My Net Profit?
While we can’t solve marginal cost inflation, sourcing cost inflation, tariffs or other increases in your costs, what we can do is offer a lower-cost accounting solution that helps you get full visibility to your numbers at a fraction of the cost of alternatives. We offer a solution that is significantly cheaper than classic accounting software like QuickBooks or Xero, and doesn’t require third-party connectors like A2X or Link My Books to see your eCommerce detail. Give it a try today for FREE, and see if this is a way to claw back some of your net profit.
Ready to automate your eCommerce bookkeeping?
Join thousands of sellers who save hours every month with Seller Ledger.