Do you sell cards from top games like Magic: The Gathering, Pokémon, Yu-Gi-Oh!, One Piece and Disney Lorcana? Well, now there’s an easier way to track your sales and determine your profits. Using our updated Chrome browser extension, Seller Ledger will regularly import the key information you need to determine the profitability and taxes owed for your business, including:
Card and pack item prices
Shipping collected
Commissions
Transaction fees
Item fees
Payouts
Plus, if you track your inventory costs with unique SKUs, Seller Ledger will automatically tie those sales back to the item costs, reduce your inventory and update cost of goods sold.
Seller Ledger matches payouts to your bank deposits
Seller Ledger does something pretty powerful when we import your sales, fee and payout history from TCGplayer. We compare all imported transactions from TCGplayer to the payouts we receive and make sure the sum total of all of the transactions in the payout match the amount of each payout.
We even organize your transactions into two sections when you click into your TCGplayer account: “Not paid out” transactions and “Paid out” transactions. In fact, from the TCGplayer account summary view, you can click into any payout to see every single transaction that makes up that payout. This makes sure that your financial amounts from TCGplayer are accurate.
Lastly, if you choose to link your bank account to Seller Ledger, we will also automatically match the payouts that come from TCGplayer to the deposits when they show up in Seller Ledger. These are properly treated as transfers, so you avoid any risk of double counting.
How to automate your TCGplayer accounting
In order to link your TCGplayer account to Seller Ledger, you need only do the following:
1. You should use the Chrome browser when accessing Seller Ledger so that you can also make use of the second tool (below).
2. Once you are using Chrome, you will want to install Seller Ledger’s custom-built Browser Extension. This extension allows Seller Ledger to automatically pull down and import the proper transaction details.
Once you are properly set up, Seller Ledger will regularly access your TCGplayer account and retrieve the order, shipping, commission, fee, and payout information.
Ready to automate your eCommerce bookkeeping?
Join thousands of sellers who save hours every month with Seller Ledger.
Seller Ledger recently announced the ability to help eCommerce sellers track and report on their sales tax obligations. To make that possible, we built out a full sales tax engine, complete with state and local jurisdiction-level breakdowns. Now we are making that functionality available to developers and potential partners through the release of a sales tax calculations endpoint in our API.
How to calculate sales tax
To accurately calculate the sales tax on an eCommerce order, you need to know a number of things:
The amount of each item within an order
Whether shipping was collected from the customer and whether it is taxable
The shipping address of the purchasing customer
The states where you have nexus (physical or economic)
The sourcing rules for a given order
Whether the specific item is subject to any special tax rules or exemptions
Fortunately, Seller Ledger makes all of that simple. We automatically track nexus for you based on your account. And we make it very easy to submit the necessary information to our API to get the right amount to collect. If you collect enough information to properly fulfill an order, you will have enough information to tell Seller Ledger what it needs to know.
Coming soon: Product taxability
As of the date of this post, we are still working on a comprehensive set of product taxability rules. Stay tuned for that release.
Get the full breakdown
Because we have a pretty extensive history in sales tax (our founders ran product and engineering for TaxJar,) we know that a single tax amount isn’t sufficient for all clients. So, our API returns not only the total amount of sales tax due on an order, but we also break it down by how much is owed to each jurisdiction, including:
State amount collected
County amount collected
City amount collected
Special district amount collected
To learn more about our new sales tax calculations endpoint, visit our API documentation.
Pricing for sales tax calculations is the exact same as it is for Seller Ledger. We simply charge you based on the number of monthly transactions you have flow through our system. Plans start at $10 per month with a 30-day free trial.
Ready to automate your eCommerce bookkeeping?
Join thousands of sellers who save hours every month with Seller Ledger.
In our continued efforts to simply eCommerce accounting, we’re pleased to announce the ability to sync your Square account with Seller Ledger. This provides the biggest step to better automate accounting for Square sellers.
As we did before with our Shopify integration, we allow Square sellers to bring in both online and point-of-sale transactions.
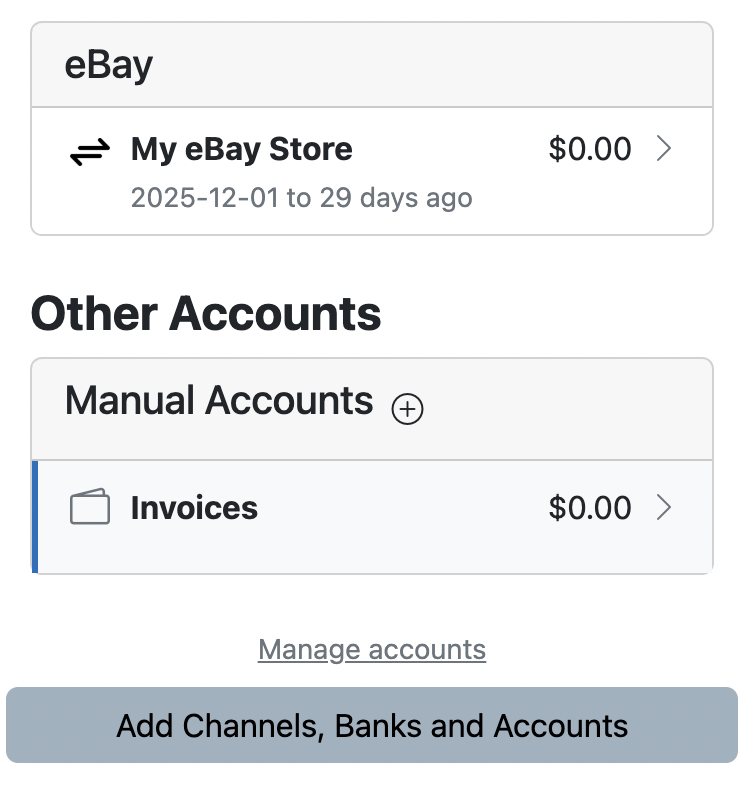
To link your Square account, simply click the “Add Channels, Banks and Accounts” button on your dashboard. Then, click the Square logo:
Log in to Square and, once you are returned to Seller Ledger, we will begin importing you transaction history. Doing so will allow us to bring in sales, returns, fees and even sales tax that you may have collected – all broken out in detail and summarized to help you with tax filing.
And as with any new functionality, we’d love to hear any constructive feedback you might have. Email us at [email protected].
Ready to automate your eCommerce bookkeeping?
Join thousands of sellers who save hours every month with Seller Ledger.
A while back, we wrote a pretty in-depth blog post about consignment sales and 1099-Ks. Since then, we’ve had a number of questions from customers about how to properly track consignment sales in Seller Ledger. And we’ve added a LOT of functionality to make that easier, so let’s dive right in.
Consigned items are not technically your inventory…
The first thing to realize when dealing with consignment sales, is that, even if you are temporarily taking possession of the items to sell, they do not count as your inventory because they never belong to you. As such, they would not normally be part of your business’s inventory for accounting purposes.
However, online sellers often treat consigned items similar to their own inventory because they receive the items, list them for sale, accept the customer payments, and then try to figure out the profits to be shared. Marketplaces also include all of those sales in their 1099-K to sellers, as they can’t tell the difference between a seller’s own inventory item listed or sale and a consigned item.
Fortunately, Seller Ledger provides a way for consignment sellers to handle this case.
Treat your consigned item as inventory with $0.00 cost
So long as you are using either periodic or continuous inventory tracking, you can simply record your consigned items as inventory with a $0.00 cost. This ensures that the per-order profit reflects only those costs needed to sell the item, which can then be used to accurately calculate the commission owed to the consignor.
The trade-off
The one caveat with this technique is that it will skew the total gross profit numbers for your business. Consigned items will effectively look like they generate 100% gross margin, and when included with the rest of your personal sales, will make your overall numbers look better than they likely are.
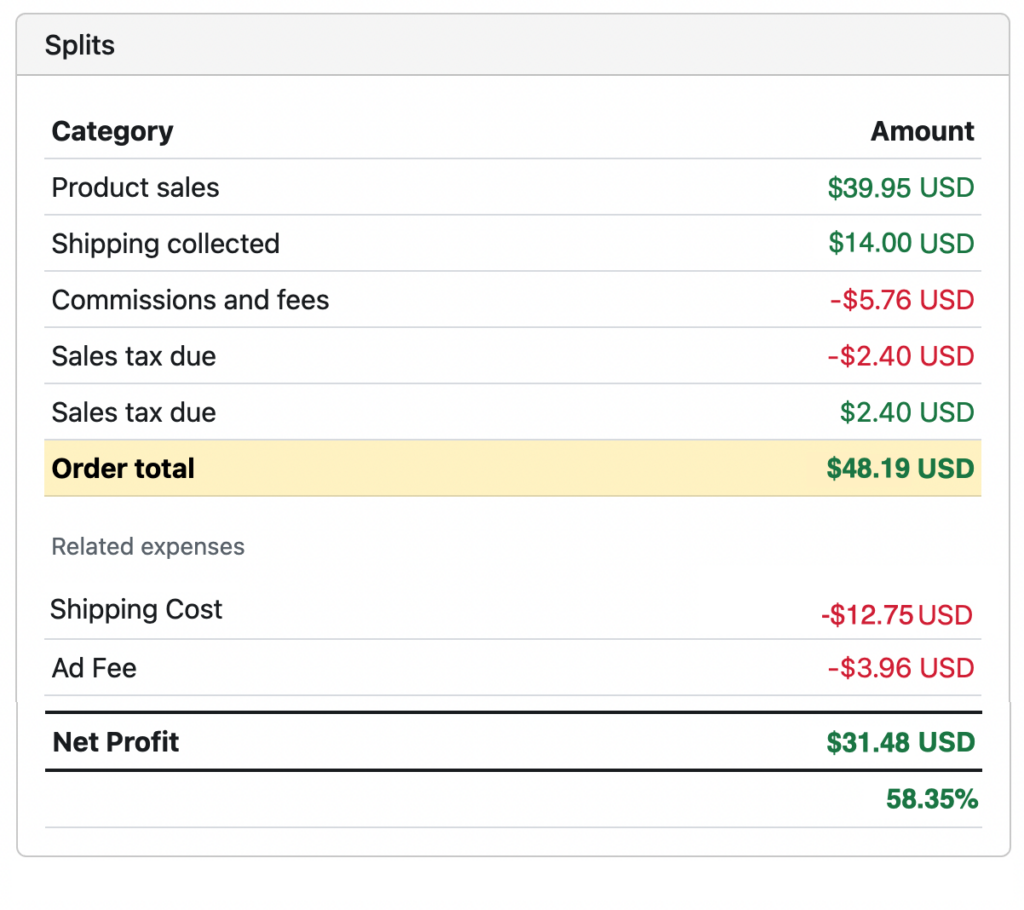
How do I calculate the net profit of each sale?
Most consignees (the people doing the selling on behalf of someone else) negotiate payment terms based on the money earned AFTER subtracting costs like shipping and fees. Normally, this requires a lot of time spent in spreadsheets. But for many online sales channels, Seller Ledger does this for you automatically. We import the sale price, any shipping label costs, order-related fees – everything. See how we do it for eBay, Amazon, Walmart and other platforms.
In this case, let’s say you were doing a 50/50 split with the consignor. That would mean sending her/him $15.74.
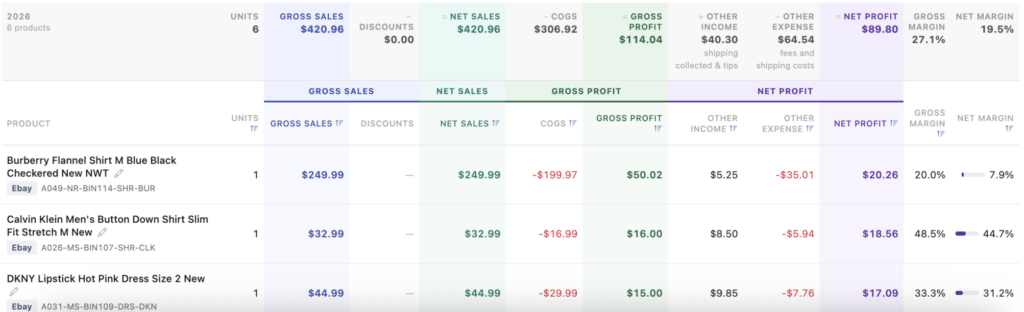
In fact, we have a report that you can look at to see the net profit by product across all sales – the Gross and Net Profit report.
Pro tip
If you use unique SKUs but include a shared code in those SKUs for consigned items, you can search on that SKU in the gross and net profit report to see just your consigned items. For example, if every consigned item starts with “CONS-“, just search on those letters and the report will filter to just those sales. This is also a good work-around for letting you see business-wide gross profit for consigned vs non-consigned items.
Categorizing consignor payments
As mentioned earlier, the items you sell on behalf of your consignor do not count as inventory. Then the question becomes, how do you treat those payments? As mentioned in that prior blog post, the most common category we see used is “Commissions & fees.” By making sure each of those payments gets categorized that way, you have legitimate expenses to reduce your taxable income from consignment sales that may show up on your 1099k.
Frequency of payments
The odds are, you don’t want to have to be sending lots of small to midsize payments to a consignor, especially if you start scaling your consignment business. It would be better to keep track of what you owe each consignor and then send them payment on a regular basis when the amount owed hits a certain level. So how do you do that?
Well, it’s pretty easy. The phrase “how much you owe” should provide a clue. We just need to create a new “accounts payable” liability account that will keep track of how much you owe, and then when you pay it.
Automate your eCommerce bookkeeping with Seller Ledger.
To start, go to the Settings -> Accounts in your Seller Ledger account (or click “Manage accounts” on your Dashboard):
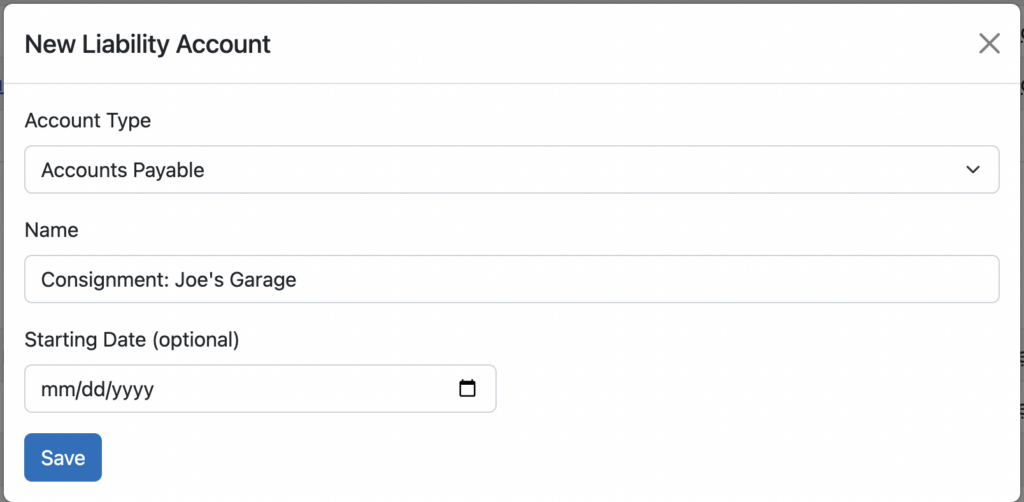
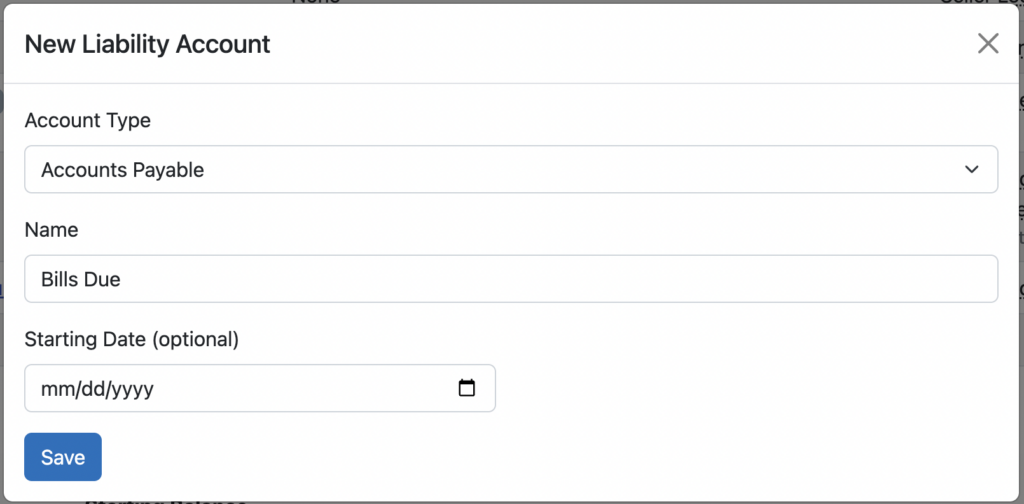
Scroll down the page a bit and click the button to “Add Liability Account.” Then, select “Accounts Payable” as the Account Type, pick a name and, optionally, a start date and opening balance.
If you sell items for more than one consignor, you might think about creating an account for each one of them. But as you’ll see, you can track all of your consignor payments in a single account too.
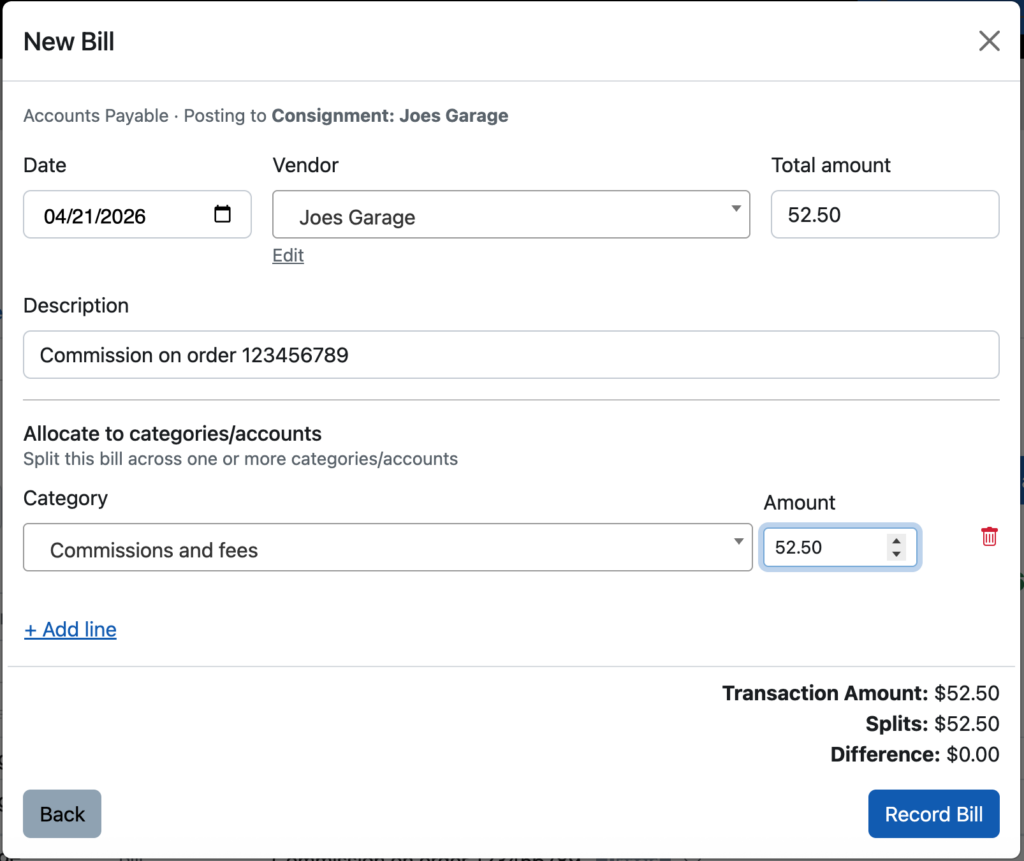
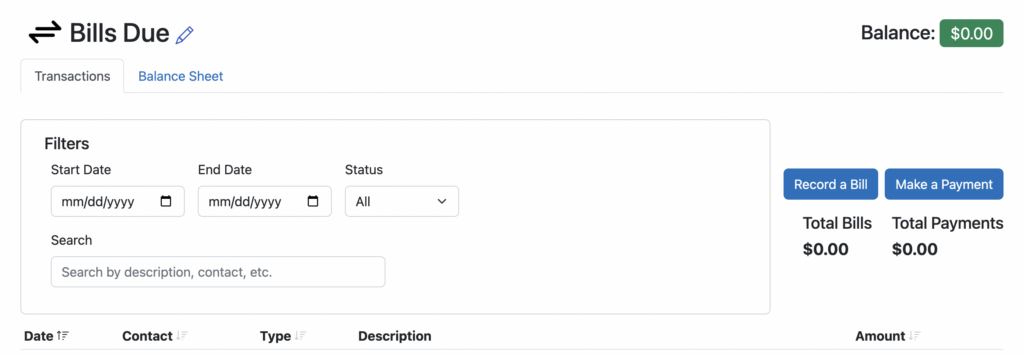
Now that you have created an account for tracking consignment amounts owed, click into it from your Seller Ledger dashboard to see options for recording bills and payments. Each time an item sells, and you calculate the commission based on the net profits we outlined earlier, simply click the button to “Record a bill” and enter the details for that commission amount. Don’t forget to categorize the amount owed as “Commission and fees.”
As you sell more items for this consignor, continue to record those commissions within this account. You will see your account balance grow over time:
Tracking commission payments
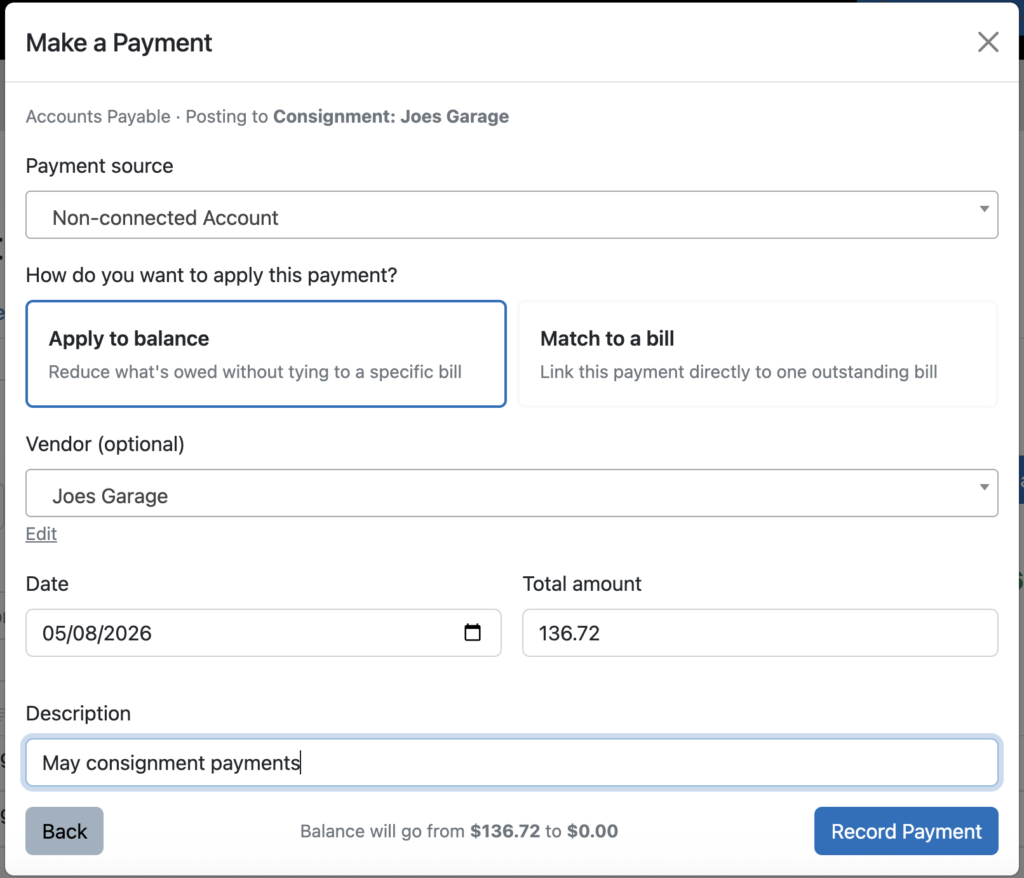
Now, when it comes time to send a payment to your consignor, you have a couple of choices on how to do it. If you have a linked bank account where your payment is imported, you can categorize the payment amount as “Transfer: Consignment: Joes Garage”. Or, if you don’t have a linked bank account, just click into this account, click the “Make a Payment” button, and record the payment details. Because we have multiple commissions to be paid out, we can click the “Apply to balance” option.
Click “Record Payment” and voila – you have paid all of the outstanding money owed to your consignor. And better yet, you get to determine how often you make those payments.
Ready to automate your eCommerce bookkeeping?
Join thousands of sellers who save hours every month with Seller Ledger.
As we recently announced with improved support for invoice tracking, we are also announcing similar improvements to tracking bills (a.k.a. money you owe to other people).
For those sellers that may pay vendors on Net 30 terms, or for consignment sellers, this new functionality should come in pretty handy.
Tracking bills
The first thing you need to do is to create a new account to track your bills. In accounting parlance, these are “accounts payable.” Again, go to Settings -> Accounts (or click on the “Manage accounts” link in the lower left part of your Seller Ledger dashboard). Scroll down the page to the Liabilities section and click the “Add Liability Account” button:
Next, choose the account type “Accounts Payable”, name your account, set an optional start date and opening balance, and you’re ready to start tracking bills.
Once you have created an account for tracking bills due, click into it from your Seller Ledger dashboard to see options for recording bills and payments.
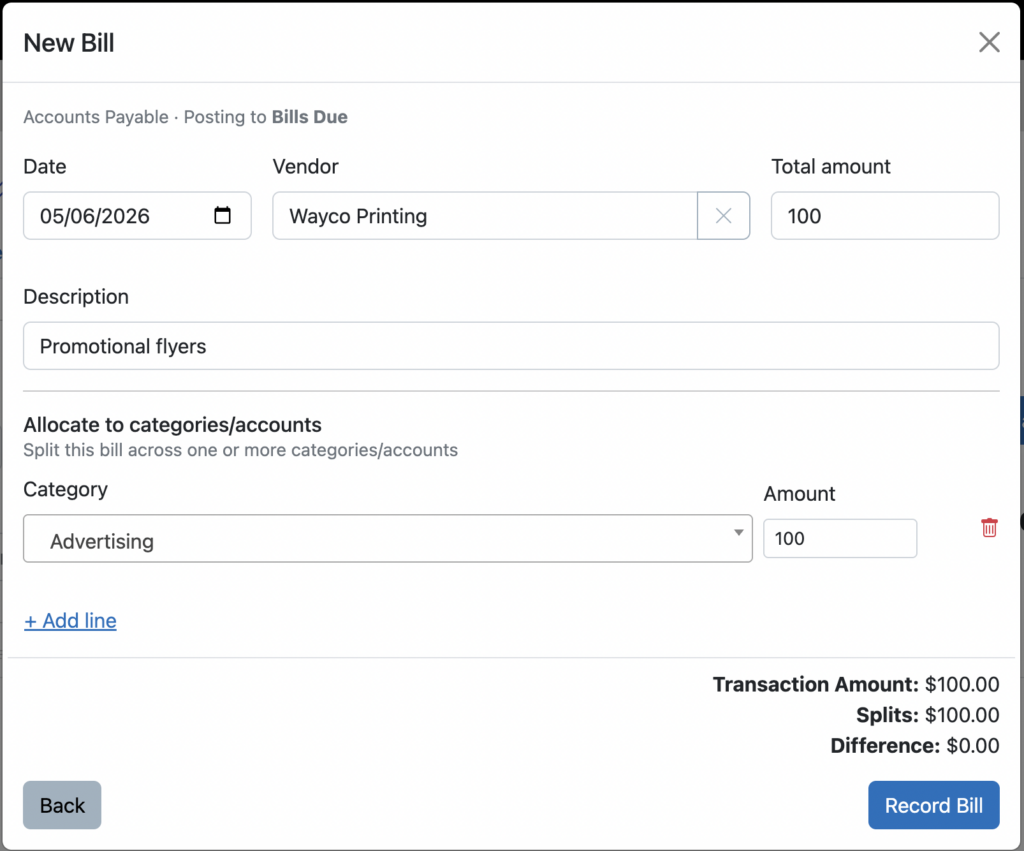
Click the button to Record a Bill, fill out the details and click save.
Record payment of a bill
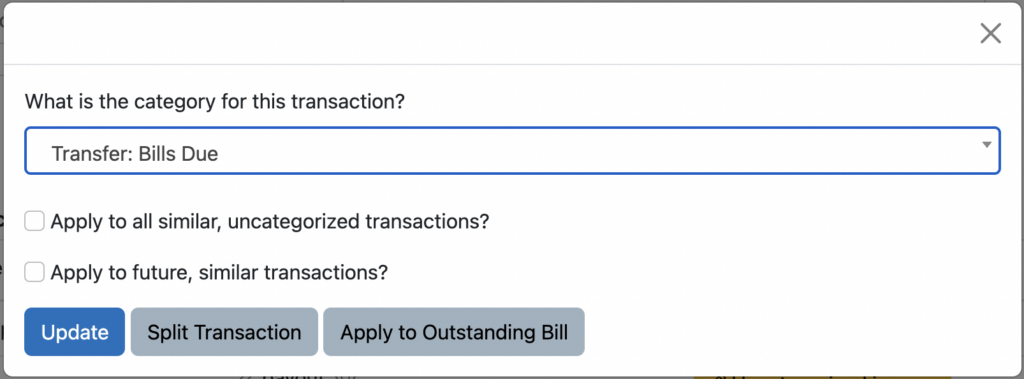
Very similar to how it works with Invoices, you have a couple of different ways to record payment of a bill. From within your linked bank account (or credit card,) you can categorize the payment amount as “Transfer: Bills Due”. When you do, you’ll see an extra button pop up to “Apply to Outstanding Bill”.
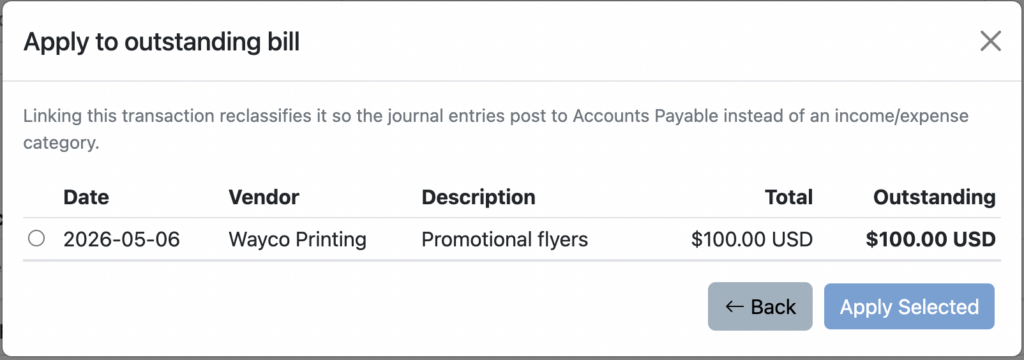
If you click that button, you’ll be shown any outstanding bills to which you can apply that payment.
If you don’t have your payment account linked to Seller Ledger, you can always click back into the Bills Due account, click the “Make a payment” button and record it that way.
Ready to automate your eCommerce bookkeeping?
Join thousands of sellers who save hours every month with Seller Ledger.
As we continue to improve the product based on customer feedback, today we’re announcing the release of improvements to tracking invoices. In accounting parlance, this involves accounts receivable (money owed to you) accounts.
Why would I need to track invoices?
For many small sellers, cash-based accounting works quite well. You simply recognize income and expenses when you receive or spend the money. But as your business grows, you may choose to use more of an accrual model, where you recognize income when you make the sale, since payment can come a bit later. For that, you’ll need some new accounts.
Tracking invoices
To track invoices in Seller Ledger, you’ll want to create a new account. Go to Settings -> Accounts, or just click “Manage accounts” at the bottom of the account list on your dashboard.
Click the “Add Asset Account” button to see the following:
Choose “Accounts Receivable” as the type, give the account a name and, optionally, a start date, and you’ve created an account that will let you keep track of the money people owe you.
Now, once you’ve created your invoice account just click into it to start recording invoice transactions.
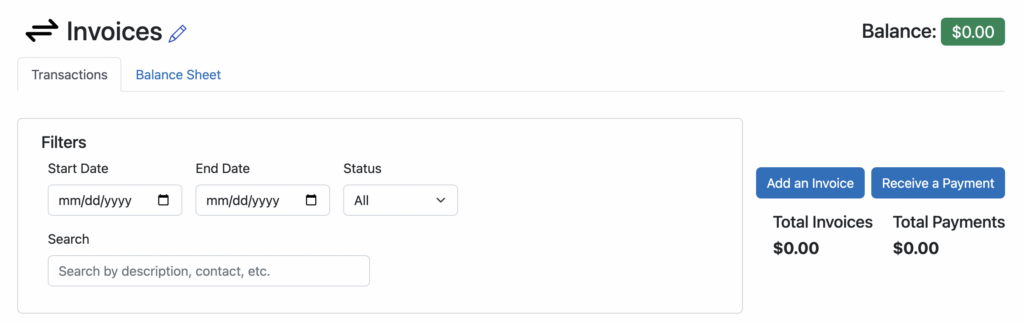
At the top of the screen, you’ll see buttons to “Add an Invoice” or “Receive a Payment”
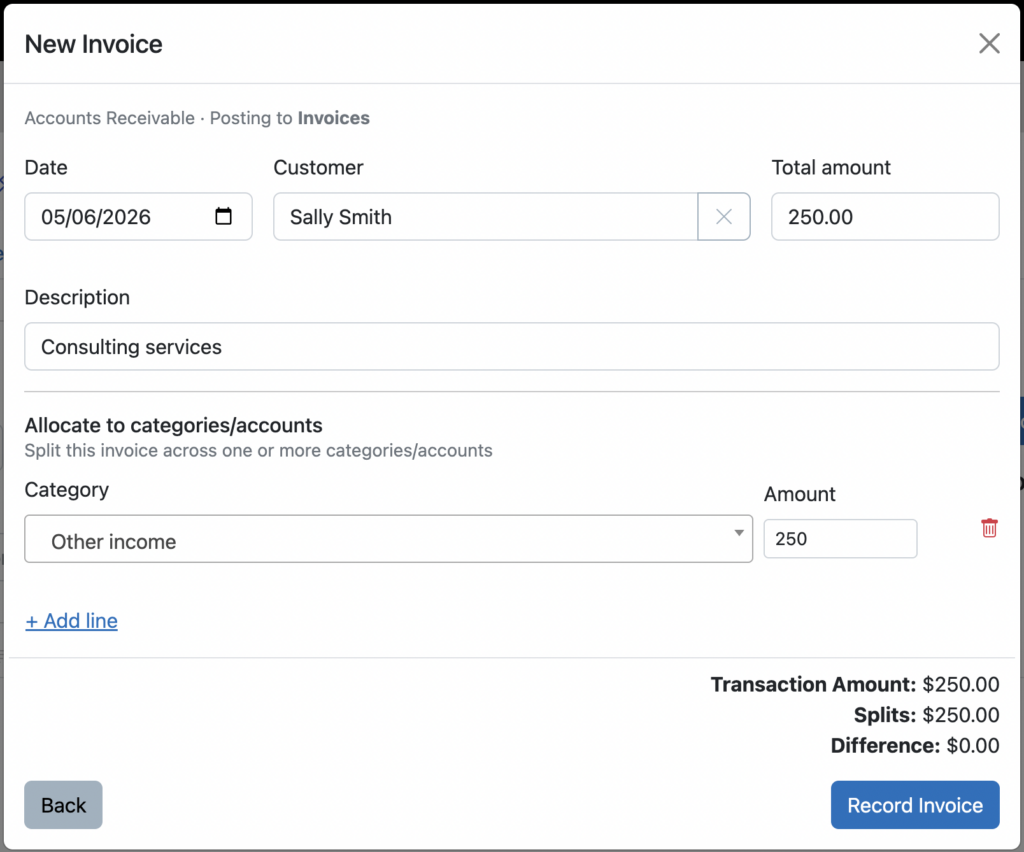
Click “Add an Invoice” and you’ll see a screen like the following:
You can even split the invoice amount into multiple categories if you would like.
Tracking invoice payments
When a customer pays an invoice, you can record that payment in a few different ways.
If you have connected the bank account where checks and payments get deposited, you should see the payment for an invoice show up there. Simply click to categorize that payment as a transfer to the new Invoices account.
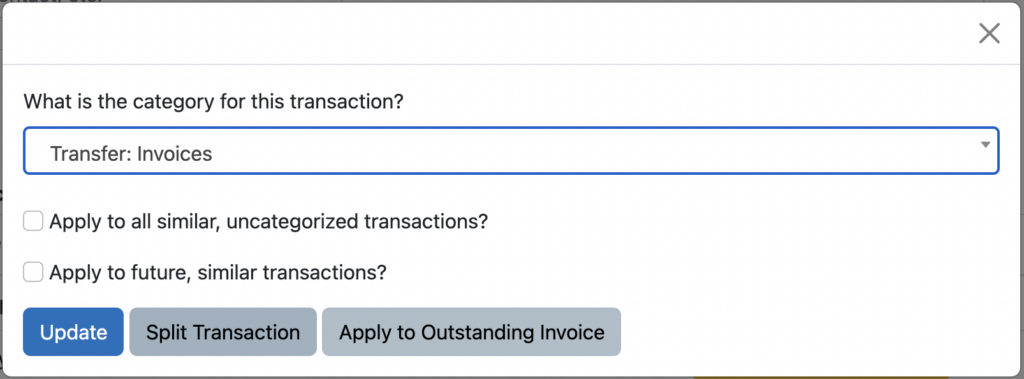
Notice that, as soon as you choose the Transfer: Invoices option, a button appears to allow you to “Apply to Outstanding Invoice.” Click that and you can mark the specific invoice as having been paid.
And if you don’t have a connected bank account, just click into the Invoice account and choose the “Receive a payment” button.
Invoice amount tracking only
At the present time, Seller Ledger only allows you to track the amounts of your invoices. We do not provide electronic sending of invoices. Not do we yet support the ability for customers to pay your invoices electronically.
Ready to automate your eCommerce bookkeeping?
Join thousands of sellers who save hours every month with Seller Ledger.
As bigger companies have started using Seller Ledger, we’ve started to get more requests to provide access to multiple team members. Well, we now have that!
Like we did when rolling out access for accounting professionals, Seller Ledger account owners can grant access to other team members. The same permission restrictions apply – team members will be unable to do the following:
Add or remove connected accounts, banks or credit cards
Change your billing information
Change your business name
To add a team member, simply go to Settings -> Business and click the button to “Add Team Member”.
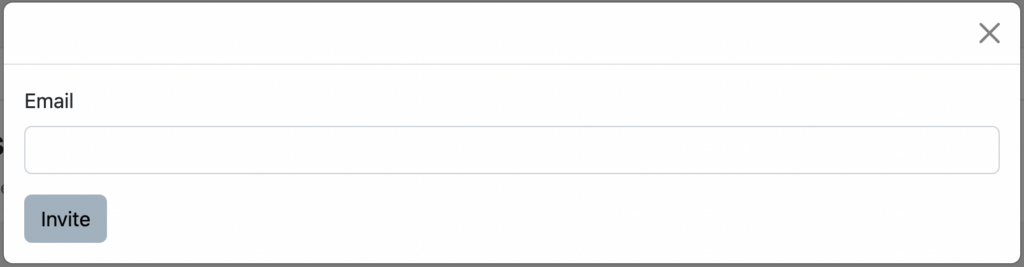
This will pull up a form asking for an email address. Just enter that and click “Invite”.
That’s it. Your team member will receive an invitation to create an account on Seller Ledger to access your business books.
And, just like with accounting professionals, you can revoke access at any time. And there are no additional costs for using this feature.
Ready to automate your eCommerce bookkeeping?
Join thousands of sellers who save hours every month with Seller Ledger.
Handling transfers between accounts is one of the most basic elements of proper accounting. In the world of eCommerce sellers, this includes payouts that get withdrawn from a marketplace account, like Amazon or eBay, and get deposited into your bank account. It also includes transactions like payments from your bank account to a credit card account. Because these transactions represent money that moves between accounts, they don’t impact your profit and loss. Making sure that they are treated properly is critical to accurate record-keeping, so you don’t end up double counting anything.
Seller Ledger does a great job of automatically recognizing transfers between different accounts and matching them. However, sometimes, due to timing issues with banks, or even potential mistakes made by customers, these automatic matches of transactions can get mixed up. To help with these cases, we’ve rolled out some improved functionality.
Match to a specific transaction
Let’s take an example of a credit card payment from your business checking account. You may have categorized it as a transfer to the correct credit card account, but it’s not showing as matched.
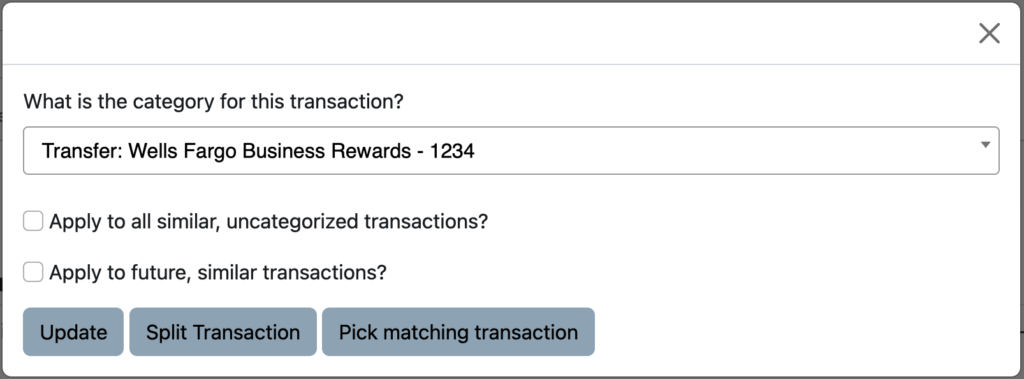
To help with that, just click the edit/pencil icon next to the current “Transfer” category. It will bring up a new “categorize” pop-up with a new option to “Pick matching transactions”.
Click that button and Seller Ledger will now show you any transactions that match that same amount across different accounts you have in the software. In this case, it finds the payment made on that Wells Fargo credit card.
Just select the transaction, click “Match Selected”, and you’re all set.
Ready to automate your eCommerce bookkeeping?
Join thousands of sellers who save hours every month with Seller Ledger.
Since we launched, Seller Ledger has automatically imported up to 90 days of transaction history from connected marketplaces, eCommerce platforms, banks and credit cards. This was designed to give everyone a chance to really get to see how the software works for them, on real data, during the 30-day free trial.
However, a number of customers over the years have asked for the ability to choose a specific start date. This has been most prevalent at the beginning of tax years, as customers like to start “fresh” (often after switching from more expensive, more complex solutions:)
Setting your own start date
While Seller Ledger still imports 90 days automatically, it is now super simple to go in and change, on connected-account by connect-account basis, when you would like data to import from.
First, just click on the connected accounts whose import start date you’d like to change:
Next, click on the edit/pencil icon at the top of the account view:
You’ll see a new option to choose a start date. Just pick the start date you’d like:
Click “Save” and you’re all set.
If you had any transactions prior to the new date you’ve entered, they will be deleted from the system. If you don’t want those older transactions deleted, DO NOT set a more current date than you want transactions for.
Billing limitations still apply
If you are just starting a free trial, you won’t be able to enter a date from the start of the prior tax year (or longer.)
Ready to automate your eCommerce bookkeeping?
Join thousands of sellers who save hours every month with Seller Ledger.
As we have done with both eBay and Amazon, we also recently released the ability for Walmart customers to view the NET profit on each order.
Walmart profit per order
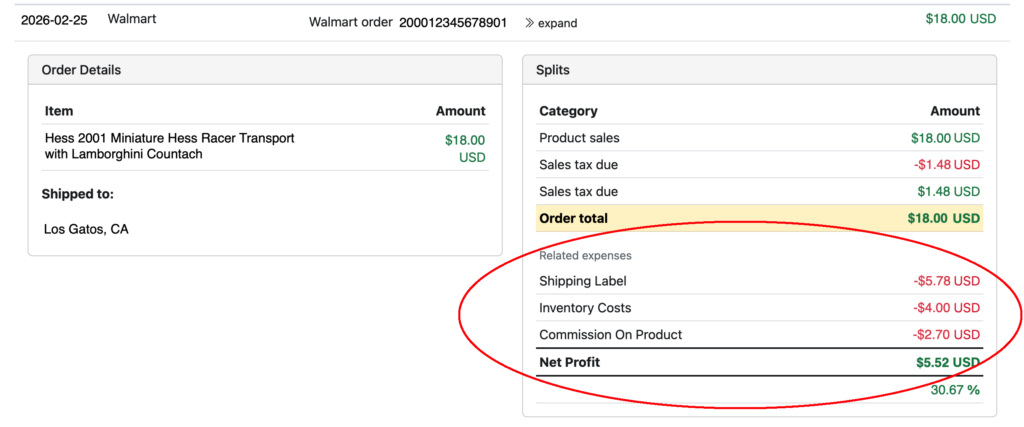
Click the “>>expand” link next to any order in your Walmart account. Under the category split totals that make up that order, you will see a new “related expenses” section that includes other fees and expenses that are tied to that order. This includes the Walmart commission charged for that order. In addition, if you purchase shipping labels through Walmart, we include that too.
Lastly, as mentioned when rolling out our Gross Profit report, if you track your inventory costs at the item level and use unique SKUs for each of your Walmart items, we will match those costs to the correct item. That, plus the other related expenses, helps you see the true NET profit for each order on Walmart.
If you are a Walmart seller who’d like this kind of visibility and automation in your accounting, give Seller Ledger a try. We offer a 30-day free trial, no credit card required.
Ready to automate your eCommerce bookkeeping?
Join thousands of sellers who save hours every month with Seller Ledger.