When we first launched our Whatnot integration, the only sales data available to Whatnot sellers was their Ledger history. Customers could download those reports and then upload the CSV-formatted files to Seller Ledger. Since then, Whatnot has added weekly order reports, which provide much more transaction detail, including:
Item prices
Coupon costs
Shipping costs
Commission fees
Payment processing fees
To take advantage of that, Seller Ledger has rolled out new functionality to automate Whatnot accounting. Customers no longer need to download files from Whatnot and upload them to Seller Ledger. All of that is taken care of.
How to automate your Whatnot accounting
In order to fully automate your Whatnot account within Seller Ledger, you only need two things:
1. You should use the Chrome browser when accessing Seller Ledger so that you can also make use of the second tool (below).
2. Once you are using Chrome, you will want to install Seller Ledger’s custom-built Browser Extension. This extension allows Seller Ledger to automatically pull down and import the proper transaction details.
They say imitation is the sincerest form of flattery. Well, here’s another form of flattery, though perhaps less sincere. We discovered yesterday that QuickBooks is buying Google ads against our product name.
We take that as a compliment, because it must mean that they would like to reach prospective eCommerce customers who are searching for us. That is quite flattering, considering they:
Are significantly larger than our company
Have been around a lot longer than us
Have had years (decades?) to try to enhance their software in ways that would make it work well for online sellers.
However, spending on advertising is a lot easier than simplifying an existing product that isn’t particularly well-suited to eCommerce. And we have faith that word will continue to spread about how much better Seller Ledger is for eCommerce accounting.
So we welcome the challenge – the challenge of competing with QuickBooks.
Ready to automate your eCommerce bookkeeping?
Join thousands of sellers who save hours every month with Seller Ledger.
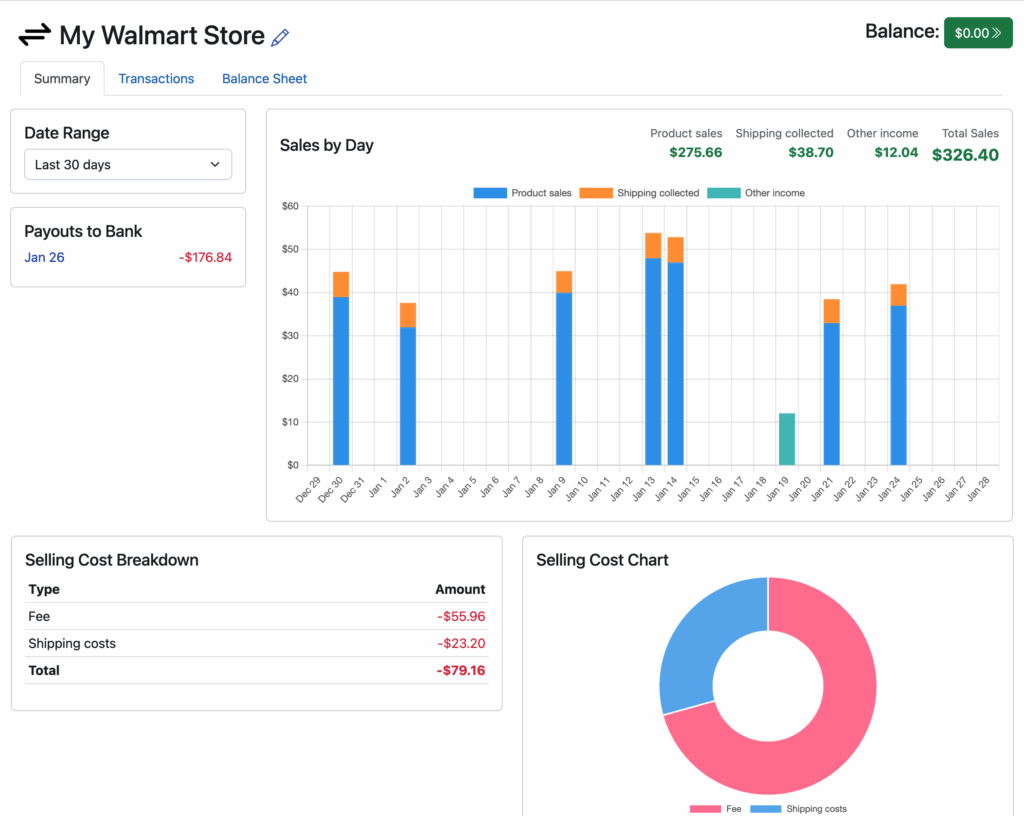
Continuing the work we did for both Amazon and eBay, we’ve just rolled out a new channel summary page for Walmart. While Seller Ledger has been importing Walmart sales, refunds and fees for more than a year now, we’ve made it even easier to make sense of all of that detailed data.
From your Seller Ledger dashboard, just click into your Walmart account to view a screen like the following:
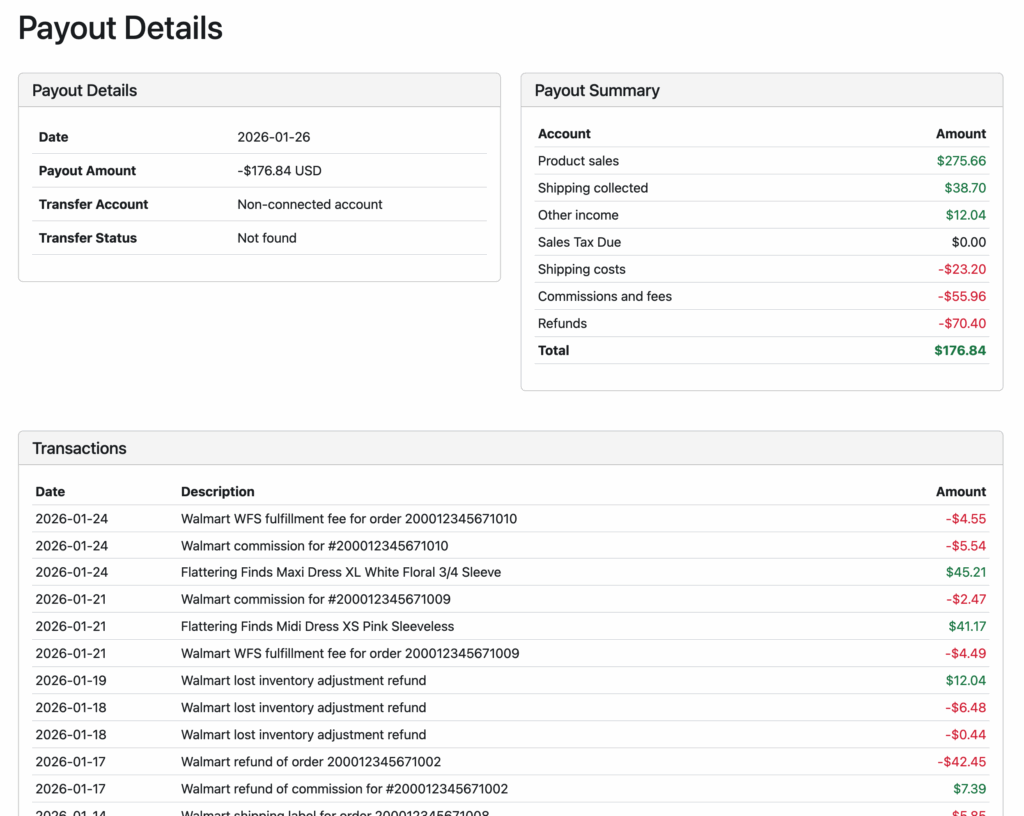
You can choose from a number of date ranges to see your data. You can click into any payout to view a summary of (and mini profit and loss statement for) that payout. You can even drill down to see every single transaction that makes up each payout.
You can also see a summary of your sales and expenses for the period, with a breakdown of selling costs.
Whether you’re thinking of switching or just getting started, this step-by-step guide will help you choose the right solution for your Amazon business.
Amazon (and eCommerce) accounting comes with a rather unique set of challenges, above and beyond traditional business accounting. In addition to regular income and expense tracking, you can expect to face:
Lots of order transactions (if you’re lucky)
Even more fee transactions
Inventory and cost of goods sold tracking
Reconciling platform payouts vs your bank
The good news is, with modern software, you can shrink the time you spend on accounting for your Amazon business from hours a month to minutes.
How do I choose?
First, let’s assume that you’d like to get your Amazon data into your accounting software with as little customization and setup as possible. That will rule out platforms like Wave Accounting and FreshBooks, which not only don’t have direct integrations with Amazon, but they require using a general-purpose API (application programming interface) tool like Zapier to make it work. That’s a non-starter for most sellers.
Next, the key question becomes – how much (and what kind of) Amazon data do you want to bring into your accounting software. Specifically, do you want all of the transactions from Amazon or just summarized information?
Detailed vs Summarized Amazon Data
So what does it mean, to get detailed vs summarized Amazon data? Let’s take a look at each method:
Detailed transaction data
This means pulling in every order, including line items, discounts, sales tax collected and remitted, shipping collected and fees subtracted. It also means bringing in shipping label transactions, and LOTS of other Amazon fees.
What are the pros and cons of this approach?
Pros:
You get a detailed understanding of your Amazon accounting, not only at the P&L and balance sheet level, but also down to the net profit on every sale (if your solution can pull that off – more on this later.)
You can automate inventory and cost of goods calculations by mapping sales back to the original inventory purchases.
You avoid the issue of payouts that can span different periods (e.g. an early January payout that includes both December and January transactions.)
Cons:
A lot of folks (especially old-school CPAs) worry about “cluttering up” your books with too much detail, which can bog down your accounting platform’s performance. Amazon does produce an enormous number of small transactions.
Reconciling all of those transactions to the payouts and deposits to your bank can be a royal pain in the neck if your solution doesn’t do this for you (again, more on this later.)
Summarized data
Using this approach, instead of bringing in all Amazon transactions, you summarize them outside of your accounting platform, and instead, match the totals to each payout that shows up in your bank account.
The pros and cons of this approach are pretty much the reverse of the above:
Pros:
Reconciliation of all of those Amazon transaction totals to your payouts should be easier.
You avoid “cluttering up” your accounting software with details you may never need to dig into.
The performance of your accounting software remains high by limiting the data you add.
Cons:
You miss out on net profit calculations.
You can’t automate inventory/cost of goods calculations.
Payouts that span multiple months or years are still problematic.
Biased perspective
We’d like to take a quick moment to point out the following observations. We believe two of the most commonly referenced reasons for choosing the “summarized” approach stem from folks dealing with practical limitations of existing solutions.
First, the idea that a lot of data will “clutter up” accounting software is more a reflection of the design of that software than the data itself. Good software design, especially around the user interface, can do an awful lot to hide details until you’re ready to look for them. In addition, when a software solution already has a lot of non-eCommerce features that already “clutter up” the interface, perhaps avoiding those unused features would help.
Second, the argument about performance is equally fascinating. There are many other platforms that process exponentially more data than accounting platforms and yet are still performant. Just ask Google, Amazon, eBay and Shopify (or TaxJar.) So changing your desired behavior because of the scaling limitations of a platform seems suboptimal.
What are the best options?
In addition to looking at the data options from Amazon, you may have some other criteria specific to you and your business. How much do you want to do yourself vs outsource to an accountant or bookkeeper? Do you want something specifically designed for eCommerce? How much do you value simplicity? Are you price conscious?
We’ll go through the leading contenders in the space, based on current (2026) sentiment:
Seller Ledger
Seller Ledger is one of the newer players in the space, created by several of the original team members behind Outright/GoDaddy Bookkeeping and TaxJar. It provides both the accounting platform plus a direct Amazon integration (as well as many others) and chooses the “detailed transactions” approach.
Seller Ledger is specifically designed for eCommerce sellers, so it has a much simpler user interface and setup process that traditional accounting software. It also has a pricing model that starts much lower and grows with the size of your business. Additionally, it does not limit features based on pricing tiers.
Detailed transaction approach
Seller Ledger pulls in all transaction data from Amazon via a custom-built integration. It does not require any third party connectors. And while it does pull in every Amazon transaction, it also ties every single transaction to each payout, and matches those payouts directly to your bank account deposit. This addresses the concerns about payout reconciliation, because it is built into the system, and also avoids the timing issue when a payout occurs around the end of a period.
It groups all transactions related to each Amazon order (including fees, shipping labels, etc) so you can see your net profit per order. That includes cost of goods sold, if you are using unique SKUs. Plus, it can automate inventory levels using the FIFO (first-in, first-out) method.
If you want to outsource your Amazon accounting completely, you can use Seller Ledger and invite your accounting pro to access your data. But bookkeeping services are not included in the price of the software.
Plans start as low as $10/mo for very small sellers and go up based on monthly transaction volume.
Limitations/concerns
As of the time of this writing, Seller Ledger is primarily designed for US eCommerce sellers. It handles US income and sales tax very well, and now provides currency conversion that works really well for North American merchants with sales in MXN and CAD. For sales in other countries, we provide report filters by native currency.
It is also exclusively designed for eCommerce businesses, so if you require invoicing or other features for service-based businesses, you may want to look elsewhere.
QuickBooks Online or Xero + third party connector
The most familiar names in accounting software, these two classic platforms support all kinds of business types, not just Amazon businesses.
QuickBooks is by far the most popular accounting platform in the market. It has a direct integration option with Amazon, though most commentary suggests using a third party connector (A2X, Link My Books, Synder) to properly handle Amazon data. It is also more recommended for US-based businesses. However, QuickBooks is also relatively expensive and is notorious for raising prices (as in, up 35% in the last 3 years as of this writing.)
Xero has no direct integration with Amazon, relying instead on those same third party connectors. It tends to be much more recommended for non-US businesses (especially anyone based in New Zealand or Australia.) And it is quite a bit less expensive than QuickBooks.
Now let’s look at the third party connectors. While there are a lot of more general purpose middleware solutions out there (e.g. Zapier, Webgility, etc,) we are going to focus on the 3 that appear to be the best tailored for eCommerce.
A2X Accounting is well respected for their data accuracy and working especially well with QuickBooks. They use the “summarized” approach to bringing in Amazon data, though they have a creative solution for splitting payouts across periods. They are said to be a bit more complex than other solutions, and more expensive.
Link My Books, which also uses the “summarized” data approach, focuses a bit more on ease of use and VAT compliance. It is also a bit less expensive than A2X Accounting.
Synder is a more broad-based connector, working not only with Amazon and other marketplaces, but also with payment platforms like Stripe, PayPal and Square. They also support the “detailed” approach to Amazon data in your accounting platform. They tend to be a bit more complex, which, given their extra capabilities makes sense. And their pricing is a bit higher.
The combos
Given the performance and “clutter” concerns, and seeing the US vs non-US focuses, it would seem like the choices really come down to:
QuickBooks + A2X Accounting (if you are US-based)
Xero + Link My Books (for non-US businesses.)
In both cases, you will be using the “summarized” Amazon data approach, with the pros and cons mentioned earlier.
Both combinations are also designed very well to work with accounting professionals.
In terms of pricing, QuickBooks Online + A2X Accounting is going to be on the more expensive side, at likely $100-$200/mo to start (depending on how many channels you link and transactions you process.)
Xero + Link My Books appears to start at about half that rate and go up from there.
One additional thought: by using two different applications, it might make for fun customer support inquiries if/when something changes or breaks. And given how often Amazon adds or changes their fees, software updates are inevitable.
Finaloop
Another relatively new option, Finaloop is a “full service” solution for eCommerce businesses looking for software + bookkeeping all in one place. Like Seller Ledger, they provide the accounting platform and a direct integration with Amazon, using the “detailed” data approach. And similar to Synder, they also link to other marketplaces and payment platforms. But their big claim to fame is that their service also comes with team members who will do your bookkeeping for you.
With pricing that starts at $250/mo, the base pricing isn’t that much more expensive than QuickBooks + A2X Accounting. But, prices rise pretty quickly and are based on your business revenue.
Limitations/concerns
Given what happened to Bench Accounting, another startup that tried to build a “software + bookkeeping” business (more broadly than eCommerce,) you’ll want to make sure you can take your data with you if needed.
Summary Comparison
Seller Ledger
Best for:
Small to mid-sized Amazon sellers in the US
Those who want detailed Amazon data
Those who want an affordable option
QuickBooks + A2X Accounting
Best for:
Larger US-based Amazon sellers
Those who want summary level data
Those willing to pay for quality/reputation
Already have an accounting pro that likes this combination
Xero + Link My Books
Best for:
Larger non-US based Amazon sellers
Those who want summary data
Those looking for a more affordable summary solution
Already have an accounting pro that likes this combination
Finaloop
Best for:
Amazon sellers who want to outsource their bookkeeping but don’t already have an accounting pro
Those willing to pay for that outsourcing
Those who want detailed Amazon data
Ready to automate your eCommerce bookkeeping?
Join thousands of sellers who save hours every month with Seller Ledger.
As we approach the end of our 3rd year since launch, Seller Ledger is announcing our pricing update for 2026.
Seller Ledger is increasing prices 0%
Yes, you read that right. We are keeping prices the same. Just like we did in 2025. And 2024.
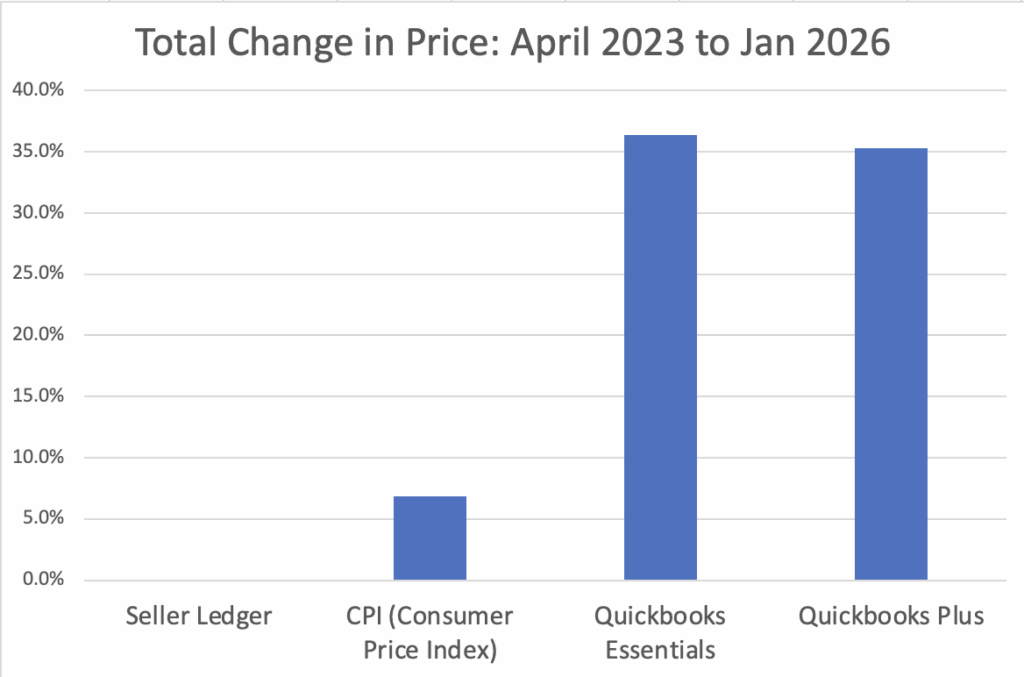
We haven’t raised prices since we launched on April 1, 2023. To put that in perspective, let’s look at a simple chart comparing us with the overall rate of inflation and the leading accounting platform: QuickBooks Online.
As you see, over the last 2 years and 9 months, the total rate of inflation has been 6.8%. We also included the change in price for QuickBooks Essentials, which allows for up to 3 sales channels but no inventory tracking, and QuickBooks Plus, which includes everything in Essentials plus inventory tracking. In both cases, their monthly prices have increased more than 35%, or 5x the rate of inflation.
Conversely, Seller Ledger’s monthly pricing hasn’t changed at all. Given the rate of inflation over that time, Seller Ledger has actually gotten cheaper relative to most other products and services.
And yet, we’ve added a TON of new functionality
Just look back at what we added in calendar year 2025. Click on any of the bulleted items to learn more.
Oh, and though we haven’t promoted it yet, those of you who still have to deal with sales tax returns might want to check out our new state sales tax reports under the “Taxes” tab.
If you want to go back even further to see what we’ve added since launch, feel free to check out our blog.
How is that possible without raising prices?
There are two parts to this answer:
First, we are a private company that is not beholden to outside shareholders. The number one responsibility of public company executives is to maximize shareholder value. We get to choose what we solve for. Every team member owns stock in this company. And we prefer to focus on making customers happy, first and foremost. It also helps that we’re profitable, which can be explained by the next point.
As it turns out, adding all of the functionality we have over the year has attracted some significantly larger customers. So much so that we’ve had to add some new pricing tiers above our largest tier. If you are an eCommerce seller with more than 5,000 orders/transactions a month, check out our updated pricing page.
Methodology
In the spirit of full transparency, we used the Wayback Machine to look up pricing from both QuickBooks and Seller Ledger. Want to double check? Go ahead.
Here’s looking to a great 2026!
Ready to automate your eCommerce bookkeeping?
Join thousands of sellers who save hours every month with Seller Ledger.
Just as we announced last summer with regard to eBay, we are proud to announce the ability to see the NET profit on each Amazon order. What is net profit per order? It’s how much money you make after all order-level costs have been factored in, including inventory cost, fees and shipping. Many customers think of it as their “ROI” or return on investment for each item they sell.
Amazon profit per order
If you click the “>>expand” link next to any order in your Amazon account, you will now see all expenses that are tied to that order. This includes any and all Amazon and FBA fees associated with that order. In addition, if you purchase shipping labels through Amazon, we include that too.
And most importantly, as we talked about when rolling out our Gross Profit report, if you track your inventory costs at the item level and use unique SKUs for each of your Amazon items, we will match those costs to the correct item.
There are a lot of solutions out there that will summarize Amazon amounts and match them to payouts, but how many other accounting solutions tie everything together like this to see profit on every single order?
Ready to automate your eCommerce bookkeeping?
Join thousands of sellers who save hours every month with Seller Ledger.
On of the challenges of importing data, especially from certain banks and credit cards, is that they can create a lot of similar but not identical contacts/vendors/customers.
While Seller Ledger does its best to learn over time and create consistency among contacts, sometimes you still end up with slight variations.
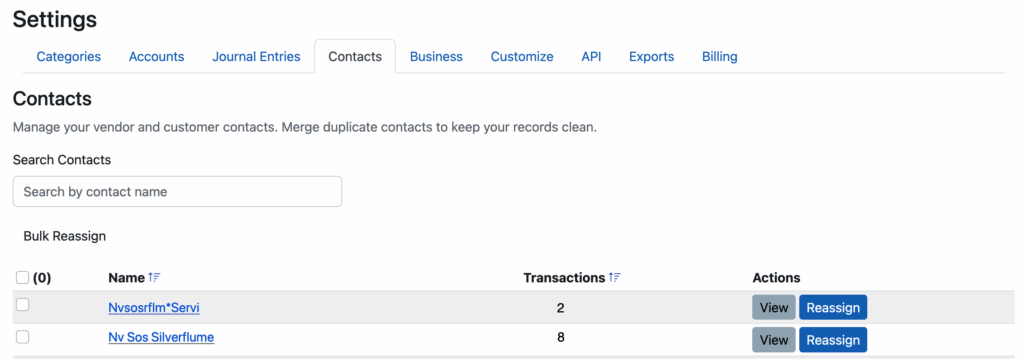
Fortunately, we’ve just rolled out a new section under Settings where you can now manage your contacts.
From here, you can see all of the contacts used in Seller Ledger, including how many transactions are associated with each contact
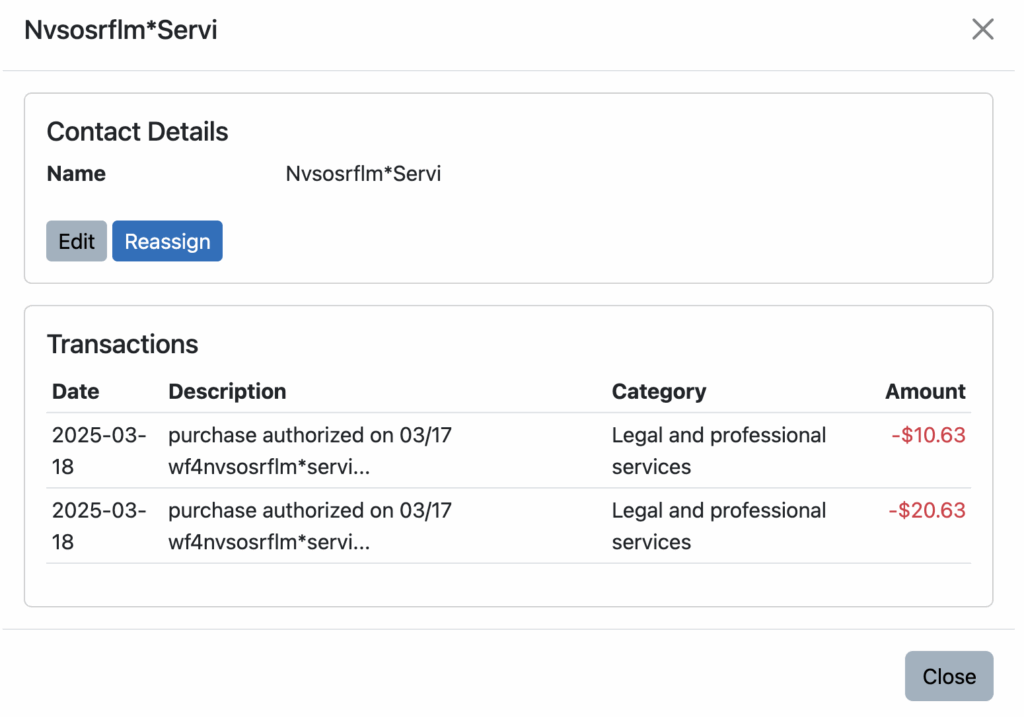
As you can see in the example above, we have two contacts that look awfully similar. If you click on the contact name (or the “View” button) you can see the transactions that use that contact name:
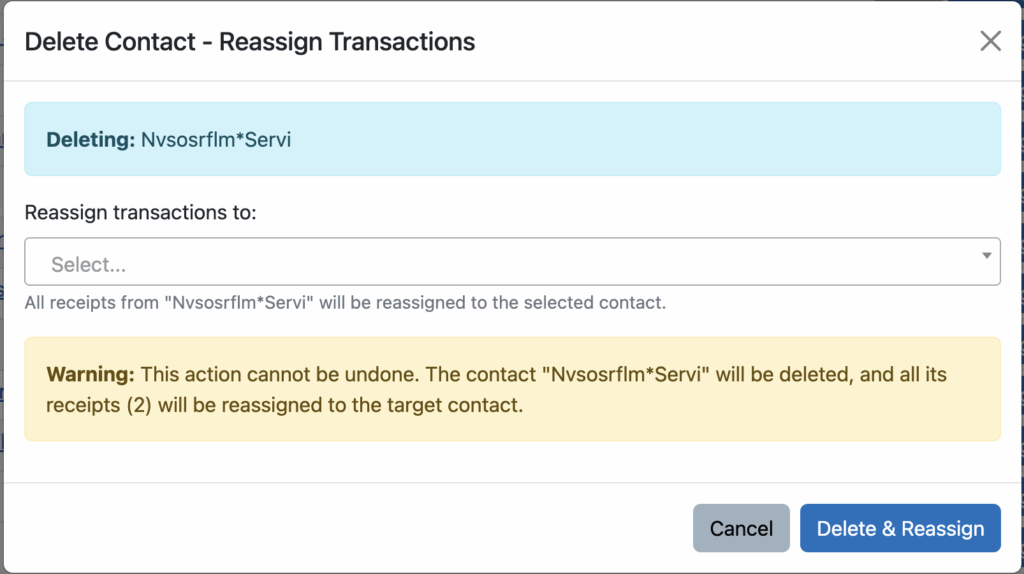
These transactions look like they are consistent with the more commonly used contact name of “Nv Sos Silverflume”, so let’s reassign these transactions to that name:
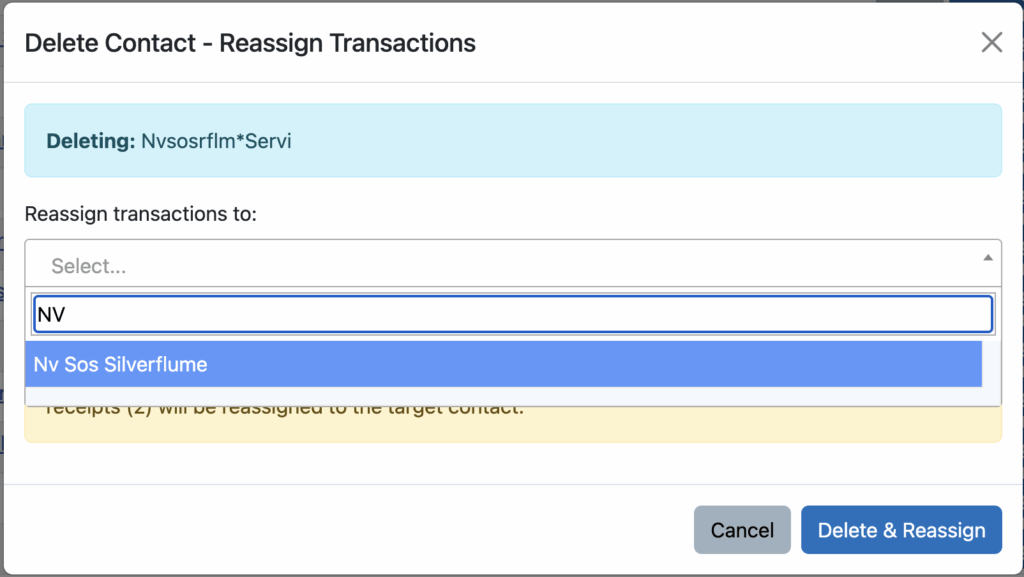
Then just start typing in and choose the name of Contact you want to reassign these transactions to:
Click “Delete & Reassign”, and Seller Ledger will move those two transactions to the new Contact name and remove the old one. From here, the list of contacts is updated as such:
That’s it. Now as you are editing/managing contacts elsewhere in Seller Ledger, your list of options will look quite a bit cleaner. And your Expenses by Vendor report will thank you for it:)
Ready to automate your eCommerce bookkeeping?
Join thousands of sellers who save hours every month with Seller Ledger.
Don’t miss out on your deductions. Just tell Seller Ledger the date of the trip, a description of its purpose, and the distance traveled – we’ll calculate the rest. And remember, not only can you track your trips one at a time, but you can now also upload a CSV file of all of your trips – a pretty good option if you’re making lots of trips to the post office.
Ready to automate your eCommerce bookkeeping?
Join thousands of sellers who save hours every month with Seller Ledger.
To better support accounting pros and some of our bigger customers who use more traditional double entry accounting, we are pleased to announce the ability to record year-end closing entries within Seller Ledger.
What are closing entries?
In essence, closing entries “reset” a business’s profit and loss each year. Think of the profit and loss report as a scoreboard, showing you how much money you made (or lost) in a year. When a new year starts, your profit and loss starts all over. But, you don’t want to lose track of the prior year scores. That’s where closing entries come in. These entries take the profit and loss amounts and move them to the balance sheet.
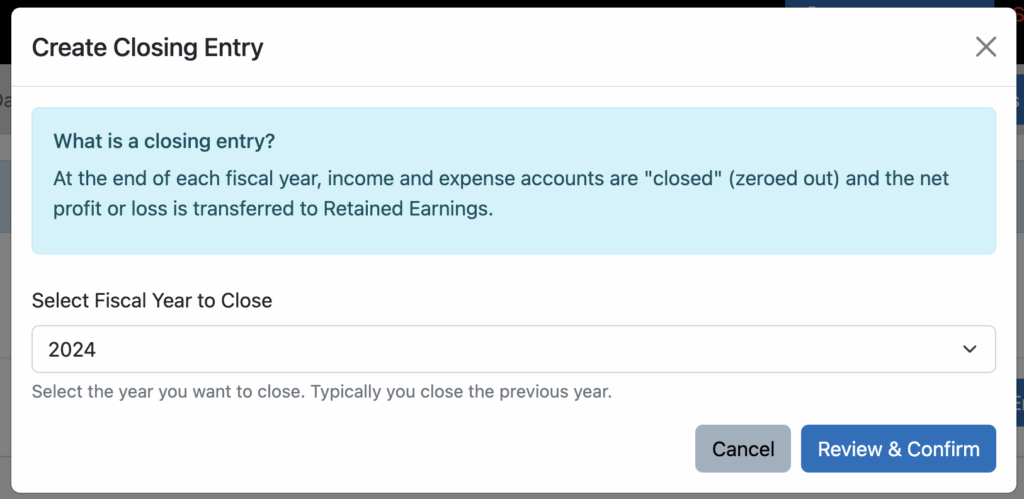
Click the button to “Add Closing Entry. You will then see a pop-up asking which year you would like to close.
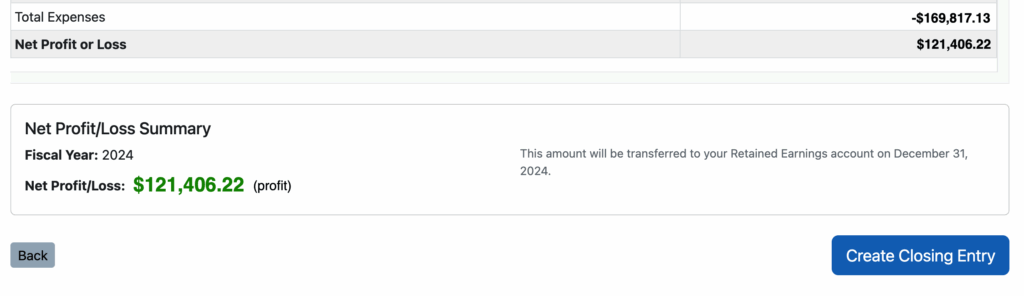
Click “Review and Confirm” and you will be presented with the complete profit & loss for that year, as well as the net profit or loss that will be transferred to retained earnings.
Click the button to “Create Closing Entry” and Seller Ledger does the rest of the work for you. Your Profit and Loss will be reset for the next year, and your balance sheet will be updated to reflect the change to retained earnings.
Ready to automate your eCommerce bookkeeping?
Join thousands of sellers who save hours every month with Seller Ledger.
To help eCommerce sellers stay more organized, we are pleased to announce that Seller Ledger now supports the ability to attach receipts to transactions. And we do it in a couple of ways.
Start with just your receipt
Do you have a cash purchase that you need to put into Seller Ledger? Take a picture of the receipt and upload it first. Seller Ledger, using some AI magic, will try to parse the image. We also support other file formats.
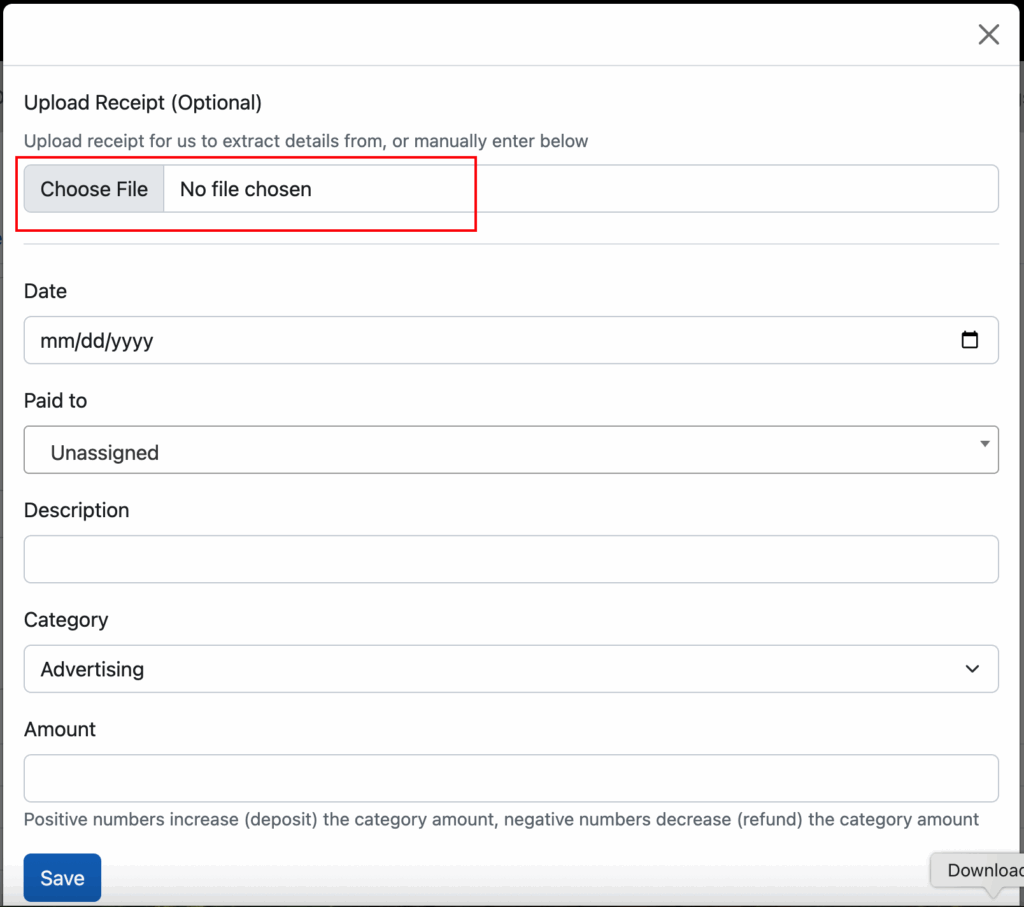
In this example, go to the Expenses tab and click the “Add Expense” button:
Then, click the option to “Choose File” and select the receipt file from your hard drive.
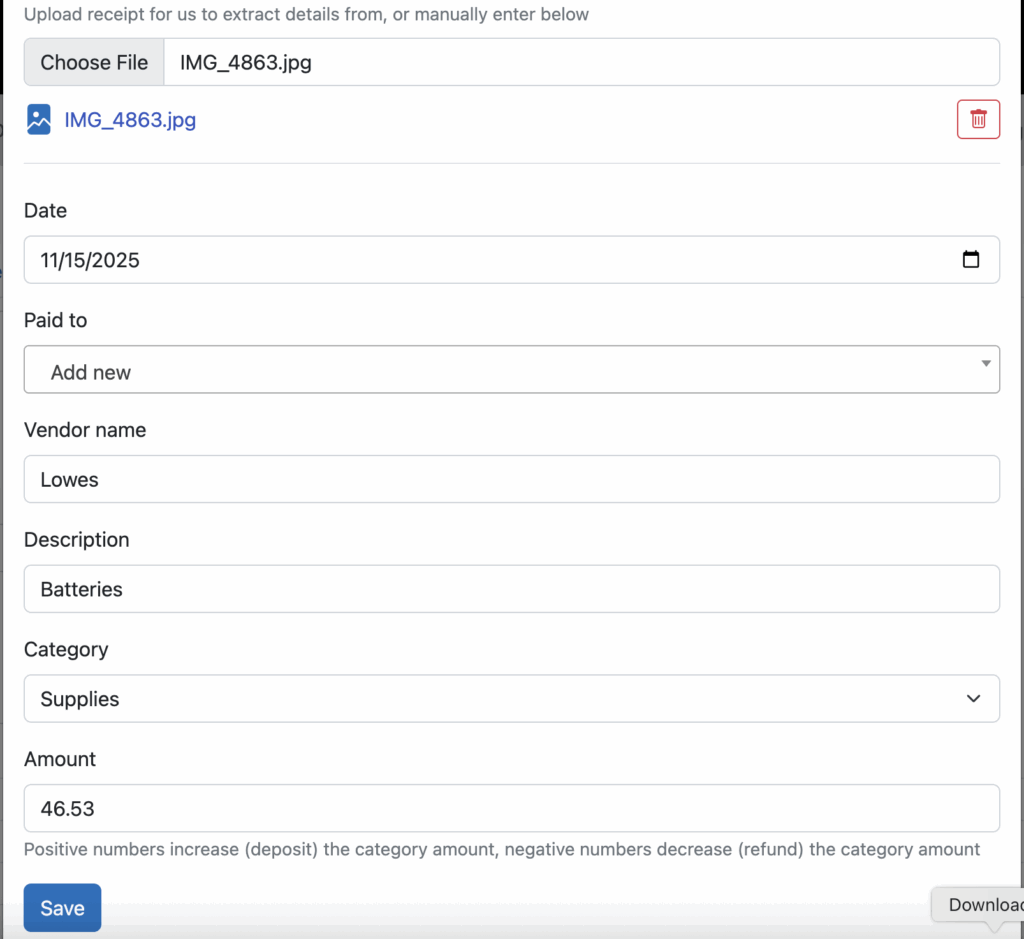
After choosing the file, Seller Ledger will extract as much information as possible and pre-populate the fields below. In this case, it got the date and amount correct, but I had to edit the Vendor and Description.
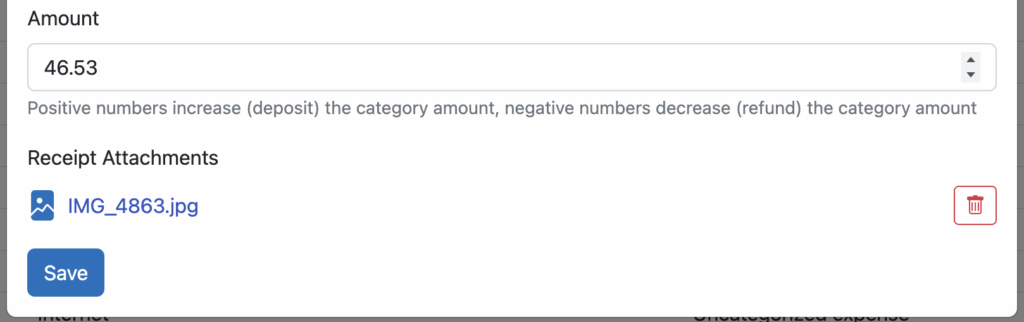
Click the save button and your new expense is recorded, with a copy of the receipt that you can view at any time by clicking on it.
Attach a receipt to an existing transaction
You can also upload a receipt to an existing transaction that has been imported into Seller Ledger. Just click into your bank or credit card account and you’ll see a new paperclip icon to the far right of the transaction.
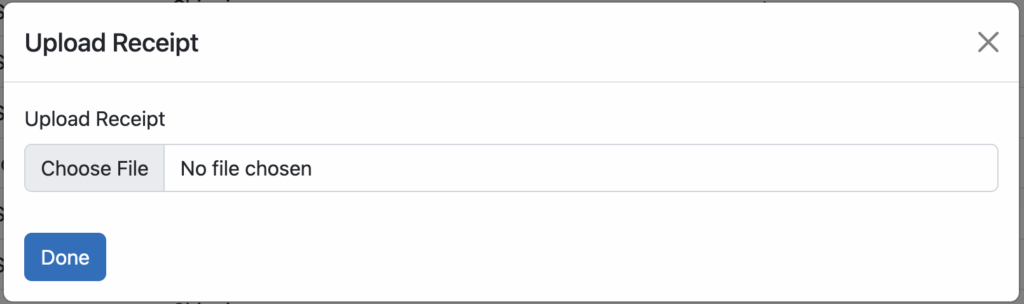
Clicking the paperclip icon pops up a simple dialog box:
Find the image or file of your receipt and click Done. In your transaction list, you will now see the icon has changed to a small receipt, which you can click on to preview the file you just uploaded.
As always, we want to thank all of the customers who wrote in suggesting this feature. Keep ’em coming!
Ready to automate your eCommerce bookkeeping?
Join thousands of sellers who save hours every month with Seller Ledger.