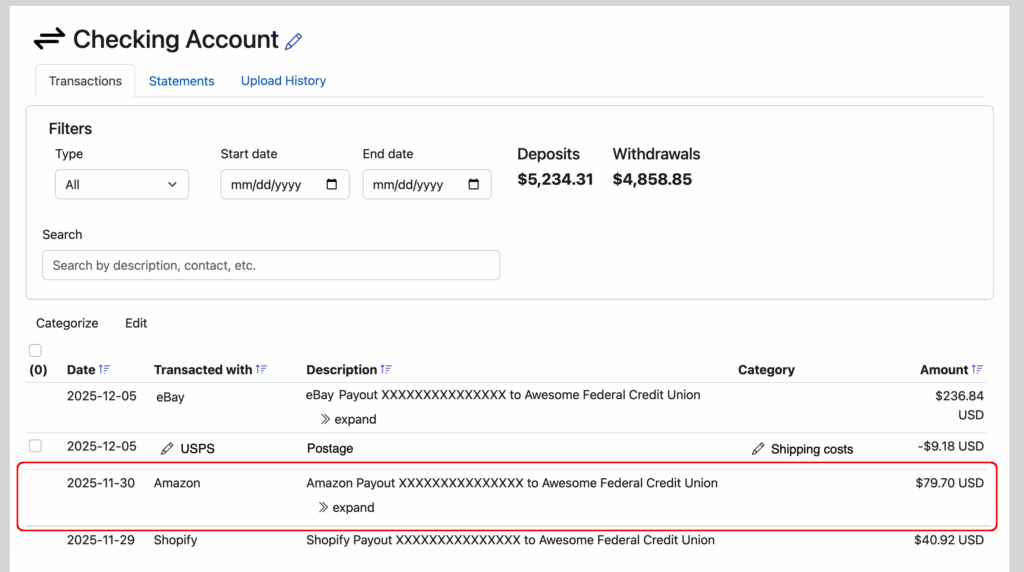
Just as we announced last summer with regard to eBay, we are proud to announce the ability to see the NET profit on each Amazon order. What is net profit per order? It’s how much money you make after all order-level costs have been factored in, including inventory cost, fees and shipping. Many customers think of it as their “ROI” or return on investment for each item they sell.
Amazon profit per order
If you click the “>>expand” link next to any order in your Amazon account, you will now see all expenses that are tied to that order. This includes any and all Amazon and FBA fees associated with that order. In addition, if you purchase shipping labels through Amazon, we include that too.
And most importantly, as we talked about when rolling out our Gross Profit report, if you track your inventory costs at the item level and use unique SKUs for each of your Amazon items, we will match those costs to the correct item.
There are a lot of solutions out there that will summarize Amazon amounts and match them to payouts, but how many other accounting solutions tie everything together like this to see profit on every single order?
Ready to automate your eCommerce bookkeeping?
Join thousands of sellers who save hours every month with Seller Ledger.
On of the challenges of importing data, especially from certain banks and credit cards, is that they can create a lot of similar but not identical contacts/vendors/customers.
While Seller Ledger does its best to learn over time and create consistency among contacts, sometimes you still end up with slight variations.
Fortunately, we’ve just rolled out a new section under Settings where you can now manage your contacts.
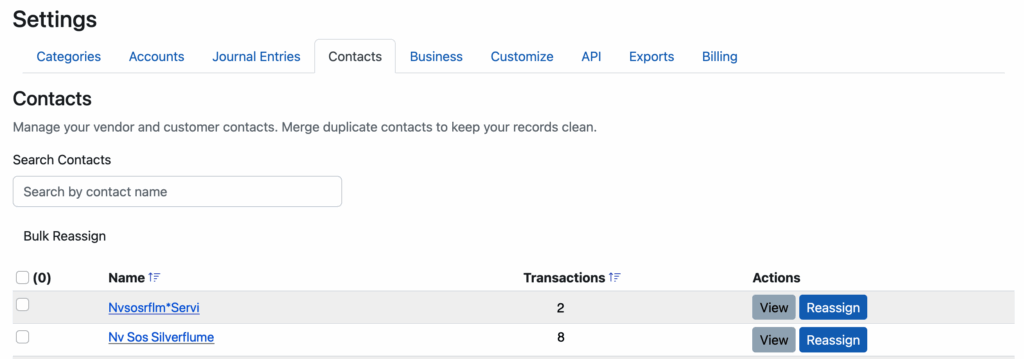
From here, you can see all of the contacts used in Seller Ledger, including how many transactions are associated with each contact
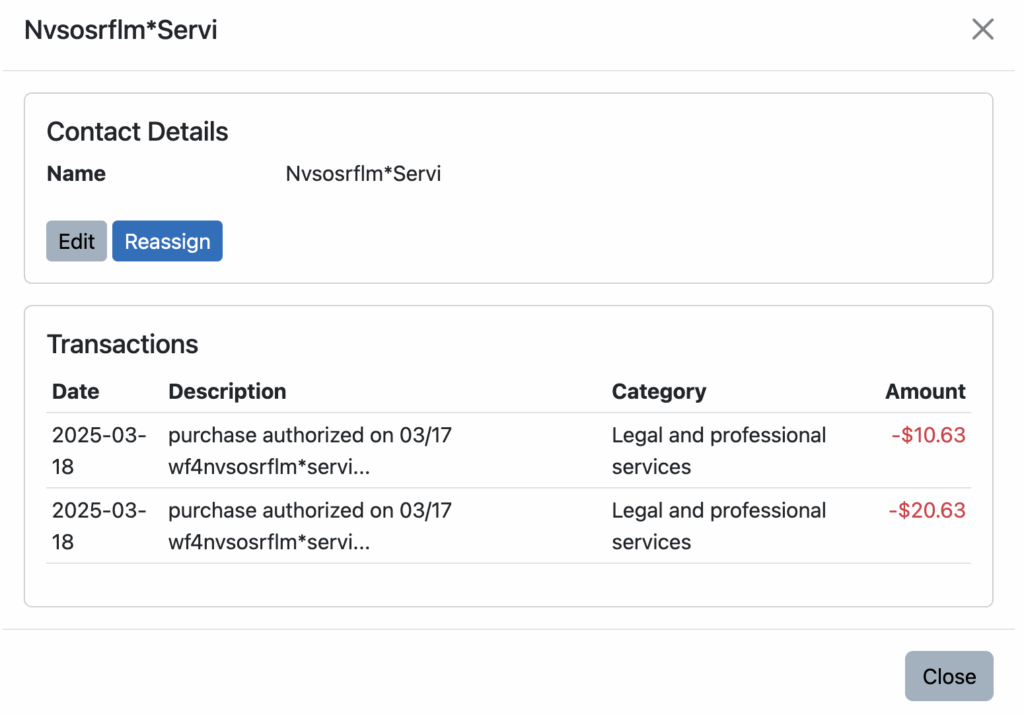
As you can see in the example above, we have two contacts that look awfully similar. If you click on the contact name (or the “View” button) you can see the transactions that use that contact name:
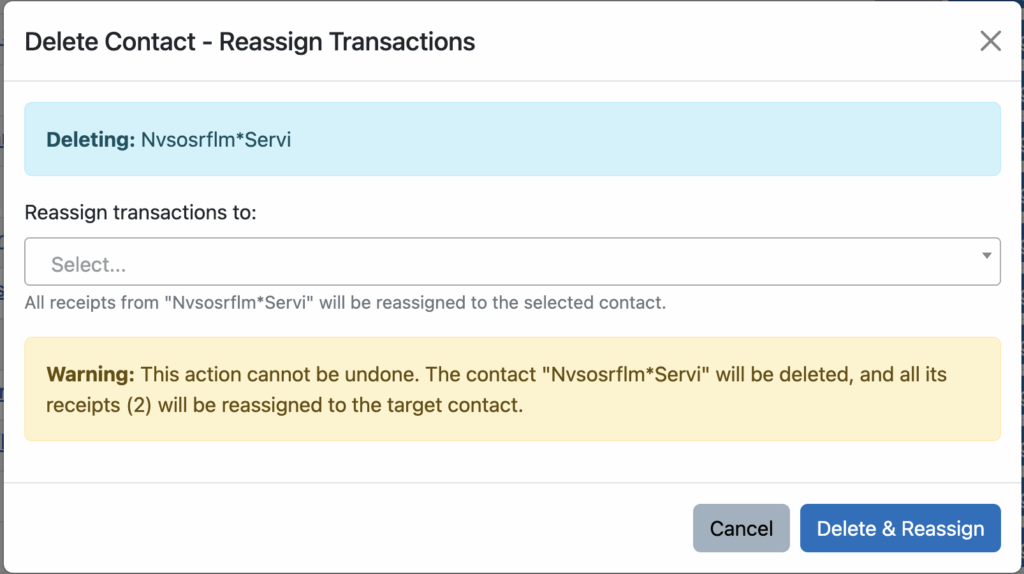
These transactions look like they are consistent with the more commonly used contact name of “Nv Sos Silverflume”, so let’s reassign these transactions to that name:
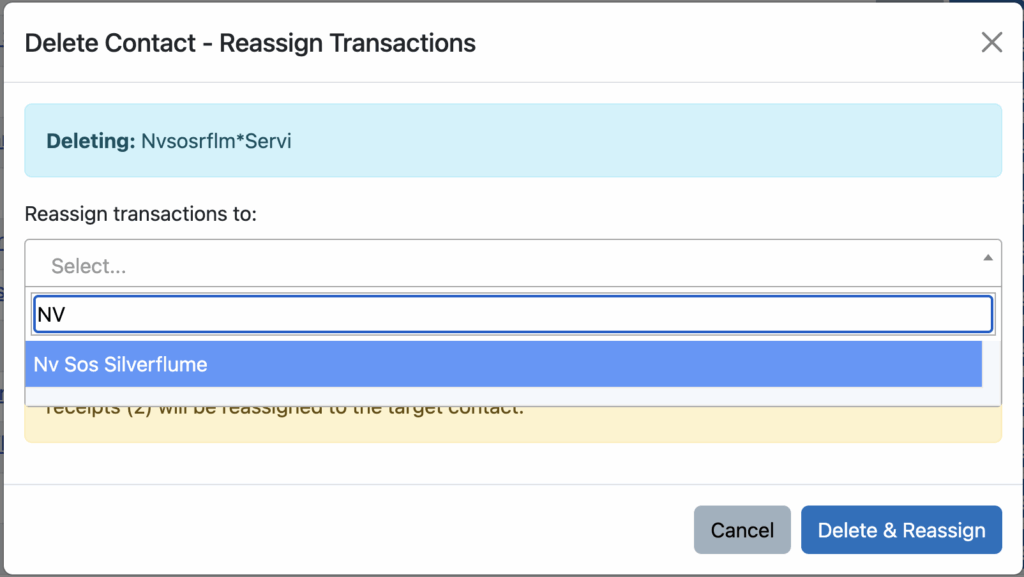
Then just start typing in and choose the name of Contact you want to reassign these transactions to:
Click “Delete & Reassign”, and Seller Ledger will move those two transactions to the new Contact name and remove the old one. From here, the list of contacts is updated as such:
That’s it. Now as you are editing/managing contacts elsewhere in Seller Ledger, your list of options will look quite a bit cleaner. And your Expenses by Vendor report will thank you for it:)
Ready to automate your eCommerce bookkeeping?
Join thousands of sellers who save hours every month with Seller Ledger.
Don’t miss out on your deductions. Just tell Seller Ledger the date of the trip, a description of its purpose, and the distance traveled – we’ll calculate the rest. And remember, not only can you track your trips one at a time, but you can now also upload a CSV file of all of your trips – a pretty good option if you’re making lots of trips to the post office.
Ready to automate your eCommerce bookkeeping?
Join thousands of sellers who save hours every month with Seller Ledger.
To better support accounting pros and some of our bigger customers who use more traditional double entry accounting, we are pleased to announce the ability to record year-end closing entries within Seller Ledger.
What are closing entries?
In essence, closing entries “reset” a business’s profit and loss each year. Think of the profit and loss report as a scoreboard, showing you how much money you made (or lost) in a year. When a new year starts, your profit and loss starts all over. But, you don’t want to lose track of the prior year scores. That’s where closing entries come in. These entries take the profit and loss amounts and move them to the balance sheet.
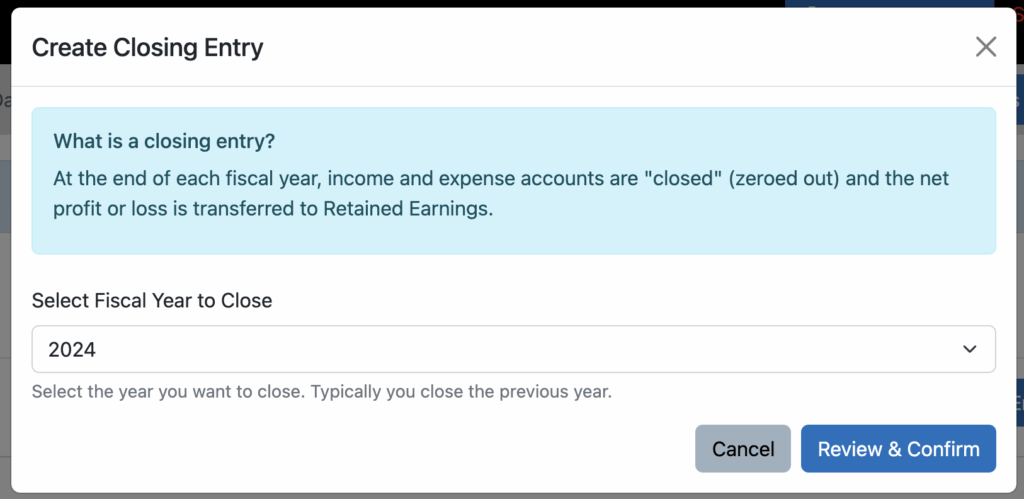
Click the button to “Add Closing Entry. You will then see a pop-up asking which year you would like to close.
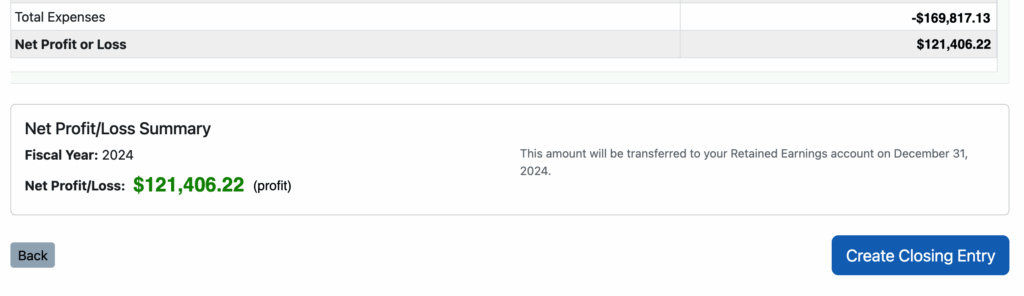
Click “Review and Confirm” and you will be presented with the complete profit & loss for that year, as well as the net profit or loss that will be transferred to retained earnings.
Click the button to “Create Closing Entry” and Seller Ledger does the rest of the work for you. Your Profit and Loss will be reset for the next year, and your balance sheet will be updated to reflect the change to retained earnings.
Ready to automate your eCommerce bookkeeping?
Join thousands of sellers who save hours every month with Seller Ledger.
To help eCommerce sellers stay more organized, we are pleased to announce that Seller Ledger now supports the ability to attach receipts to transactions. And we do it in a couple of ways.
Start with just your receipt
Do you have a cash purchase that you need to put into Seller Ledger? Take a picture of the receipt and upload it first. Seller Ledger, using some AI magic, will try to parse the image. We also support other file formats.
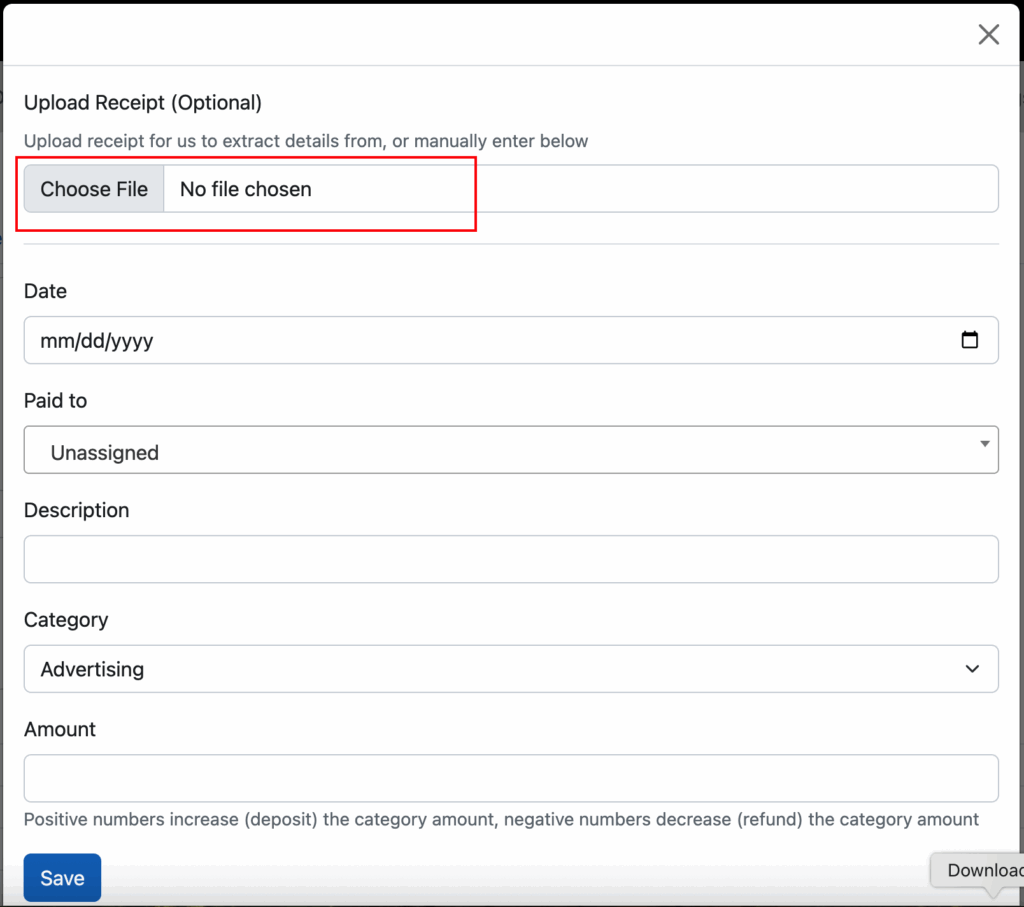
In this example, go to the Expenses tab and click the “Add Expense” button:
Then, click the option to “Choose File” and select the receipt file from your hard drive.
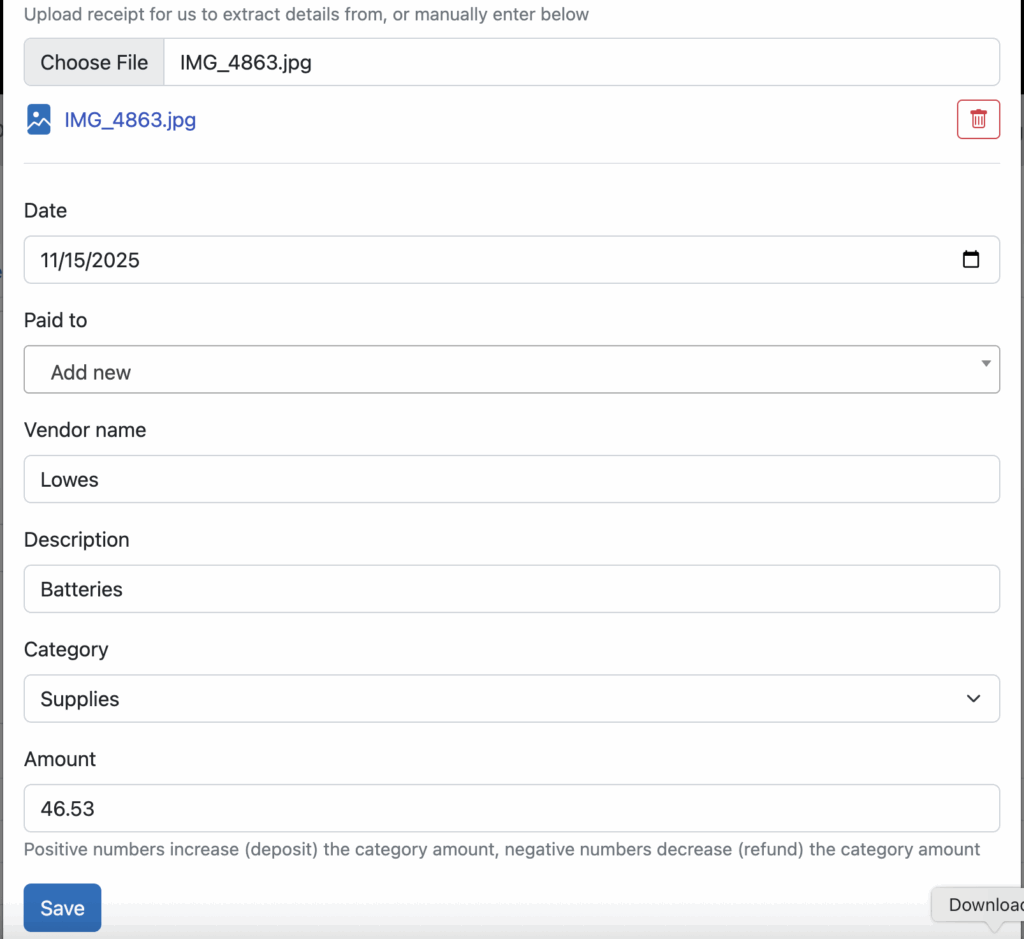
After choosing the file, Seller Ledger will extract as much information as possible and pre-populate the fields below. In this case, it got the date and amount correct, but I had to edit the Vendor and Description.
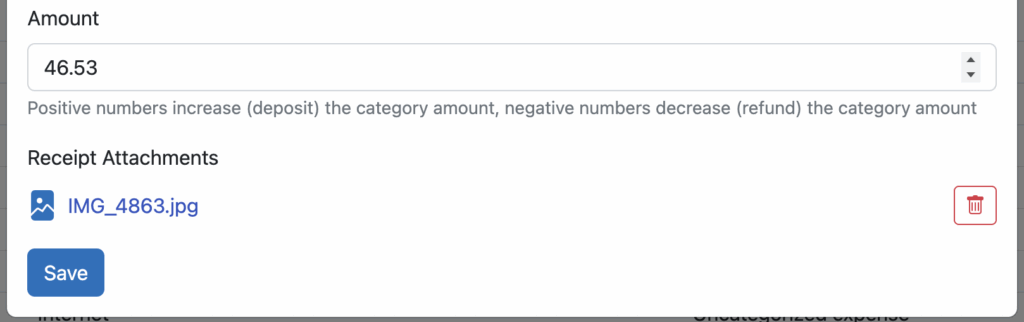
Click the save button and your new expense is recorded, with a copy of the receipt that you can view at any time by clicking on it.
Attach a receipt to an existing transaction
You can also upload a receipt to an existing transaction that has been imported into Seller Ledger. Just click into your bank or credit card account and you’ll see a new paperclip icon to the far right of the transaction.
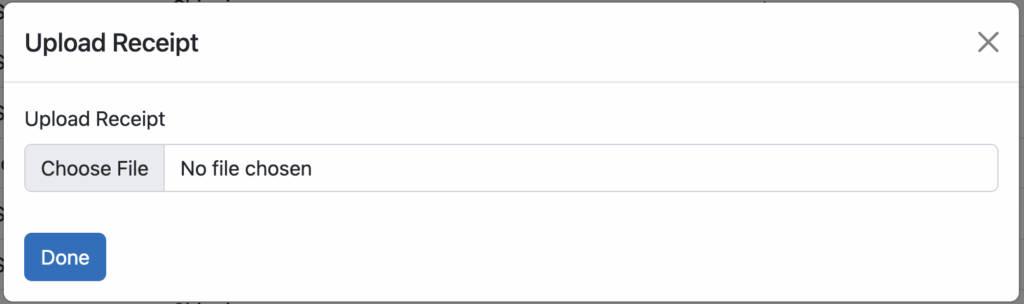
Clicking the paperclip icon pops up a simple dialog box:
Find the image or file of your receipt and click Done. In your transaction list, you will now see the icon has changed to a small receipt, which you can click on to preview the file you just uploaded.
As always, we want to thank all of the customers who wrote in suggesting this feature. Keep ’em coming!
Ready to automate your eCommerce bookkeeping?
Join thousands of sellers who save hours every month with Seller Ledger.
If you are trying to tackle eCommerce accounting, you know how critical it is to be able to reconcile marketplace sales and expenses to the payouts that hit your bank account. Well, just like we previously did for eBay, we are pleased to announce the ability to drill into any Amazon payout to see the precise data that makes up that payout amount.
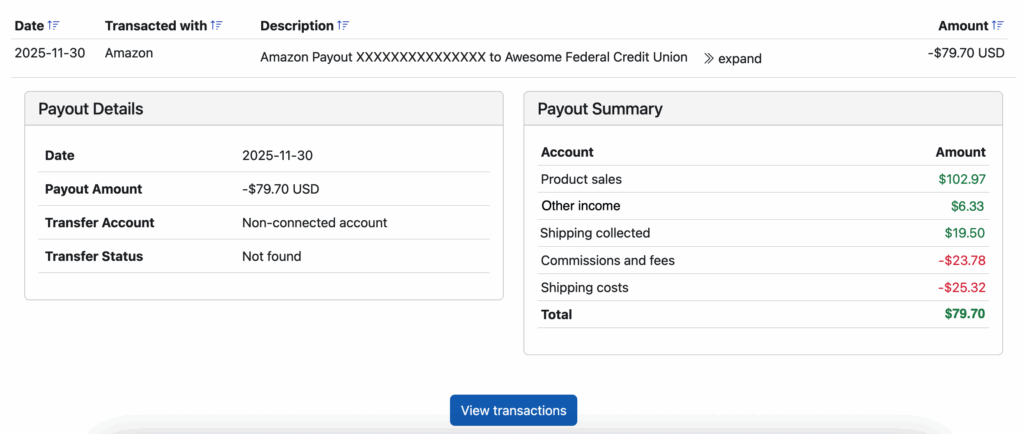
When you click into your Amazon account from your Seller Ledger dashboard and review your transactions, you have likely seen your payouts listed with an “>>expand” link next to them:
When you click expand, you’ll see some important additional information. Not only do we show the bank account details that the transfer was made to, but we show the summary totals by category.
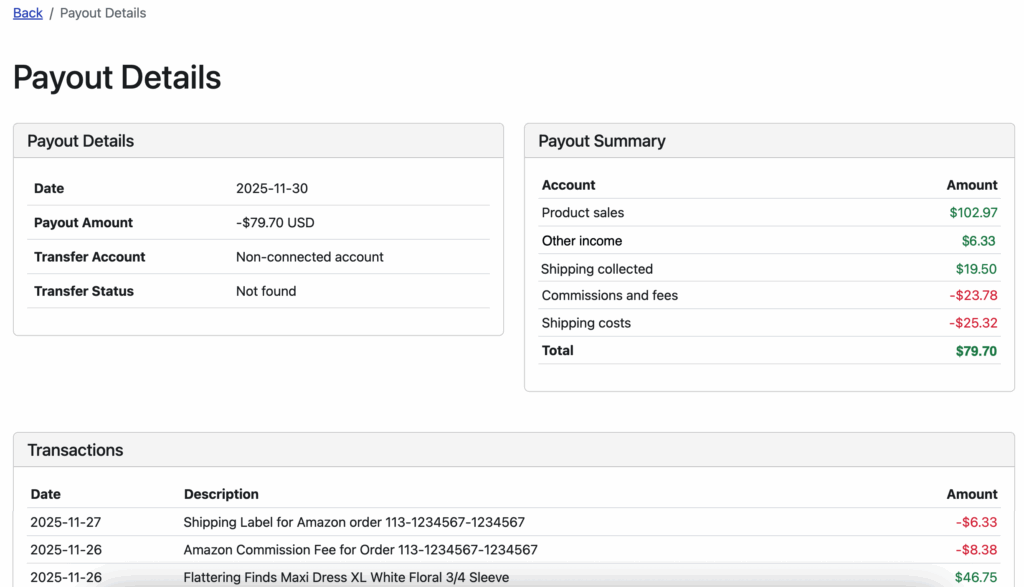
And if that’s not enough, we also provide a button to be able to drill down and see EXACTLY which transactions make up that payout.
And as a reminder, if you link Seller Ledger to the bank account where those payouts get deposited, we will automatically match the payouts from your Amazon account to the deposit in that bank account.
This means you can look at any Amazon payout deposit and drill all the way back down to see the transactions that are included.
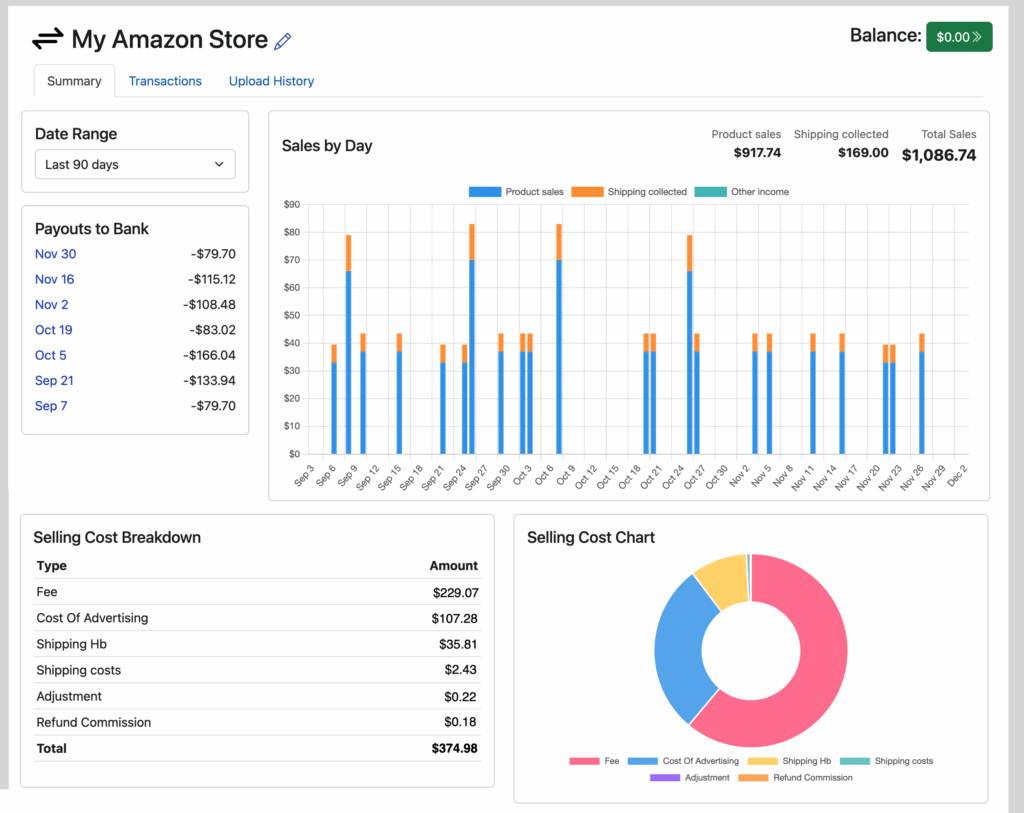
As we did earlier this summer for eBay, we’ve now rolled out a new channel summary page for Amazon as well. While Seller Ledger has been able to import all of your Amazon sales, refunds and fees for a while, now it’s even easier to make sense of all of that detailed data.
Now, when you click into your Amazon account from your Seller Ledger dashboard, you’ll see a screen like the following:
Drill down on any payout to see the totals for each payout including every single transaction that’s included in that payout.
Amazon has a large number of transaction types, especially their fees. While Seller Ledger focuses primarily on rolling up all of those amounts to your end-of-year tax form, this new view should help you get a better sense of all of Amazon’s financial data.
While most of the major eCommerce marketplaces, like Amazon, eBay, Walmart, and Etsy have robust APIs that make it possible for us to automatically import and categorize their transactions, a lot of newer and smaller marketplaces haven’t made that investment.
Update
Since this article was originally published, we’ve released a much more flexible approach to CSV file formats. You can learn more about that here.
For some of the more popular ones, like Whatnot, Poshmark, Mercari and Depop, we’ve built a custom import tool for the transactions that they allow you to export. And we continue to evaluate other marketplaces.
But, in the meantime, we’ve recently rolled out the ability to track sales from any marketplace. You can now import order history from any online platform, so long as you can modify their transaction files to match our format. Here’s how it works:
Step 1: Download your transaction history in CSV format
Log into your marketplace and find the place to access your order/transaction history. The more detailed the report, the better. Then, download it in a CSV (comma-separated) format – a very common format for exporting data.
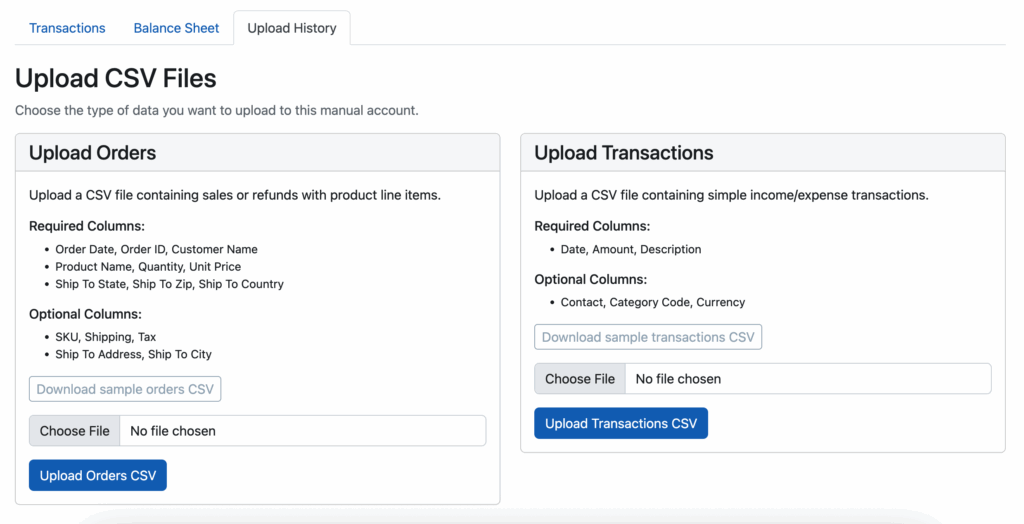
To upload a file with order and refund details, Seller Ledger expects the following fields:
Required:
Order Date
Order ID
Customer Name
Product Name
Quantity
Unit Price
Ship To State
Ship To Zip
Ship To Country
Optional:
SKU
Shipping
Tax
Ship To Address
Ship To City
In fact, it may be easier to simply use our sample format file, which we provide here.
Step 4: Upload the new file to Seller Ledger
Click into your newly created marketplace account from the dashboard and click the “Upload history” tab.
You’ll want to choose the “Upload orders” option on the left. Click the “Choose File” button, select the reformatted file you just created, and click Save. Seller Ledger will begin importing your order history, complete with any product, fee and refund details that are provided.
Ready to automate your eCommerce bookkeeping?
Join thousands of sellers who save hours every month with Seller Ledger.
Sometimes you may find yourself with inventory that isn’t selling, so you think about donating it in the hopes of writing it off. The question is – can you write off inventory donations? And if so, how?
The good news and the bad news
The good news is: yes, you are permitted to donate unsold inventory. According to the IRS:
How much you can deduct
“the amount you can deduct is the smaller of its FMV on the day you contributed it or its basis”
FMV means “fair market value”, as in, what you could sell the item for. And basis is your full loaded cost for that item.
The bad news, at least for Schedule-C filers, is that you do not get to just write the donations off as part of cost of goods sold. From that same IRS publication:
How to classify donations
“You must remove the amount of your charitable contribution deduction from your opening inventory. It isn’t part of the cost of goods sold.”
What this is basically saying is that, instead of adding those donated items to your cost of goods sold total, you need to remove them from your inventory, then deduct the value of those items on Schedule A of your personal tax return.
Handling Inventory Donations in Seller Ledger
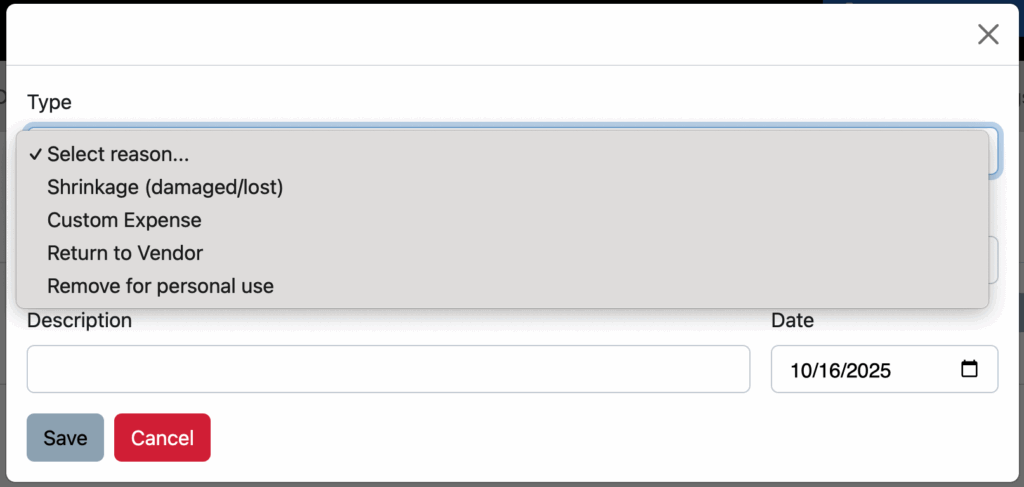
Fortunately, Seller Ledger allows you to remove donated items from inventory. When you click “Remove stock”, simply choose the “Remove for personal use” option.
This removes those items from your inventory without adding them to cost of goods sold. Instead, they will be treated as a “Not for business” expense.
Ready to automate your eCommerce bookkeeping?
Join thousands of sellers who save hours every month with Seller Ledger.
We pride ourselves on providing the most automated accounting solution for eCommerce sellers. However, there will always be circumstances where a seller conducts business in person, or on a platform that doesn’t offer much in the way of connectivity.
Update
Since this article was originally published, we’ve released a much more flexible approach to CSV file formats. You can learn more about that here.
For those cases, we’ve rolled out improved order history tracking for off-site and cash sales.
Step 1: Create an account to track those off-site or cash sales
We just rolled out the ability to add a new type of asset account that you can use to track these sales. From your dashboard, click the “Add Channels, Banks and Accounts” button. Then, scroll to the bottom of the next screen to see the following option:
This can be a “Cash” account, or an account to track sales from other online marketplaces like Facebook Marketplace, TCGplayer, StockX and more. Just name your account and you’re off to the races.
TCGplayer accounting is now automated
Since the release of this manual asset account feature, Seller Ledger has released a direct integration with TCGplayer. Check out more in this blog post.
Step 2: Add your order details
Click into your newly created account from your Dashboard. You’ll see a new button called “Add order” in the upper right:
Clicking on that button will bring up a much more detailed transactions screen that not only lets you enter the regular information like date, customer, and amount, but will also let you record the item(s) that you sold:
If you scroll down, you will also see that we allow you to enter additional information about each order, including:
Any shipping you may have collected from the buyer
Any sales tax you may have collected (or had collected for you)
Any fees that may have been incurred (for example, by a non-connected marketplace that this order sold through)
Any shipping labels or other shipping costs you had to pay
If a part of this order was donated to charity
As a reminder, the more details you can record that are tied to an order, the better able Seller Ledger is to tell you the EXACT net profit you make on every sale.
And as a reminder, you can always use the regular “Add transaction” button to record things like payouts (remember – they are transfers), non-order fees, etc.
Want more step-by-step guidance?
If you’re having trouble figuring out how to enter data from certain non-connected marketplaces, just email us a copy of one or more of their reports (or screens) to [email protected] and we’d be happy to help.
Ready to automate your eCommerce bookkeeping?
Join thousands of sellers who save hours every month with Seller Ledger.