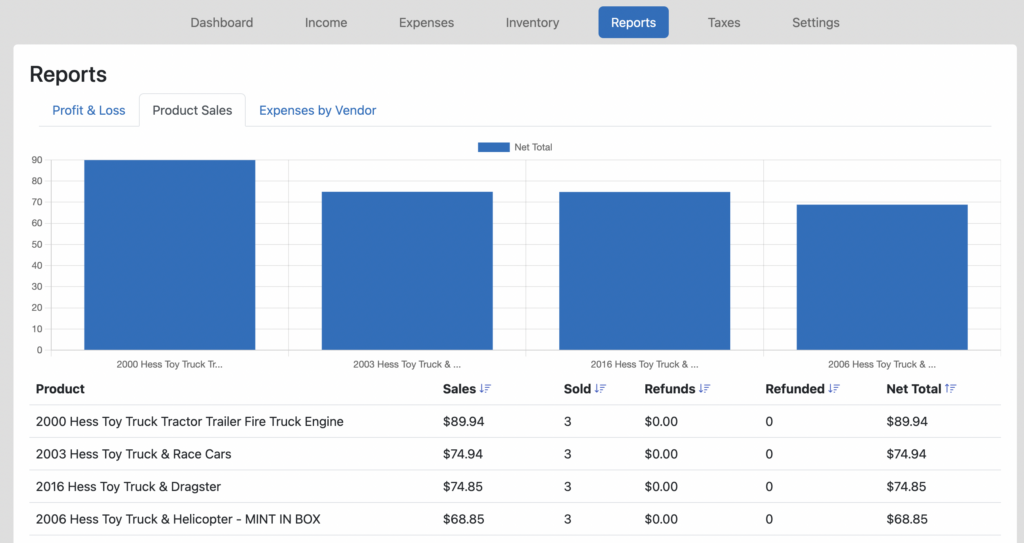
Want to know which products sell the most across all of your eCommerce channels? With Seller Ledger’s new “Product Sales” report, you’re just a couple of clicks away. Simply go to the Reports tab and click the “Product Sales” sub-tab and, voila:
Stay tuned for more updates as we continue to work on providing better insight into your eCommerce business. And please keep passing along suggestions on how we can do better.
Ready to automate your eCommerce bookkeeping?
Join thousands of sellers who save hours every month with Seller Ledger.
To prove how easy it is to use Seller Ledger’s (brand) new API, we’ve thrown together a super lightweight web application that even a novice programmer could replicate.
Goal: create a way to load mileage data into a Seller Ledger account
As a simple use case, let’s take a request we’ve heard from a number of customers – how can I import mileage transactions that I have tracked elsewhere? Given that a number of mobile mileage trackers provide trip data in CSV format, we decided to create the simplest tool we could think of: a single web form where you can copy and paste some mileage data in CSV format and send it to your Seller Ledger account.
We’ll be doing this using Ruby on Rails as the framework for this tutorial.
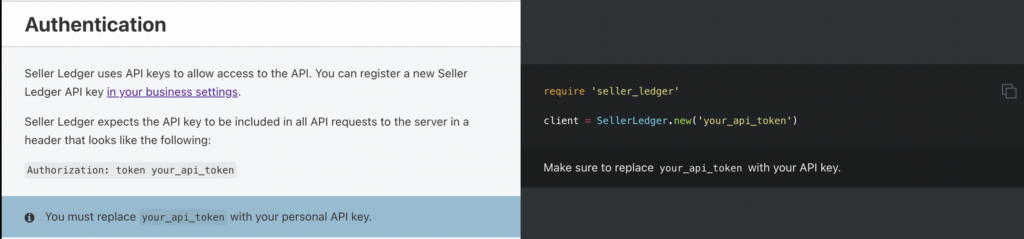
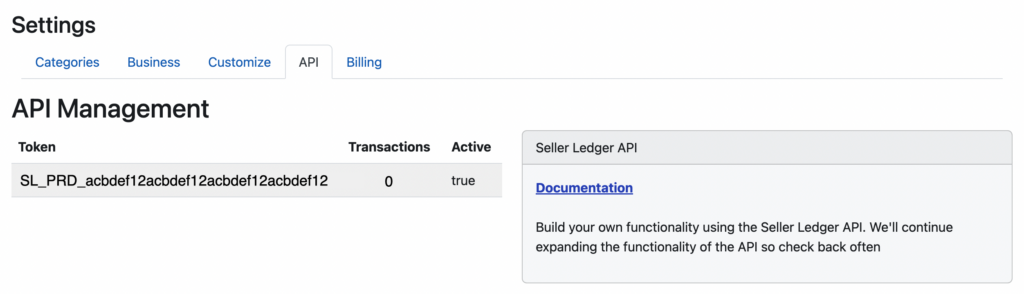
Step 1: Learn how to access a Seller Ledger account
Please be aware – the API token in the above screenshot is fake – it is not tied to a real account. Throughout this tutorial, you will need to use an actual Seller Ledger API token for this example to work.
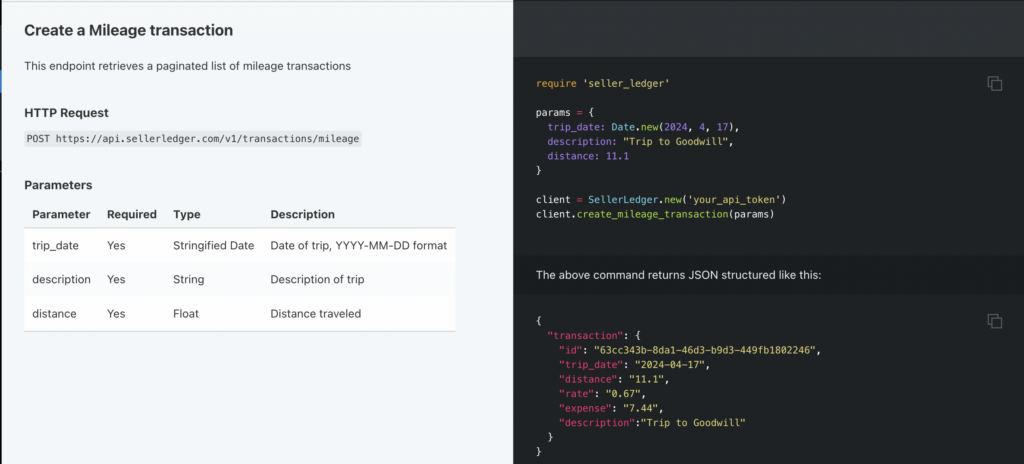
Step 2: Learn what information Seller Ledger expects in order to load mileage transactions
Looking again at the API documentation, creating a mileage transaction requires only 3 pieces of information and describes the format required:
Date of the trip
A description of the trip
Distance traveled
You don’t need to know the current IRS mileage rate. Seller Ledger has that information and does the calculation based on the date of the trip.
Step 3: build the simplest way to capture the information needed to load mileage data into Seller Ledger
So, it appears that we only need two types of information to update Seller Ledger with mileage data – an authentication token and the raw trip data itself. Let’s put that to the test. Time to start a new Rails application:
rails new test-sl-mileage-app
Fortunately, Seller Ledger has published a Ruby gem to help develop against its API. The source code for that gem, and its readme is published on GitHub. Looking at the readme instructions, I can install that gem. Let’s go into the directory of our new rails app
cd test-sl-mileage-app/
and add the gem to our project
bundle add seller_ledger-ruby
Now, let’s do some blocking and tackling to get a page where you can enter the info. These are steps specific to building a lightweight rails app, so feel free to skip ahead if you’re already familiar. Let’s create a new “home” controller – which will be the only one we’ll need (and apologies in advance for not using proper design patterns).
rails g controller home
Now, go update your routes file and edit the default root_url route:
change #root "articles#index" to root "home#index"
Make sure to add the index method to home_controller.rb
def index
end
Now it’s time to build the actual HTML page at home#index to capture the important information. To keep things simple, include a single text box to request the API token, and a text field box where a user could paste in (or type, if s/he so desires) a bunch of csv data. Create a new view file under the home folder, called index.html.erb. And add the following basic HTML:
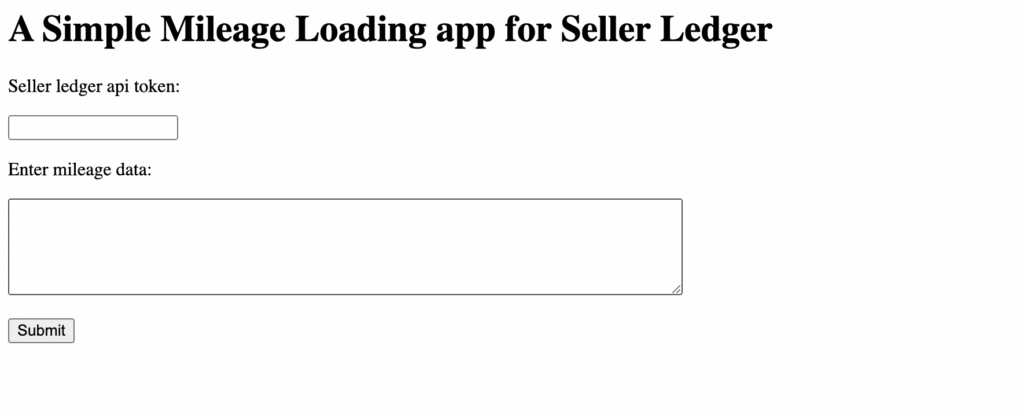
Voila – we see the following completely un-styled, yet potentially functional web page. This should allow us to capture the information needed to load multiple mileage trips into Seller Ledger
Before moving on to the next phase, add a route for that form’s post action in our routes.rb file. To keep things simple, we will put everything in the “home” controller.
post "load" => "home#load", :as => "load"
Step 4: Take the information from the web form, and push it into Seller Ledger
An easy first step here is to create a single Ruby service object (a PORO – or “plain old ruby object”) that takes an API token, initializes itself with it. The service object can then have a method that takes the raw csv data passed to it, parses it, and sends it to Seller Ledger. Create a “services” directory under the “app” folder and, inside that new folder, and create a new file. In this tutorial, we’re calling our object “Parser” and naming the file parser.rb.
class Parser

end
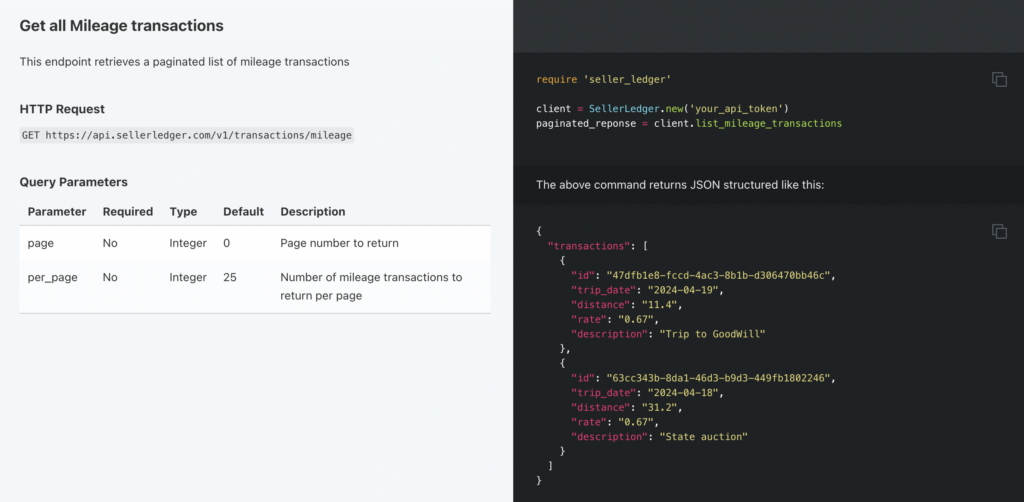
Now it’s time to create mileage transactions within Seller Ledger, so let’s take a look at that API documentation again.
Add the ‘require’ statement at the beginning of the object file. Also, create an initialize method that takes an API token as its parameter and creates a new Seller Ledger api client that can be used by the rest of our Parser object:
def initialize(token)
    @client = SellerLedger.new(token)
end
To see if this is working, let’s open ‘rails c’, create a token variable and see if we can initialize our new Parser object with it:
Bingo! Now, what’s the simplest thing we can test to see if our code is actually talking to Seller Ledger? Well, “Get all Mileage transactions” looks pretty straightforward:
Now let’s add a quick method to our Parser.rb file.
def list_mileage
    @client.list_mileage_transactions
end
Alrighty! Our lightweight web app is talking directly to Seller Ledger. Now, let’s add a “load” method in the “home” controller with some logic to grab the form data and get it ready to send to our Parser object:
def load
    token = params[:token]
    data = params[:data]
    p = Parser.new(token)
    @result = p.load(data)
end
We’re grabbing the token value from the form field and passing it in when we initialize the Parser object. We then grab the actual csv data from that form field and pass it to a new method that we’ll call “load”. And we’ll store the response from that method in an instance variable that we can show in the view.
Now, we just need to create that new “load” method in Parser.rb to grab the csv data, actually parse it, iterate over it, and pass the values into Seller Ledger:
def load(data)

    keys = ["trip_date", "description", "distance"]
    results = []
    data.each_line do |line|
        results << @client.create_mileage_transaction(Hash[keys.zip(line.chomp.split(","))])
    end
    return results
end
The approach used here was to create keys and build a hash using them for each line of input. We further assume no header information is provided in the CSV data, just the raw trip information. However, while iterating over the raw csv data, you could just as easily assign the parameters to pass into Seller Ledger individually like in the documentation.
Finally, let’s create a load.html.erb view file to show the returned results:
<h1>Results</h1>

<%= @result %>
Step 5: try it out
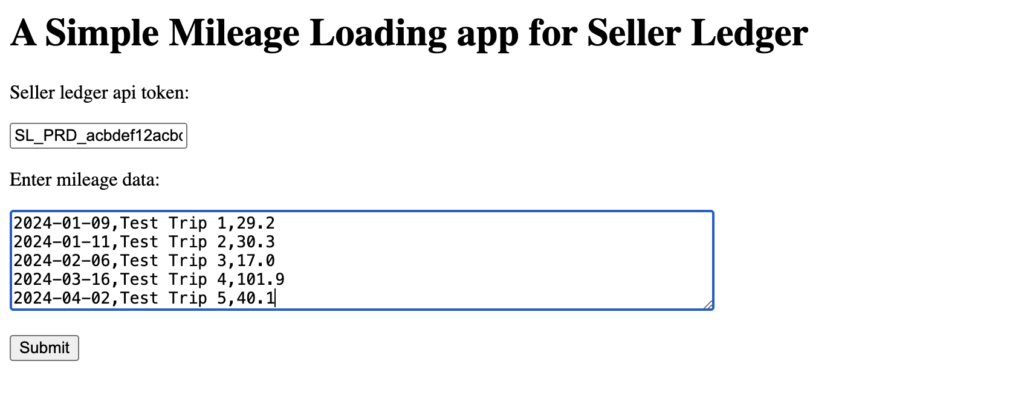
Go ahead and enter some simple csv formatted data into that web form, along with your API token (remember to use your actual token, not this fake one).
Hit “Submit” and….
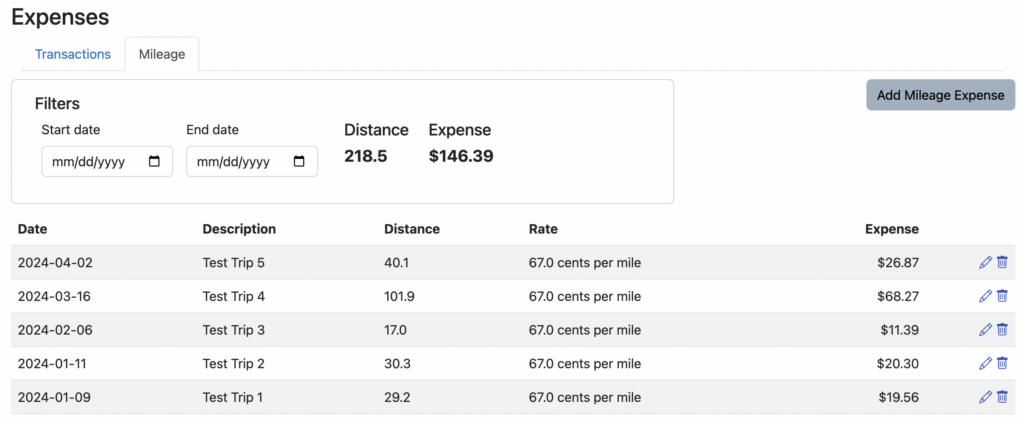
Looks like we got a result with rates and calculated deduction amounts. Let’s check our Seller Ledger account’s Mileage transaction view:
There you have it. A super simple web app to load multiple mileage trips into Seller Ledger. It actually took far less time to create the app than it did to write this tutorial.
In the spirit of encouraging more automation in the world of eCommerce accounting, Seller Ledger is announcing the launch of a new API (application programming interface). This will allow third-party developers to further extend their product functionality by making it easy to interact with Seller Ledger.
What can I do with an API?
To provide one illustration, let’s take a look at the mileage deduction. There are many third party apps (a lot of them mobile) that do a good job of tracking the miles you drive for your business, but getting that information into your accounting platform can be challenging. Seller Ledger’s first API endpoint allows anyone to upload and access their mileage trips.
We will be expanding support for more areas of eCommerce accounting and welcome suggestions from developers near and far. Please let us know what else you’d like to see.
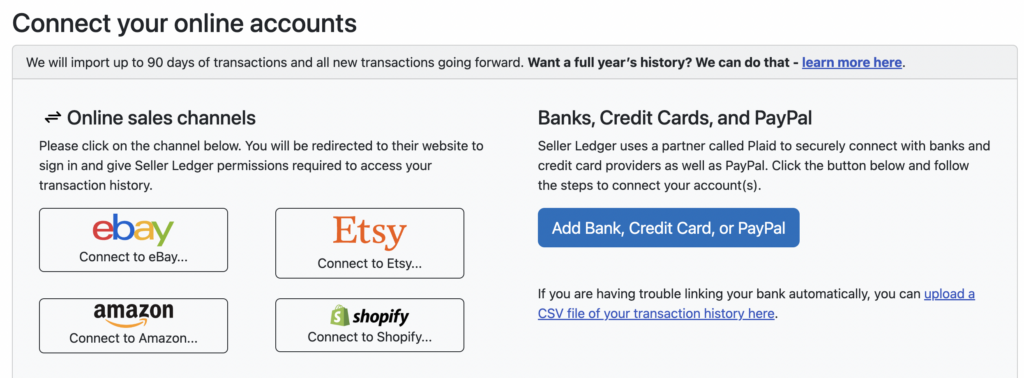
The Seller Ledger team is pleased to announce that we now connect directly with your Shopify Store to help automate much of your eCommerce business accounting. As with eBay, Amazon and Etsy, you can link your Shopify store(s) to Seller Ledger and we’ll regularly import your sales and expenses and automatically categorize them for you. Just log into your dashboard and click the “Add Account” button to link your Shopify store.
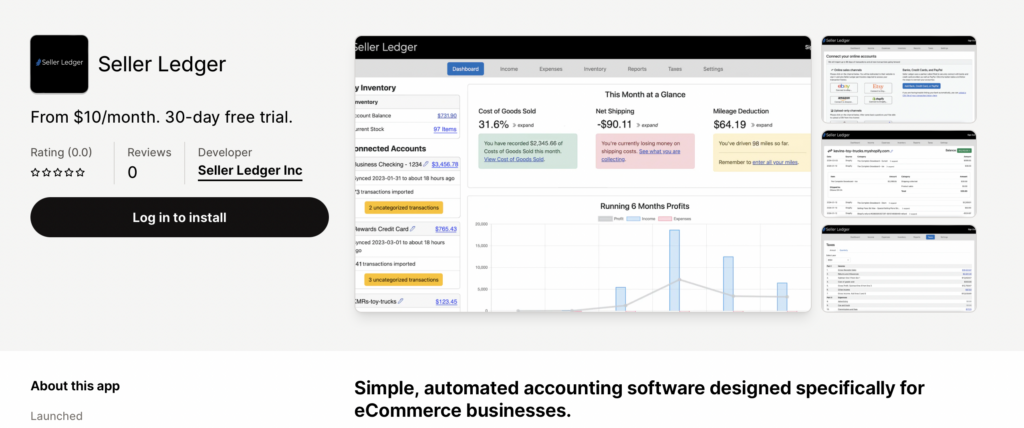
The flow is a bit different for Shopify than it is for connected marketplaces. After clicking on the button to “Connect to Shopify”, you will be taken to Seller Ledger’s listing on the Shopify App Store. Click the button to “Install” our app, and you will redirected back to Seller Ledger once the connection and proper permissions have been established.
Also, like with eBay, Amazon and Etsy, you can always change how you’d like to see your Shopify information categorized by customizing your settings.
What if I already sync eBay and Amazon with Shopify?
We do know that some users have chosen to sync their eBay and Amazon sales and product information with their Shopify store. But fear not, we only import Shopify store-specific sales from Shopify and ignore any other information from other platforms. To get data from multiple channels, you will need to connect to each channel directly. We do this to maximize the granularity and accuracy of the underlying data, as well as to avoid duplicate entries.
Thanks go out to the current Seller Ledger customers who helped us beta-test the integration with Shopify. If you are a Shopify customer and like the continued automation we’re providing, please consider helping us out with a review on the listing page. It’s a terrific way to help get the word out.
Ready to automate your eCommerce bookkeeping?
Join thousands of sellers who save hours every month with Seller Ledger.
Seller Ledger is very pleased to announce the release of new functionality to help you track the gross margin in your eCommerce business.
What is Gross Margin and why is it important?
Gross margin, to put it simply, is how much profit you make on top of the cost to create or acquire your products. This is before deducting other expenses needed to run your business. And it’s defined as a percentage of your overall revenue.
To use a super simple example:
It costs you $6 to make or buy something you intend to sell
You are able to sell that item for $10
Your gross profit on that order would be $4, which would equate to a gross margin of 40%.
As for why gross margin is an important number to watch, let’s just say that it’s the starting point for any successful eCommerce business. If you aren’t making enough profit on each and every item you sell, you won’t be able to cover the additional expenses to run your business.
For a more in-depth explanation, and some benchmarks on what a “good” gross margin looks like, check out this overview of eCommerce gross margin.
How do I find my gross margin?
Seller Ledger’s gross margin functionality only works for customers who are tracking costs on a per-item basis. You don’t need to track every single item cost, but the more you do, the more accurate your gross margin calculation will be.
If you click into the Inventory -> Sold view, you will now see a summary at the top of the screen that shows you the gross margin value and the percentage of transactions on which it’s based. To increase that percentage, you can enter more cost information for more orders.
In addition, there is a new dashboard tile that shows your gross margin for the current month. We have replaced the old “Cost of Goods” tile for inventory trackers, as this new information contains more detail – not only how much cost information you’ve entered, but also how much profit you’re generating.
Stay tuned for more updates in this direction, as we continue to look for ways to provide more insight into your business.
Ready to automate your eCommerce bookkeeping?
Join thousands of sellers who save hours every month with Seller Ledger.
Do you ever sell an item before you’ve acquired the inventory? How do you account for that? Seller Ledger has a new setting to allow that.
By default, when Seller Ledger attempts to match inventory cost information with a sale, we assume that the sold item was purchased before the date of sale. However, based on feedback from a few customers, we have heard of the need to be able to support purchases that are made after an item has already sold.
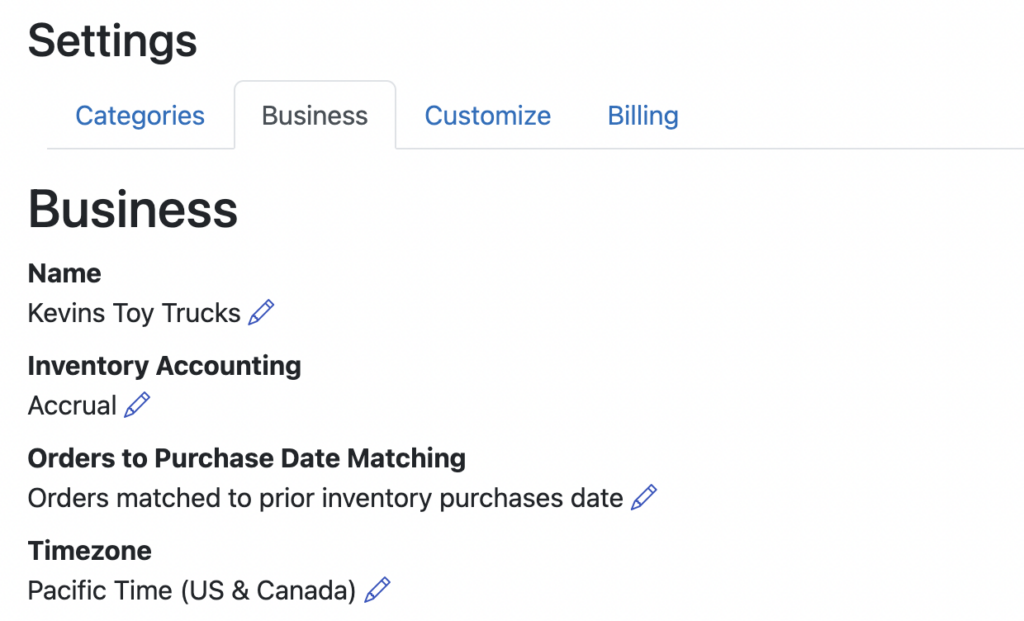
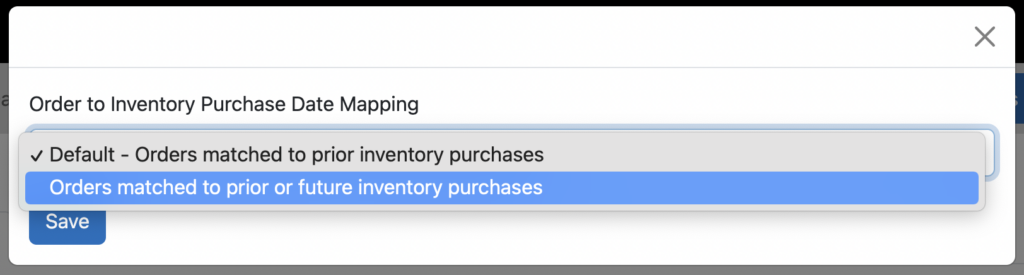
Click the edit (pencil) icon under “Orders to Purchase Date Matching” and you’ll be presented with this dialog box:
Choose the second option to also allow matching to “future” purchases and voila – Seller Ledger will now let you match to purchases made after the sale.
Ready to automate your eCommerce bookkeeping?
Join thousands of sellers who save hours every month with Seller Ledger.
In an effort to make it even easier to prepare for 2023 taxes, Seller Ledger has rolled out a few small enhancements.
View sales that have no cost information
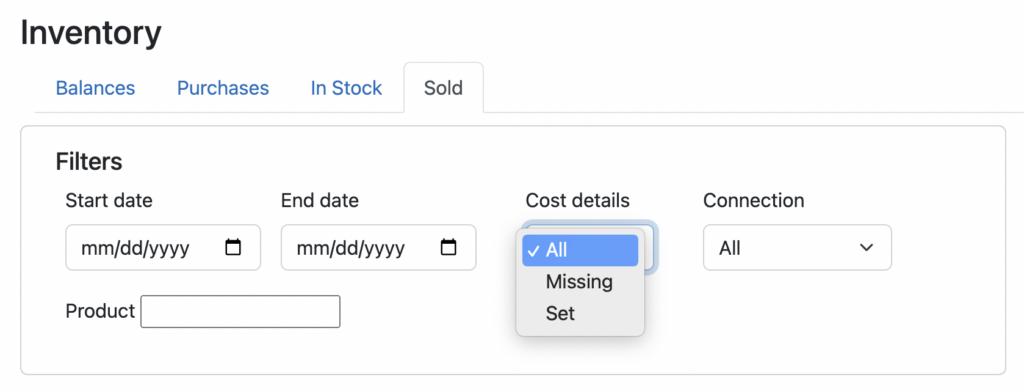
For those of you tracking inventory at the item level, we’ve made it a bit easier to identify any remaining sales for which you haven’t yet entered cost information. In the Inventory -> Sold view, there is a new filter to allow you to select sales where cost information is missing:
View “in-stock” inventory totals
At the top of the Inventory -> In Stock view, we now show you the total count and cost of all of your unsold inventory:
Mileage totals
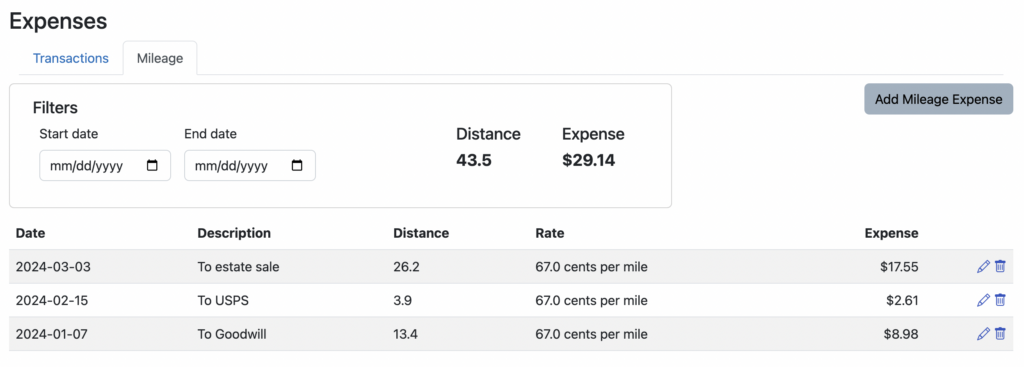
At the top of the Expenses -> Mileage view, you can now see both the total number of miles driven, and the total mileage expenses to deduct. In addition, we’ve added date range selectors so you can choose different periods to review:
While these aren’t the largest changes, they do reflect customer feedback about small ways to make the product a bit easier to use, which in turn, makes accounting and taxes less of a pain. Please keep sending us feedback at [email protected].
Ready to automate your eCommerce bookkeeping?
Join thousands of sellers who save hours every month with Seller Ledger.
The Seller Ledger team has released a number of enhancements to help you get more insights from your eCommerce financial data.
View Profit or Loss by Sales Channel
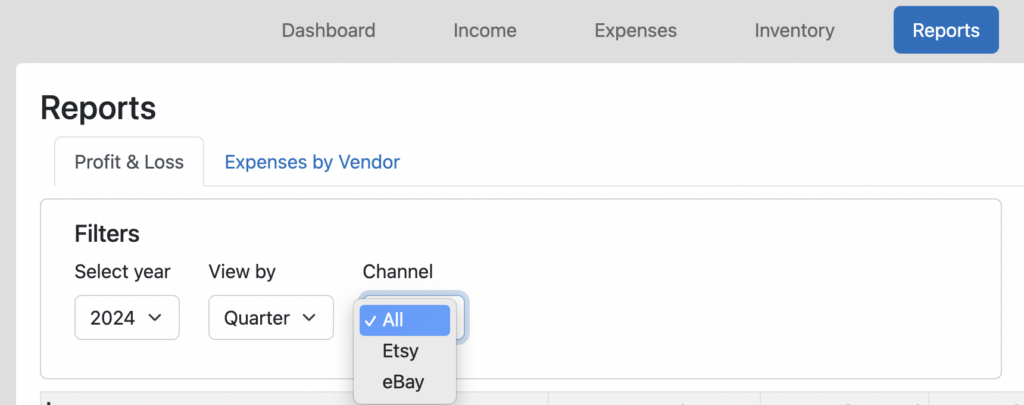
Are you a multi-channel seller? Have you wanted to view the sales and expenses specifically for one of those channels? Well, now you can. We have added a new “filter” under the Profit and Loss report:
You may also notice in that screenshot above, a new report for “Expenses by Vendor.” If you missed our previous blog post announcing that, you can learn more about it here.
Select a date range in Account views
While we have had this available in the Income and Expense tabs for a little while, we also recently rolled out the ability to select a custom date range when you click into any account view from your Dashboard:
More forgiving date selector
We have heard from a number of users that the date selector can be finicky, especially when trying to type in dates (the final value, year, often reacted too quickly.) This has now been improved. If you try typing in the start or end date rather than selecting from clicking the calendar icon, you should see a significant improvement.
Ready to automate your eCommerce bookkeeping?
Join thousands of sellers who save hours every month with Seller Ledger.
We’ve made several changes over the past few weeks to make it easier to see the most important information on your Seller Ledger screen.
Account balance details
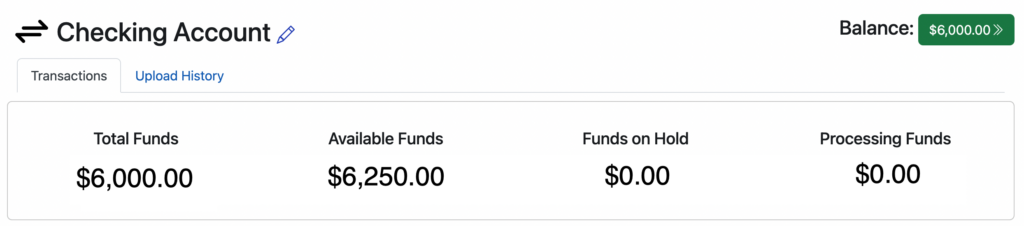
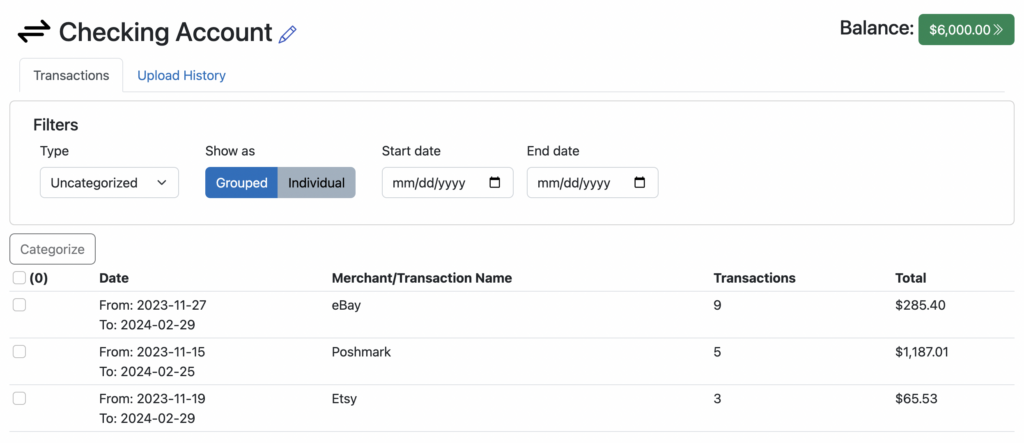
When clicking into an account view from your Dashboard, we had previously shown the balance details at the top (including total funds, available funds, etc.) by default. However, because customers tend not to rely on these details every time they click into the account, we have moved them under a new “Balance” button:
Click to expand
Click the green “Balance” button to see the balance detail information:
Click on the same button to hide these details. This frees up valuable vertical screen real estate and fits more transactions on the screen.
Rapidly categorizing transactions
Again, in an effort to make better use of vertical screen real estate, we’ve also changed the interaction for bulk editing of uncategorized transactions, placing everything on the same row:
Changing category of individual transactions
In an effort to make each transaction row more readable, and to save space, we have combined the visual cue for changing a transaction category with the category name, especially for uncategorized transactions:
Please let us know what you think of these changes by contacting us at [email protected]
Ready to automate your eCommerce bookkeeping?
Join thousands of sellers who save hours every month with Seller Ledger.
As we all work our way through the 2023 tax season, the team at Seller Ledger has begun working on improvements to help give you better insight into your business.
Expenses by vendor
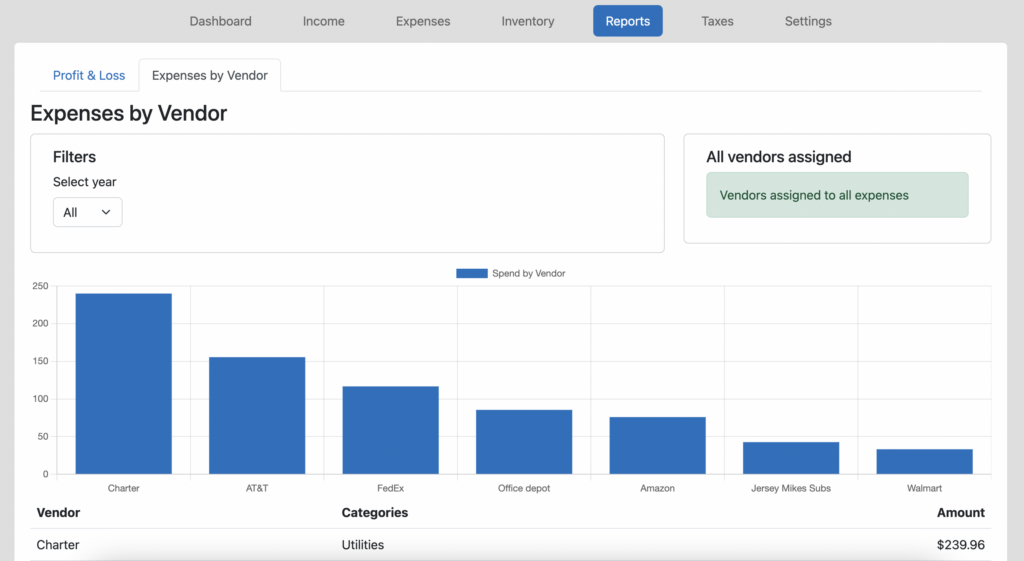
You will notice a new report under the “Reports” tab – one called “Expenses by Vendor”:
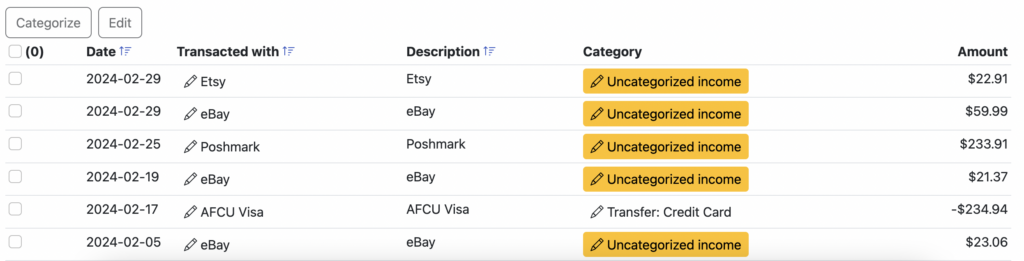
This report is made possible because of some important functionality we’ve added to transaction tracking. As you can see from the following example, there is now a new “contact” field in Seller Ledger account views, labeled as “Transacted with”:
This field allows Seller Ledger to group spending amounts by the name of each “contact”.
Now, you may notice that the information coming in from banks and credit cards is hard to group unless the names here make sense. This can be due to a variety of reasons:
Paper checks – In those cases where you must write a paper check to a vendor, most banks simply provide a description about the check itself, not the name of the vendor.
Very long, hard to decipher descriptions – Sometimes we just can’t tell who the vendor or customer is. In those cases, we default to “Unassigned.”
Similar, but not quite identical names – This varies by bank, but sometimes they use very small variations in vendor names that can make it hard to group transactions together
Fortunately, Seller Ledger has implemented a number of features to help you quickly edit these contact names.
Editing Contacts
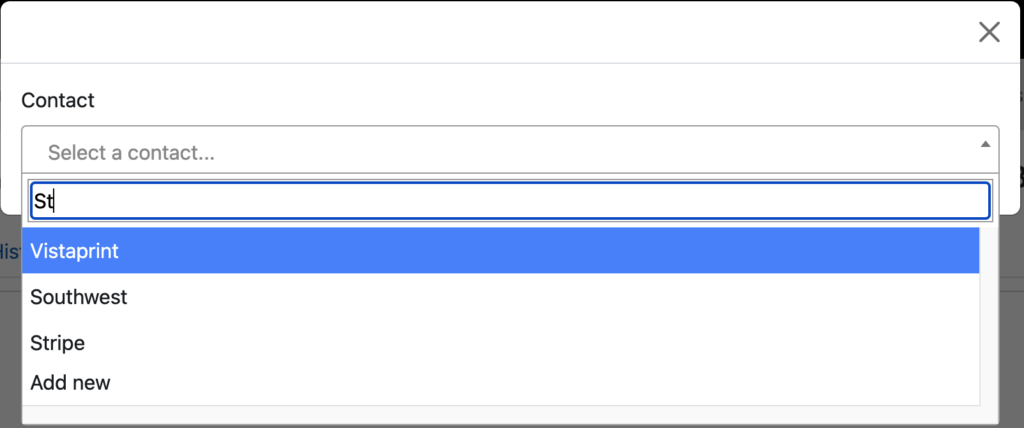
Next to each “Transacted with” name, you’ll now see an edit icon. Click that to either choose a “contact” that’s already in the system, or add a new one:
Now, editing each transaction one at a time might make sense for paper checks, but for most imported transactions, you’re going to want to edit them in bulk. And for that, we’ve added each of the following capabilities:
Multiple select: choose multiple transactions and edit them in one step.
Filter by “unassigned”: to see all of your transactions where we are unable to guess at a contact name, choose “unassigned” from the list of filter options.
Sort by “Transacted with” and by “Description” fields: for those pesky, small variations of the same name, it sometimes helps to sort so that similar names are grouped together.
Hopefully, this helps provide a bit more insight into how your business is doing. Stay tuned for more updates along these lines, as we have big plans for 2024.
Ready to automate your eCommerce bookkeeping?
Join thousands of sellers who save hours every month with Seller Ledger.