Don’t miss out on your deductions. Just tell Seller Ledger the date of the trip, a description of its purpose, and the distance traveled – we’ll calculate the rest. And remember, not only can you track your trips one at a time, but you can now also upload a CSV file of all of your trips – a pretty good option if you’re making lots of trips to the post office:)
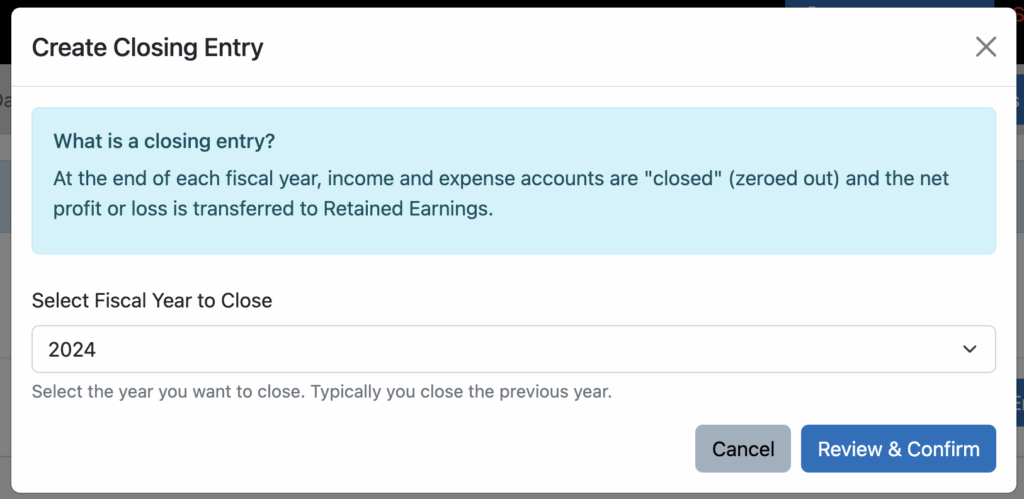
To better support accounting pros and some of our bigger customers who use more traditional double entry accounting, we are pleased to announce the ability to record year-end closing entries within Seller Ledger.
What are closing entries?
In essence, closing entries “reset” a businesses profit and loss each year. Think of the profit and loss report as a scoreboard, showing you how much money you made (or lost) in a year. When a new year starts, your profit and loss starts all over. But, you don’t want to lose track of the prior year scores. That’s where closing entries come in. These entries take the profit and loss amounts and move them to the balance sheet.
Click the button to “Add Closing Entry. You will then see a pop-up asking which year you would like to close.
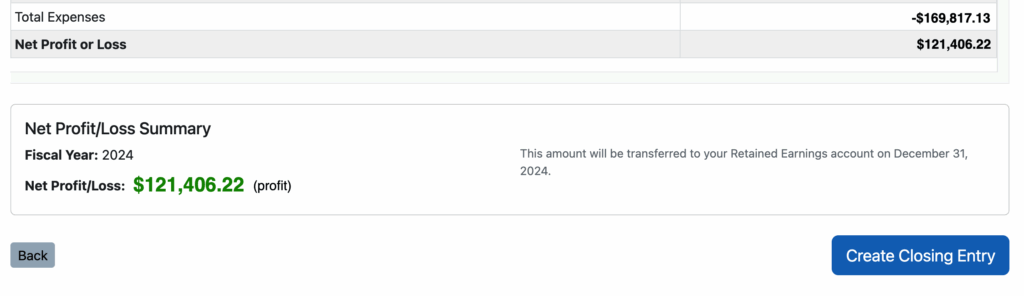
Click “Review and Confirm” and you will be presented with the complete profit & loss for that year, as well as the net profit or loss that will be transferred to retained earnings.
Click the button to “Create Closing Entry” and Seller Ledger does the rest of the work for you. Your Profit and Loss will be reset for the next year, and your balance sheet will be updated to reflect the change to retained earnings.
Sometimes you may find yourself with inventory that isn’t selling, so you think about donating it in the hopes of writing it off. The question is – can you write off inventory donations? And if so, how?
The good news and the bad news
The good news is: yes, you are permitted to donate unsold inventory. According to the IRS:
How much you can deduct
“the amount you can deduct is the smaller of its FMV on the day you contributed it or its basis”
FMV means “fair market value”, as in, what you could sell the item for. And basis is your full loaded cost for that item.
The bad news, at least for Schedule-C filers, is that you do not get to just write the donations off as part of cost of goods sold. From that same IRS publications:
How to classify donations
“You must remove the amount of your charitable contribution deduction from your opening inventory. It isn’t part of the cost of goods sold.”
What this is basically saying is that, instead of adding those donated items to your cost of goods sold total, you need to remove them from your inventory, then deduct the value of those items on Schedule A of your personal tax return.
Handling Inventory Donations in Seller Ledger
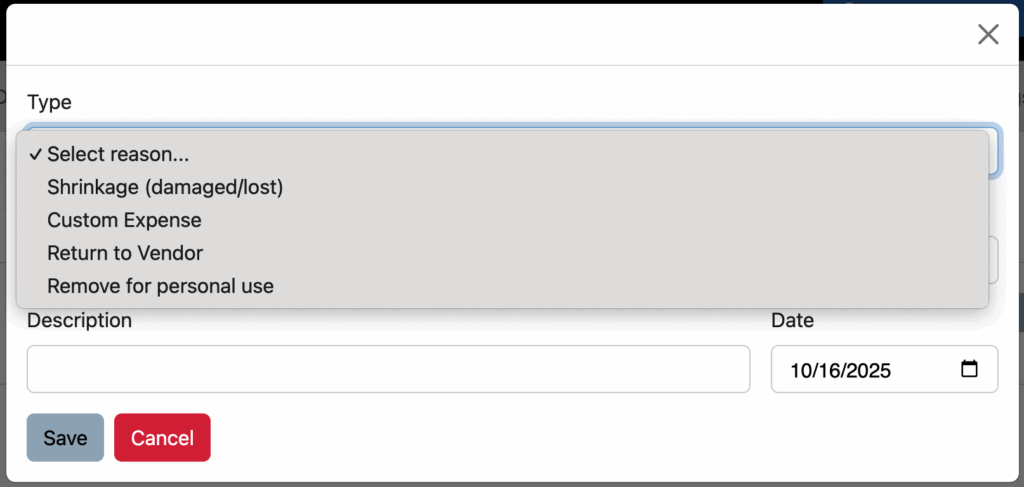
Fortunately, Seller Ledger allows you to remove donated items from inventory. When you click the “Remove stock”, simply choose the “Remove for personal use” option.
This remove those items from your inventory without adding them to cost of goods sold. Instead, they will be treated as a “Not for business” expense.
While we pride ourselves on providing the most automated accounting solution for eCommerce sellers, there will always be circumstances where a seller conducts business in person, or on a platform what doesn’t offer much in the way of connectivity.
For those cases, we’ve rolled out improved order history tracking for off-site and cash sales.
Step 1: Create an account to track those off-site or cash sales
We just rolled out the ability to create/add a new type of asset account that you can use to track these sales. From your dashboard, click the “Add Channels, Banks and Accounts” button and, if you scroll to the bottom of the next screen, you’ll see the following option:
This can be a “Cash” account, or an account to track sales from other online marketplaces like Facebook Marketplace, TCGplayer, StockX and more. Just name your account and you’re off to the races.
Step 2: Add your order details
Click into your newly created account from your Dashboard, and you’ll see a new button called “Add order” in the upper right:
Clicking on that button will bring up a much more detailed transactions screen that not only lets you enter the regular information like date, customer, and amount, but will also let you record the item(s) that you sold:
If you scroll down, you will also see that we allow you to enter additional information about each order, including:
Any shipping you may have collected from the buyer
Any sales tax you may have collected (or had collected for you)
Any fees that may have been incurred (for example, by a non-connected marketplace that this order sold through
Any shipping labels or other shipping costs you had to pay
If a part of this order was donated to charity
As a reminder, the more details you can record that are tied to an order, the better able Seller Ledger is to tell you the EXACT net profit you make on every sale.
And as a reminder, you can always us the regular “Add transaction” button to record things like payouts (remember – they are transfers,) non-order fees, etc.
Want more step-by-step guidance?
If you’re having trouble figuring out how to enter data from certain non-connected marketplaces, just email us a copy of one or more of their reports (or screens) to [email protected] and we’d be happy to help.
Give it a try
Whether it’s cash-sales or other non-connected platforms, you can now get a complete view of your eCommerce business finances. Seller Ledger offers everyone a 30-day free trial, with no credit card required. Sign up and see for yourself how easy it is to get your finances in order.
If you’re an eCommerce seller, are self-employed or have income not subject to regular tax withholding (like investment earnings), you likely need to pay estimated taxes to the US federal government throughout the year. These payments are often called “quarterly,” but if you look at the due dates, you’ll notice they don’t neatly align with three-month calendar quarters. So, what’s the deal?
Why the “Quarterly” Deadlines are a bit strange
The US tax system works on a “pay-as-you-go” principle. This means you’re supposed to pay taxes on your income as you earn it, rather than waiting until the end of the year to pay one big lump sum. Estimated tax payments help people meet this rule.
Here are the typical due dates for a calendar-year taxpayer:
Payment 1 (January 1 – March 31 income): April 15
Payment 2 (April 1 – May 31 income): June 15
Payment 3 (June 1 – August 31 income): September 15
Payment 4 (September 1 – December 31 income): January 15 of the next year
As you can see, the second payment period is only two months long, while the others are three or four months. This unevenness is the main reason why they aren’t true calendar quarters. And it explains why you will see different amounts in different screens within Seller Ledger.
Important Note
If a due date falls on a weekend or a legal holiday, the deadline is typically pushed to the next business day.
When Did It Change and Why?
Estimated taxes used to be paid based on strict calendar quarters, with payments typically due on the 15th of April, July, October, and January. The change to the current, somewhat quirky schedule happened back in the 1960s, specifically with the Tax Adjustment Act of 1966.
The main reason for this shift was to help the federal government’s budget. The federal fiscal year begins on October 1st. By moving the third payment due date from October 15th to September 15th, the government was able to collect a significant chunk of tax revenue before the start of its new fiscal year. This provided a quicker influx of cash.
This change left an extra month that needed to be accounted for in the payment schedule. Since the April 15th deadline for the first payment (and the annual tax filing deadline) was already well-established, and the January 15th deadline for the final payment covered the end of the calendar year, those dates largely stayed put. The logical place to absorb the shifted month was the second payment period, moving its due date from July 15th to June 15th. This is why the second “quarter” covers only April and May.
Essentially, the due dates were adjusted to align with the federal government’s fiscal year planning and cash flow needs, creating the slightly uneven “quarterly” schedule we have today.
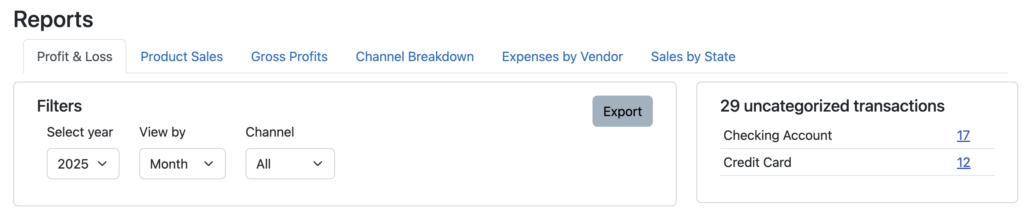
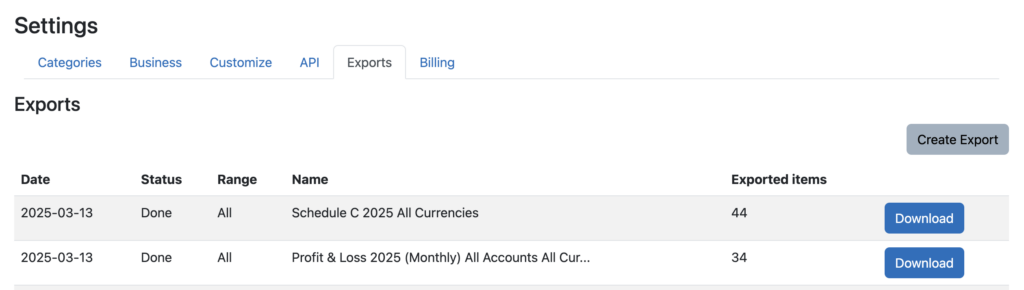
In our continued efforts to make it easier to get data out of Seller Ledger, we just added the ability to export both the Profit and Loss report and the Schedule C tax report.
Just click the “Export” button in the upper right of the Filters section and Seller Ledger will generate a comma-separate (CSV) file containing the values. You will then be taken to the Exports page under Settings (which we announced a few months ago) where you can download the file you just requested:
As always, we look forward to more customer suggestions. Keep them coming by emailing us at [email protected].
Tax time is here (in the United States, anyway) and for Shopify businesses in particular, that means a lot of potential complexity. And now that the 1099-K threshold is being lowered to $5,000 per platform, now is a great time to consider ways to simplify Shopify taxes
You can avoid a lot of hassle by investing some time in planning how to manage your business finances. And while tax preparation is one of the last things Shopify store owners tend to focus on (or enjoy,) each filing season can be a painful reminder of the choices we previously made.
6 tips to simplify Shopify tax organization and filing.
1. Use separate bank and credit card accounts
It sounds obvious, but newer and smaller sellers often think they can put this off for the future. But spending the time (and money) to separate commingled personal and business finances is just not worth it. Make sure you have a dedicated business banking account, where all of your eCommerce payouts get deposited. Take out a dedicated business credit card (or use a debit card) and make sure all of your business expenses are paid through it. Doing so makes it a relative breeze to get your transaction history for tax time. You’ll have fewer places to look, fewer statements to track down, and most importantly, get to completely skip “removing” personal transactions.
2. Choose banks and credit cards that have “good” online banking capabilities
When choosing a bank or credit card, do a little research into their online banking capabilities. While most banks have some level of online banking, some banks do a much better job making transaction history available electronically. In particular, small, regional banks and credit unions tend to invest less in their online banking capabilities. This can lead lead to less data being made available, and sometimes at lower quality.
Another way to evaluate online banking capabilities is by looking at how banks handle sign-in and authorization. The best banks now support OAuth, which permits 3rd party application developers to get customer “permission” to access specific data from their bank using special tokens, which avoid the need to request usernames and passwords. In addition, customers can choose to manage and “revoke” permission of these external programs from the bank’s website.
3. Use accounting/bookkeeping software that’s great at accessing electronic data
I mentioned in the prior tip the importance of online banking and access to electronic financial records. The same goes for eCommerce channels. Most large, established channels make their data available through APIs (application programming interfaces,) which allow other software companies to access that data. But not all access is the same.
Some accounting solutions take shortcuts, like only pulling payout information, which is pretty much what you get from banks anyway. But those payouts are missing key details, like item prices, shipping collected, sales tax collected and possibly remitted, and fees paid. Given that different platforms report different totals on 1099-Ks, you’ll want to make sure you have proper transaction details to give you an accurate financial picture.
Others completely ignore things like the actual products sold and that sale’s effect on inventory and cost of goods sold. For example, you may not want to choose a product whose Shopify review reads like this:
Actual accounting software review from a Shopify customer
“This does not pull in sales receipts with product info. So if you track inventory in [name removed to avoid embarrassment], it will not reduce your inventory when you sell an item”
Spend a little time up front, do your homework, read reviews and discussions in different online communities, and make sure your accounting software gets you the eCommerce details you need.
4. Watch out for channel duplication
These days, most successful eCommerce merchants sell across multiple channels. And some platforms, like Shopify, allow you to connect other marketplaces to get a more complete view of your sales. For example, the Shopify Marketplace Connect app allows you to bring in data from Amazon, eBay, Etsy, Walmart and more. But this can lead to challenges in reporting, as the same data gets replicated across different platforms. You’ll want to ensure that you’re never double counting sales or expenses.
Unfortunately, this may lead you to think you can simply connect all of your other marketplaces to Shopify, then pull all of that information from a single source. While this may sound in theory, having worked directly with Shopify’s API, we know that the level of detail you get from the kind of direct integrations outlined in Tip #3 is lost when the data gets to Shopify.
Hopefully, accounting/bookkeeping software knows how to handle this, but you will want to keep an eye on the data.
5. Create (and list) unique SKUs for your inventory
This might be the single biggest thing you can do to avoid headaches at the end of the year (and for many years to come.) Investing the time to create a system of assigning unique SKUs (stock keeping units) for each item you sell will pay off immeasurably down the road. A lot of retailers and eCommerce sellers use a “smart code” approach, similar to what Shopify outlines in this handy tutorial. But whichever method you use, the most important thing is to choose something that is unique to each product/item.
You’ll also want to make sure to use these same SKUs across channels when listing items for sale. Doing so can enable the following (assuming your accounting/bookkeeping system is set up well):
When an item sells, that sales record will reduce your inventory account, helping make sure you avoid stock-outs and accidentally selling product you no longer have.
Having your inventory counts get updated automatically also helps for end of year inventory counts and valuation.
Also, when that item sells, if you have recorded the cost of that information in your accounting/bookkeeping software, it can calculate the cost of goods sold automatically for you, both on that item, and over the course of the year.
In addition to simplifying end-of-year calculations of inventory value and cost of goods sold, this approach can also calculate the gross profit/margin on each sale, giving you better insight into what products drive the most profit for you.
6. If you still need help with sales tax, just pay for a service
While most online marketplaces (eBay, Amazon, Etsy, etc.) must now collect and remit sales tax on behalf of sellers, many online store platforms like Shopify, Woo Commerce and such still leave it up to the merchant to collect sales tax from the buyer and remit (a.k.a. “file”) to the individual states. For sellers in that category, I strongly recommend outsourcing to a paid service like Shopify Tax, TaxJar or another similar service.
Want to try it yourself? You can learn more in this article, but here’s a partial list of what that entails:
Determine in which states you have nexus (physical or economic) so that you know where to collect and file
Register your business in each state where you have nexus
Determine the correct rate to charge based on the item being sold (including any product taxability exemptions, whether shipping is taxable, etc) and the jurisdictions that apply (which can be state, county, city and even special taxing districts.)
Total up all of the sales by each reporting jurisdiction
File accurately in each state, some of whom share similar interfaces, many of whom are specific to just that state. Oh yeah, and the filing frequency differs by state.
As the original head of product for TaxJar (though I left long ago,) I can assure you that trying to manually determine all of the above and comply properly, is incredibly complex and can become a monster drain on your productivity as a business owner. Of all the places to try to save money, this one might be the worst idea to do so:)
In summary
As you can tell from this article, there is a strong bias in favor of thinking through and structuring your approach to business finances up-front, in the hopes of automatic future workflows. For any business owner, it’s better to spend the bulk of your time where you add the most value, and minimize time spent on drudgery. For Shopify and other eCommerce merchants, that means getting back to sourcing, listing and fulfilling. Hopefully, some of these tips can help simplify Shopify taxes going forward, with the added bonus of informing you how to run your business more profitably.
If you are a US-based eCommerce merchant who files a Schedule-C with your tax return, you may wish to consider Seller Ledger, an accounting/bookkeeping platforms that does a lot of what’s described above (particularly tips 3 & 4.) We offer a 30-day free trial, no credit card required. We can even help pull in all of your 2024 transaction data. And we have plans to expand to other business types as well as internationally.
In an effort to make sure you write off all legitimate business deductions for your eCommerce business, we though it would be helpful to go a bit deeper on the IRS rules around “Business use of your car” so that you cab maximize mileage deductions.
Mileage deductions are a simple way to reduce your tax burden, and many driving trips for resellers and online store owners qualify, but it’s so hard to remember to enter them all!
The IRS recommends tracking mileage driven for your business by recording every trip at the time that you take it. You can include your trips to all of these types of destinations that might be relevant for you:
Inventory sourcing trips
Office supply runs
Trips to the Post Office, FedEx or UPS to ship your packages
Trips to reseller meet ups or conferences
Driving to any in-person training sessions or educational opportunities related to your business
There are two different methods to calculate your mileage deduction, which we explain in more detail below, but either method requires you to track how many miles you drove for business purposes, so you’ll want to be as accurate as possible in capturing these.
But what if you’re already three quarters of the way through the year and you haven’t been tracking all of your miles? Read on for how we’ve seen some sellers capture legitimate business trips they took, even if they might not have been recorded in the moment.
Here are 3 ways we’ve seen sellers maximize their mileage deductions.
Disclaimer
Before proceeding it’s important to mention that we at Seller Ledger are not tax experts and are not trying to provide tax advice. It is critical that you as a reader make your own decisions on how to handle your specific tax situation, which may include hiring a professional.
1. Use a mileage tracking app
Some sellers use mileage tracking apps, such as MileIQ or Everlance, that can help you to keep track of how many miles you’re driving for business purposes versus personal. On the plus side, these apps can save you a lot of time versus manually entering each expense. On the minus side, they can be an additional cost and they don’t help for the time period you weren’t tracking your miles.
2. Mine your other financial records
Wouldn’t it be great if someone could give you a record of each of your driving trips throughout the year even though you forgot to record them at the time?
If you’re using Seller Ledger’s automated bookkeeping software to import your business bank and credit card expenses and categorize those expenses, it can get you pretty close. Chances are, you’ve got a record in Seller Ledger of an expense for each of those inventory sourcing trips. Simply go to the Expenses tab, select the “Cost of Goods Sold” category and you’ll have a list of each vendor you bought from and the date of the transaction. We’ve seen sellers create a Mileage Deduction in Seller Ledger for each of those trips where they know they drove to the vendor.
We’ve seen sellers use the same tactic for trips to the Post Office, FedEx or UPS for shipping trips. In your Expense tab, select Category “Shipping Costs” and you’ll see a list of your transactions. Sellers obviously can’t deduct mileage for instances where they purchased a shipping label from eBay or Amazon online to ship a package, and they can’t deduct mileage if the shipper picked product up from their home or office, but each seller knows how their business operates and where legitimate driving trips are included, this is a tactic that has helped other sellers to identify them.
This method works for Office supply runs, Education sessions, or any other vendor/expense where it was needed to drive to for business purposes.
3. Use Google Maps
The Simple Part: We’ve talked with sellers who didn’t know the distance between two locations they traveled to earlier in the year. They simply entered their starting point and the destination in Google Maps, and there they had it – they knew the number of miles traveled.
The More Sophisticated Part: One seller even taught us about the timeline in Google Maps. It’s possible to see your timeline in Google Maps both in the mobile app and on the website. All the places you have searched for throughout your history will come up – you can click the “see more” button to see more locations, revealing the potential destinations from your past. The seller was using this tool to research past trips that might qualify as business trips they could deduct.
They shared another approach in Google Maps which is to click on your profile in the upper right of the mobile app and turn on your location history. With this feature enabled you can see the driving trips that you actually took whether they were today, a week ago, a month ago, etc. and it can include your location history that you actually travelled to. This was another gold mine for the seller in identifying trips they took for business purposes.
Standard Mileage Deduction Rate
In 2025, the current IRS mileage deduction rate is now $0.70 per mile. To use the standard mileage rate method, you can multiply this amount by the number of miles driven for each work trip to calculate your mileage deductions. At the end of the year, the sum of all those mileage deductions can be subtracted from your taxable income so that you pay taxes on a lower amount.
Actual Expense Method
Alternatively, there is another method to deduct driving costs by writing off a percentage of your vehicle costs, the actual expense method. This method takes into account spending on things like car insurance, and vehicle repairs among other vehicle-related costs. To use this method, calculate the number of total miles driven for work during the year. Then note the total miles driven by the vehicle during the year. The number of miles driven for work divided by the total miles is the deduction percentage.
For example, if you drove 2,000 miles for work out of a total of 10,000 miles in a year, then 2,000/10,000 = 20%. Once you know this percentage, you will apply it to the total money spent on the vehicle during the year. If you spent $5,000 on the vehicle that year, then 20% * $5,000 would be $1,000, so you could deduct $1,000 for the year.
Unfortunately, you cannot use both methods to deduct vehicle-related expenses, you must choose one or the other. Most folks choose the simple mileage deduction rate, logging their miles as they go and multiplying by the IRS rate to calculate their total deduction for the year.
Of course every seller’s situation will be unique and we cannot provide tax advice for your unique situation. An accountant can help you to identify and maximize mileage deductions. In addition, here are a couple links from the IRS that might be helpful to you on this topic:
Lastly, if you’re an online seller looking for an easy way to track your business expenses going forward, we recommend giving Seller Ledger a try. Seller Ledger offers a 30 day free trial, with no credit card required, and lots of smart features that learn and remember your vendors, so the more you use it, the faster and easier it gets over time. You can even upload a CSV file of all of your trips.
Seller Ledger was designed to provide the simplest, most automated bookkeeping solution for ecommerce sellers, at an affordable cost. If you sell on eBay, Etsy, Amazon, Walmart, Shopify, Poshmark, Mercari, Whatnot and more, Seller Ledger can automate your bookkeeping and make tax time easy.
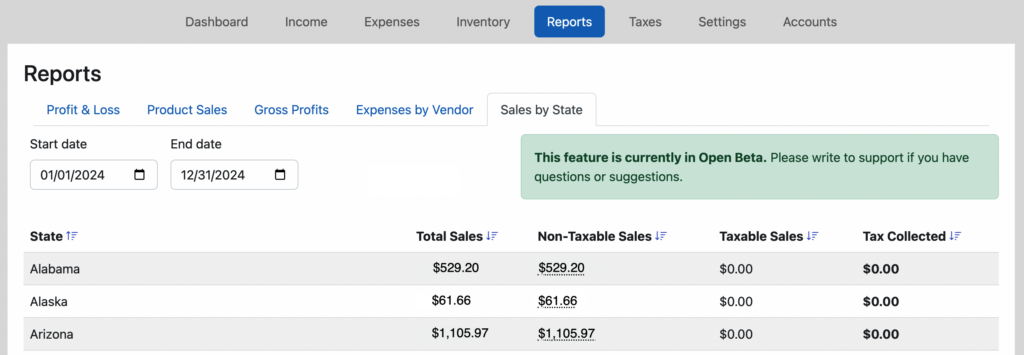
In response to a number of customer requests, we recently rolled out a new report called Sales by State. You can find it under the “Reports” tab:
This reports shows you sales by state, broken into Non-taxable Sales (e.g. any sales collected and remitted by a marketplace facilitator like eBay, Etsy, Amazon, etc, as well as any shipping collected in states where shipping is not tabale) and Taxable Sales (e.g. sales on store platforms or other channels where sales tax need to be collected. We also show any sales tax that has been collected by not remitted.
You also can click to sort by any of the columns provided.
At the time of this post, the feature is currently in an open “beta” period. Please let us know of any feedback you have at [email protected].
In an effort to make it even easier to prepare for 2023 taxes, Seller Ledger has rolled out a few small enhancements.
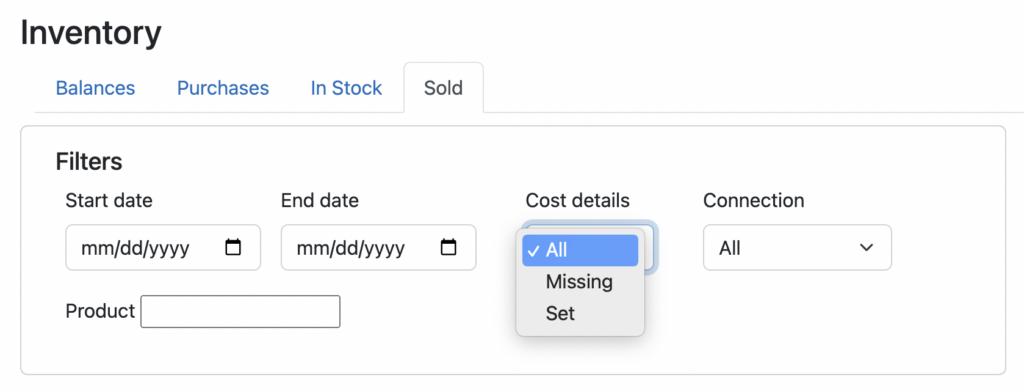
View sales that have no cost information
For those of you tracking inventory at the item level, we’ve made it a bit easier to identify any remaining sales for which you haven’t yet entered cost information. In the Inventory -> Sold view, there is a new filter to allow you to select sales where cost information is missing:
View “in-stock” inventory totals
At the top of the Inventory -> In Stock view, we now show you the total count and cost of all of your unsold inventory:
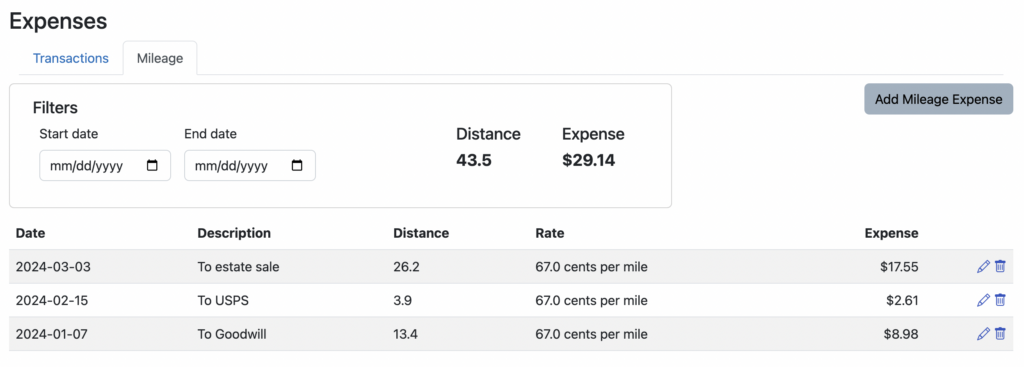
Mileage totals
At the top of the Expenses -> Mileage view, you can now see both the total number of miles driven, and the total mileage expenses to deduct. In addition, we’ve added date range selectors so you can choose different periods to review:
While these aren’t the largest changes, they do reflect customer feedback about small ways to make the product a bit easier to use, which in turn, makes accounting and taxes less of a pain. Please keep sending us feedback at [email protected].